
Acrobat How-To: Compression Session

By creating compact Adobe PDF files that can be viewed and printed virtually anywhere, Adobe Acrobat 5.0 makes document exchange a simple process. To optimize the size of your Adobe PDF documents, Acrobat Distiller offers some choices for graphic, text, and image compression. But even more importantly, Acrobat 5.0 lets you create Adobe PDF files that are optimized for fast Web viewing, or downloading page by page, in the order in which they are meant to be read. This means you can begin reading a document (and know you’re not missing anything important) before the file is finished downloading.
What’s Acrobat Distiller?
Those who use the Create Adobe PDF printer or the PDFMaker macros from Microsoft Office applications may not be familiar with Acrobat Distiller. Acrobat Distiller is what actually creates an Adobe PDF document by converting PostScript to PDF. Whether you use PDFMaker, the Distiller Printer, or the Create Adobe PDF printer, watched folders, or other tools, you are actually using Acrobat Distiller to create Adobe PDF. You have the opportunity to change the behavior of Acrobat Distiller (and therefore the nature of resulting Adobe PDF files) by altering its different settings. To launch Acrobat Distiller, select Distiller from the Tools menu after opening Acrobat 5.0.

Figure 1: To change optimization settings, first open Distiller under Acrobat 5.0’s Tools menu. Then look for Settings > Job Options in Distiller.
The What and the Why
Understanding which compression methods are used for each content type is the first step in optimizing your Adobe PDF files. Acrobat Distiller can compress color, grayscale and monochrome images, fonts, text and line art. For purposes of this discussion, we’ll stick to image compression. For more information on font embedding with Acrobat Distiller, consult the Acrobat 5.0 User Guide.
For text and line art, ZIP compression is used. Color and grayscale images may be compressed using either the ZIP or JPEG method. Monochrome images are compressed using ZIP, CCIT Group 3 or 4, or Run Length compression methods. But this information isn’t truly meaningful unless you know how to best use each compression method.
- ZIP Compression.. Best for images with either large areas of solid color or patterns , ZIP can be lossless, meaning no data is removed from the file when it is compressed. For 8-bit images, using 8-bit ZIP compression will result in no data loss. However, compressing 8-bit images with 4-bit ZIP compression results in data being removed from the file during compression.
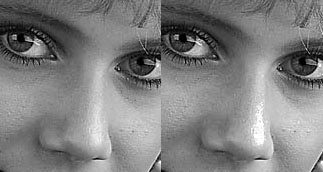
- JPEG Compression. JPEG is best for grayscale or color photographs. Because JPEG compression is lossy — meaning data can be lost during compression — care should be taken when compressing images in this fashion. With Acrobat Distiller, users can choose different quality levels of JPEG compression — high, medium and low — depending on the quality of the image required. Often, users viewing Adobe PDF files on screen can’t tell the difference between high-quality and medium-quality JPEG compression. Because there is usually more data in an image file than is capable of being rendered, JPEG compression can be an effective tool for reducing your Adobe PDF file size.Try this test: Create an Adobe PDF file using the three different JPEG Compression settings, open that PDF document with Acrobat (or Acrobat Reader), and print. Depending on your intended use, low-quality compression may be good enough. For print-quality Adobe PDF files, chances are that you’ll need at least medium- or even high-quality compression.Acrobat also provides the CCITT Group 3 and Group 4 compression options. CCITT Group 3, used by most fax machines, compresses monochrome images one row at a time. CCITT Group 4 is a general-purpose method that produces good compression for most types of monochrome images. Run-length compression is a lossless compression scheme that produces best results when compressing images with large solid areas of black and white.The How
Choosing the Automatic compression option in Acrobat Distiller will produce good quality and optimally sized Adobe PDF files 90 percent of the time. But in those cases where size matters, carefully selecting compression options in Acrobat Distiller can save a lot of space without sacrificing the quality of the document.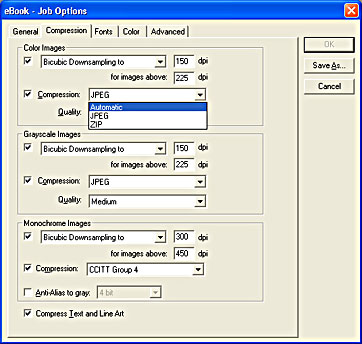
Figure 2: Distiller’s Job Options dialog box gives you three compression settings — Automatic, JPEG, and ZIP — for color, grayscale, or monochrome images. Your choice will affect how the file is optimized.
The general rule for compressing and downsampling continuous-tone images (photographs) when printing is 1.5 to 2 times the line screen resolution of the printing device. If you were asking the question, “What’s Acrobat Distiller?”then you’re probably also wondering what a line screen might be, and may be grappling with terms like “downsampling.”
Downsampling is the removal of pixels from an image in order to reduce the image to a more manageable size. Because various downsampling methods produce different results, consult the Acrobat 5.0 User Guide for more information on the average and bicubic downsampling methods used by Acrobat Distiller. It is important to understand that downsampling only impacts image content, not text and line art. Efficient use of downsampling can dramatically reduce the size of an image file (or an embedded image in an Adobe PDF file) without negatively impacting the viewing quality.
A line screen resolution (commonly referred to as lpi) is a printer’s ability to convert pixel-based resolution into a printable screen. Basically, lpi resolutions are a downsampling method for printers. By effectively controlling the relationship between pixel-based resolution and the required lpi resolution of a printer, you can minimize the size of an image without degrading the quality of the document when it is printed.
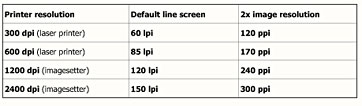
As stated earlier, the optimal ratio for pixels per inch (ppi) to a printer’s lpi screen is typically between 1.5:1 to 2:1 (ppi:lpi). In other words, if your printer is capable of reproducing a 60-lpi screen, the pixel resolution of the images in the document should stay somewhere between 90 ppi and 120 ppi. What you’re controlling is the number of image pixels that are used to create a single “dot” on the printing device. The following table, taken from the Acrobat 5.0 User Guide, demonstrates some of the more common relationships between image pixel resolution and the more common lpi screens of laser printers and imaging devices.
Figure 3: Common relationships between line screen and image resolution
Using the Compression tab in Acrobat Distiller, users can set the compression method and downsampling resolution independently for grayscale and color images. It’s worth noting that some optical character recognition (OCR) applications and some text scanning operations save files as grayscale images. When you’re creating documents, be careful not to compress the grayscale text beyond readability. Ideally, scanned text should be stored as text files or as black-and-white images whenever possible.
It’s also important to understand how the document will be viewed on screen. If your Adobe PDF document will contain a map, or an image that would require the user to zoom in, make sure you leave enough resolution in the file to facilitate this action. Of course, when viewing an image up close, a higher resolution will produce better results.
While controlling image variables such as resolution and color quality can seem intimidating, working in Adobe PDF allows designers to more easily manipulate graphics. Adobe Photoshop is recognized as the worldwide standard for image editing, and for entry-level users, Adobe Photoshop Elements offers an effective, though less complex tool for capturing and retouching images.
Optimizing your PDF files for the Web
Acrobat 5.0 offers users the choice of creating Adobe PDF files for Fast Web View. The primary advantage (and the one most users don’t know) is that Fast Web View Adobe PDF documents are downloaded from the Web page by page, instead of as a whole document. The notion of “byte-serving” in Adobe PDF makes the format useful for reading large documents — users can open and begin reading files before they finish downloading.To find out if your Adobe PDF document is enabled for Fast Web View, select Document Properties from the File menu in Acrobat. In the summary panel, you’ll find the Fast Web View field in the bottom right corner. If Fast Web View is set to No, you can re-save the PDF file and convert into one that is enabled for Fast Web View.
From the Edit menu, select Preferences > General. From there, select the Options tab. There you’ll see a checkbox option for Save As optimizes for Fast Web View. If your intent is to create Adobe PDF documents to be viewed on the Web, turn this option on. You’ll find that this reduces your file size in addition to making the PDF file downloadable one page at a time.

Figure 4: Fast Web View means that a PDF file is not only optimized for the Web but that it can be downloaded one page at a time. To enable Fast Web View for a previously saved file, check Save As Optimizes for Fast Web View under Options in Acrobat’s General Preferences. Then re-save the PDF using Save As.
For more information on compression in Adobe Acrobat, consult the Acrobat User Guide. In it you’ll find a wealth of information about image compression tools and techniques, along with information about font embedding, printing PDF documents, and much more. Knowing how to effectively manage compression methods and other Distiller options gives you high quality, appropriately sized PDF documents.
Gray Knowlton is product manager for Adobe Acrobat for creative professionals.
This article was last modified on March 13, 2022
This article was first published on August 9, 2002
Commenting is easier and faster when you're logged in!

Recommended for you
Out of Gamut: A Two-Pass Approach to Sharpening in Photoshop
In my last column, which delved into a couple of useful sharpening techniques, I...

The 7 Skills Every Design Professional Needs Today
Today more designers are finding themselves having to be well rounded with diver...
Photoshop Tip: Using History Snapshots
Whether you call them do overs, Mulligans, or second chances, we all need those...