

There’s a curious irony to the “death of film.” As the rise of digital shooting has caused camera makers, film manufacturers, and processing facilities to abandon traditional analog technology, it has also created more interest in film-based processes than ever before. Hobbyist photographers who’ve never set foot in a darkroom now have an aesthetic for everything from archaic, alternative processes to Polaroids and toy cameras. Alien Skin Exposure 4 lets the digital photographer wallow deeply in traditional film and processing looks, providing one-click access to sophisticated film stock simulation, as well as the ability to create toy camera looks like those you’ll get from smart phone apps like Instagram and Hipstamatic.
Available for both the Mac and Windows versions of Photoshop and Lightroom, Exposure 4 retails for $249, or $99 for an upgrade from a previous version. A fully-functional demo version can be downloaded from the Alien Skin web site. We reviewed the Photoshop version.
Revamped interface
Alien Skin has revamped the Exposure 4 interface, making tweaks to the layout and design of the plug-in, but also dramatically accelerating Exposure’s UI. As before, the entire interface is kept in a single window. The left side offers an interface for previewing and choosing a preset, while the middle of the window shows a large preview of your final effect. The right side houses tabbed palettes for customizing presets, or creating new looks of your own.
Figure 1 – Exposure’s interface is clean and simple, but provides an incredible amount of power.

If you’ve got any familiarity with modern image editing tools, you should be able to find your way around Exposure’s sliders with little trouble. Well-organized, and intuitive in their function, it’s easy to immediately see the function of any particular command.
However, you may find that you simply never need any of Exposure’s individual editing controls.
Presets. Lots of presets.
While Exposure presents a very nice collection of manual controls, the fact is that you might never need to touch them because of the astounding selection of presets. Ranging from black and white, to color, to highly stylized, Exposure offers a collection of looks that should satisfy just about any need.
Presets are grouped into categories, and within each category you’ll find dozens of different options. Categories include color films of various kinds, black and white films, black and white infrared, color infrared, cross processing, lo-fi, and more.
Figure 2 – Exposure 4 ships with an amazing array of presets, grouped into categories.
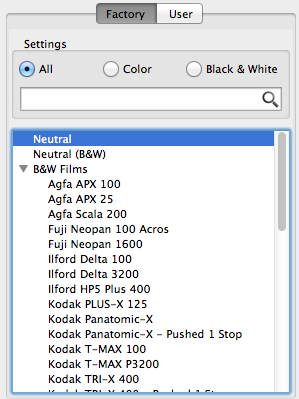
Exposure’s film simulation has always been top-notch, and version 4 continues to provide a full assortment of presets that mimic the look of specific film stocks. So, for example, on the color end you get Fuji Pro, Fuji Reala, Kodak Portra, and more. The black and white film selection is even larger, and includes simulations of films by Agfa, Fuji, Ilford, Kodak, and Polaroid.
These simulations are very well-engineered. I showed results to several long-time darkroom professionals and they all agreed that, from tonal response, to color, to film grain, these simulations accurately mimic the look of the original film stocks.
Figure 3 – Exposure 4’s film presets provide an extremely accurate simulation of a huge variety of film stocks.

Exposure’s Preset browser is very nice. As you mouse over any preset, you get a small preview of its effect on your image. This makes it very quick and easy to see exactly what your image will look like with any particular choice.
Once you’ve added a preset, the controls on the right side of the screen will update to show the settings that define that specific look. From here, you can adjust and alter to your heart’s content.
Editing
Exposure’s editing controls are divided into six categories: Color, Tone, Focus, Grain, IR, and Age.
The color controls are really just very targeted saturation controls. In addition to individual sliders for altering the saturation of shadows, midtones, and highlights, there are sliders for adjusting the saturation of both the additive and subtractive primary color channels. Basically, you get controls that mimic the Hue/Saturation dialog in Photoshop, but with the additional ability to simulate the addition of a color filter. For shooters who are used to shooting color or black and white film through colored lens filters, this will provide a very familiar way to work. For users who don’t have experience shooting through colored filters, Exposure provides an easy way to experiment.
The tone controls provide a simple tone curve, with parametric sliders, as well as a Split Toning control. These controls are redundant to controls you’ll find within Photoshop, but the advantage is that they can be combined with the other Exposure controls to create unique looks.
The Focus tab provides sharpen and blur controls. Like every other tab, these controls have their own set of presets, which can serve as nice starting points. The blur and sharpen controls let you create diffusion effects and other subtle (or not so subtle) blur- and sharpen-based looks.
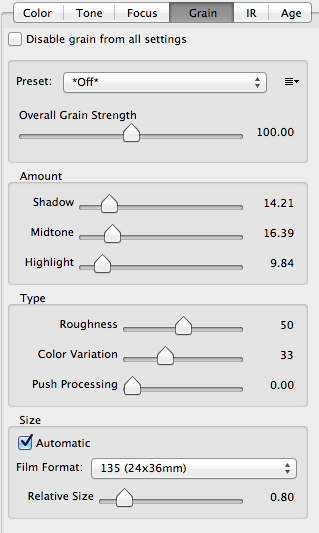
Exposure’s Grain controls are very well-developed with sliders for specifying separate grain amounts for shadows, mid tones, and highlights. Grain size and roughness can be controlled, as well as a global slider for altering overall strength.
Figure 4 – Grain controls let you alter the grain for different parts of the tonal range, in addition to specifying other grain properties.
There are no grain matching controls, so if you’re hoping to create a look that can match another analog image, then you’ll have to go by trial and error. However, if you’re trying to match a film stock for which Exposure provides a preset, that might provide all the matching capability that you need.
Alien Skin has developed an entire set of controls specifically for creating infrared looks, and the results are very authentic. Infrared can be a tricky thing to simulate, and while Exposure isn’t always perfect in its IR transformations, overall the results are very impressive.
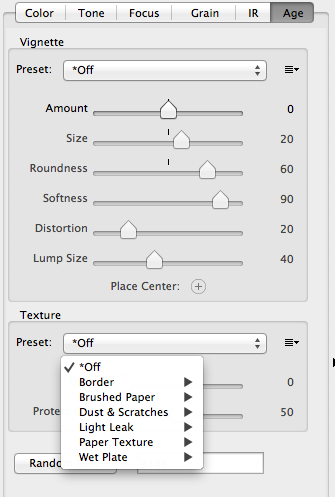
Finally, new to version 4 are Age controls which provide a vignetting tool, and the ability to add texture. With the texture controls, you can add photographic edges, scratches, and paper texture. The low-fi enthusiast will enjoy the Light Leaks options, while the archaic processor will be excited by the Wet Plate options, which let you simulate collodion and cyanotype processes.
For vignetting, I still prefer using Camera Raw, when possible, for its superior controls. However, if you need vignetting later in your workflow, Exposure’s vignette tools offer far more control than Photoshop’s Lens Correction filter.
What’s nice about Exposure’s grungy options is that they’re procedural. Rather than simply compositing canned images of scratches and dust, Exposure generates these artifacts internally. This means you can get different results on every image that you apply the effect to. If you’re adding the same Exposure settings to a series of images, this will keep you from getting visibly repeated results.
Figure 5 – The new Age controls let you apply computer-generated borders, scratches, light leaks, and more.
What’s a little frustrating is that you can’t mix and match different types of age within a single preset. For example, you can’t apply both light leaks and dust and scratches.
Exposure’s effects are always applied globally. That is, they are applied to the entire image. There are no masking tools built-in Exposure, so you’ll need to do any masking in Photoshop before you launch Exposure.
Conclusion
If you need to be able to simulate a very specific film stock, Exposure is a fantastic tool. Most users these days, though, probably have no experience with most – if any – of the film options provided by the plug-in, so accuracy of stock simulation probably doesn’t matter so much. Fortunately, Alien Skin has made it so easy to quickly preview all of the different presets that you can easily see exactly how your image will look.
Exposure offers enough power to create everything from subtle alterations to extremely stylized images. That said, there are few color effects here that you couldn’t create directly in Photoshop. The advantage of Exposure is that Alien Skin has worked out precisely how to create very specific real-world looks. More importantly, Exposure allows you to quickly apply the exact same effect to any image you open.
If you’re looking for a low-fi, grungy, or IR look, then Exposure offers features that are very hard to re-create in Photoshop.
For the busy image editor who needs to replicate a traditional film look, or who needs an easy way to quickly create and apply grungy, lo-fi looks, Exposure will be well worth the $250 price tag. If you don’t regularly need these types of edits, you might want to try to get by with stock Photoshop edits.
Score: 9
Pros: Extremely accurate film simulations; huge number of presets; very good editing controls.
Cons: Can’t apply multiple aging effects; the focus on film simulation in the presets may not matter to people who never shot film; lack of grain matching might frustrate users who are compositing with other sources.
This article was last modified on December 14, 2022
This article was first published on October 10, 2012
Commenting is easier and faster when you're logged in!

Recommended for you

CreativePro Tip of the Week: Viewing Illustrator Artwork as Outlines
This CreativePro tip for viewing Illustrator artwork as outlines was sent to Tip...

CreativePro Tip of the Week: Make Illustrator Do the Math for You
This CreativePro Tip of the Week on making Illustrator do the math for you was s...

Capture the Look of Classic Analog Photography With VSCO Film Emulations
If you were an avid photographer in the analog days, you probably had a few favo...