Bringing Out Shape and Detail in the Darkest of Colors

Light Hogs
“Is there detail in the blacks?” If you ever asked this question when reviewing photos of dramatically lit interiors, moody landscapes, product shots of black or dark-colored items, or other innumerable possibilities of subject matter, the answer could very well be “absolutely.”
It is always challenging to photograph a subject that absorbs practically all of the light shining on it. Add to the mix a slightly under-exposed capture, or a composition that includes both dark and light elements with important detail and you have a perfect candidate for post-capture perfecting.
3 Examples: Blackbirds, Cala Lilies, & Dinnerware
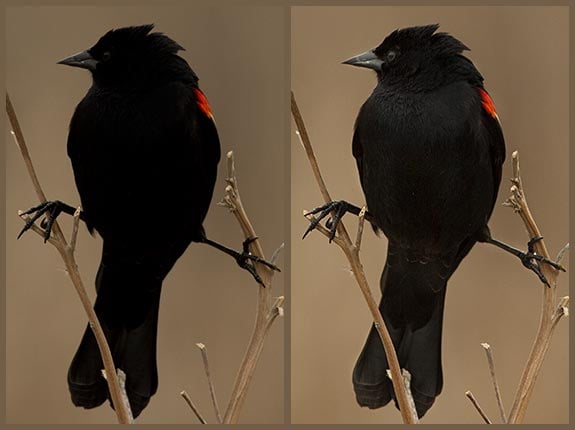
When the color of the main subject is the darkest of darks, and the shooting situation does not lend itself to using supplementary lighting, fill cards, or multiple exposures to apply the HDR (high dynamic range) technique—as in the case of this photograph of a red-winged blackbird—the detail can be brought out in post-processing.
Before/After: The amount of recovered detail viewable on-screen is highly dependent on the quality of your display. See “Test Your Display” below.
Had the blackbird been a secondary element in the photograph rather than the main subject, the silhouette look of the bird in the Before version may have been acceptable. Whereas, in the After version—a winning close-up shot—the emphasized hidden details reveal the beauty of this delicate creature and now invites the viewer to linger.
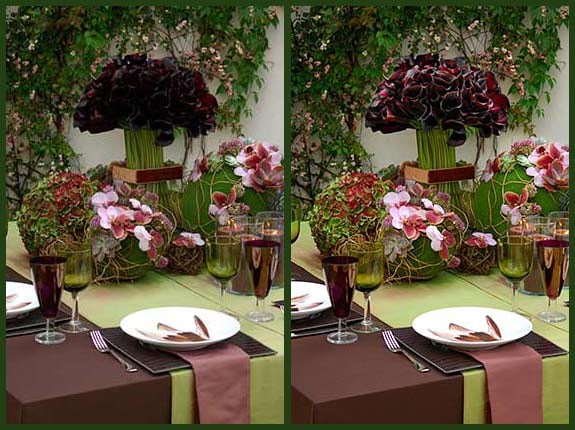
In the second example, the scenario was similar— the detail and color of the black calla lilies was hidden. It photographed as a black mass in this otherwise exquisite floral design. Post-capture editing allowed the true depth and color of the flowers to be revealed.
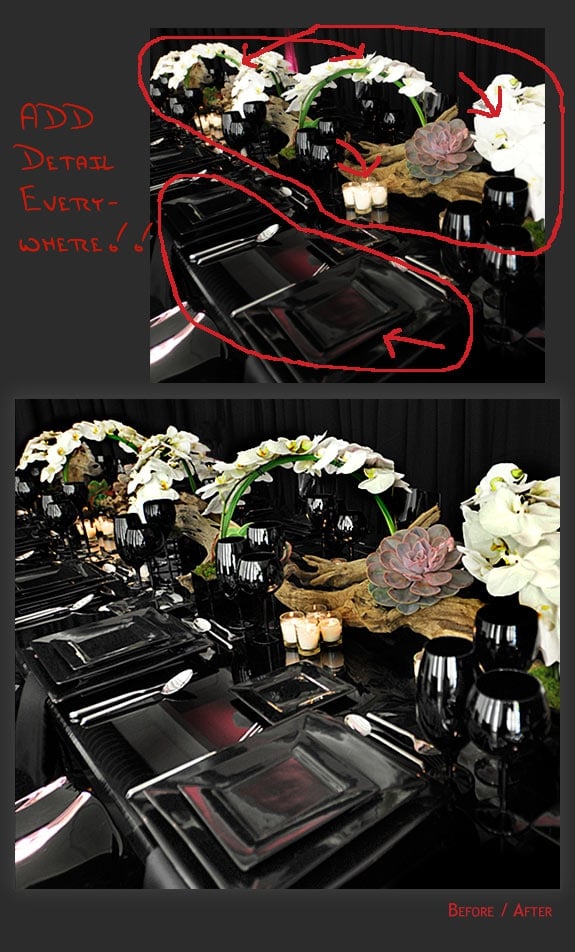
Before/After: The third example illustrates a photographic nightmare in terms of dynamic range—black plates on a black table with black linen, juxtaposed next to white orchids.
The stationary nature of the subject matter certainly lends itself to using the HDR technique which involves combining multiple exposures to capture the full tonal range of a scene. But, it was not shot in that manner. I was provided with just a single frame from which to work. The result was a respectable job; the After image held up on press. Reproduced in a luxury wedding magazine, both the highlight and shadows had detail when translated to the printed page.
Achieving the Desired Results
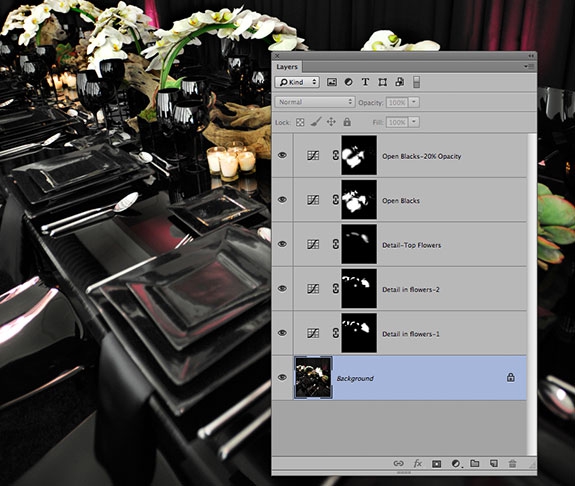
In all three examples, the results were achieved by using a combination of curve adjustment layers with masking. By isolating selective areas in each adjustment layer, and varying the density of the mask as well as the opacity of the a layer, “troubled” areas were individually controlled to bring them to the optimum density.
Photoshop Layers panel with adjustment curves
Can Your Dark Image Be Saved?
If you are debating whether a dark image can be made suitable for reproduction in print or digital media (in other words “saved”), know that in most cases much can be done to render hidden details and create a pleasing interplay of light and shadow. If the image was captured as a RAW file, all the better.
To see more examples of the extend that images can be “saved” visit the Improving Stock and the Improving Color + Light portfolio galleries.
Are You Seeing What’s Actually In The File?
The last question to consider is whether you are seeing all the data in the file. The ability to “see into” the dark tones when viewing images on a computer display is highly depended on the quality of your display.
It is a given that a high quality, color-calibrated display is mandatory for graphic design and photo professionals. This requirement is most evident when evaluating images consisting mainly of tones at the dark end of the spectrum. Low-end displays do a poor job at rendering detail in dark areas. As a result, you may not be seeing what is actually in the file.
Test Your Display
Eizo, a manufacturer of high-end displays, published an informative article about display quality and display evaluation. To determine how your display is performing, download the test images provided with the article. Once on your local drive, open them in Photoshop or another photo editing program. If the results are less than satisfactory, consider investing in a better quality display, especially if your work involves image editing or image evaluation.
This article originally appeared on chromaqueen.com. Republished with permission of the author. ©Martha DiMeo 2014
More from ChromaQueen.com
Visit the ChromaQueen blog for more informative articles on color management, color design, image enhancement, photo retouching, and photo editing written specifically for the graphic design and photography community.
Martha DiMeo is intensely passionate about photography, Photoshop, and superb color reproduction. During the course of her 25 year career Martha has worked as a staff photographer for Hallmark Cards, as a Digital Imaging Specialist for leading magazine titles (The New Yorker, Fortune, People) an
d has established and managed in-house prepress and art production departments (Cahners Business Information, Elegant Publishing). Her entrepreneurial spirit lead her to launch ChromaQueen.com, a photo editing services company specializing in photo retouching and color correction for books, magazines, art publishers, and marketing and advertising clients. Martha would be delighted to talk to you about your next color correction and retouching project. To get started, take advantage of the free image evaluation service offered through the ChromaQueen site. Upload files to receive a complimentary, no obligation, review of your images. She can be reached at 617-855-8474.
This article was last modified on June 29, 2023
This article was first published on July 14, 2014
Commenting is easier and faster when you're logged in!
Recommended for you

Now Shipping: Complete Digital Photography, 7th Edition
CreativePro author Ben Long has announced the publication of his latest book, Co...

Corel's AfterShot Pro Seeks to Lure Lightroom and Aperture Users
Bibble was a software program from Bibble Labs that helped you manage and improv...

Photoshop for Beginners
Becoming a Photoshop expert is probably on a lot of folks’ bucket lists. W...


