Build Shapes Quickly in Adobe Illustrator
Excerpted from The Adobe Illustrator CS5 Wow! Book by Sharon Steuer. Copyright © 2011. Used with permission of Pearson Education, Inc. and Peachpit Press. To receive a 35% discount on this book plus free shipping in the continental U.S., go to the Peachpit Press Online Store and enter the discount code CS5WOW during the checkout process.
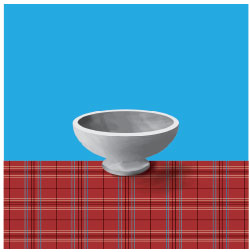
Artist and Adobe Illustrator WOW! Book author Sharon Steuer said, “I created the piece below for a user group demo to highlight how some newer features in Illustrator—the Shape Builder tool, Drawing Modes, and the Bristle Brush—make constructing objects quicker and easier.”

Follow along with Sharon’s process and learn how to create overlapping objects, color them with a Premedia Systems script, and use the Shape Builder tool to unite some parts and delete others; recolor, use drawing modes and the Bristle Brush to add a background, shading, and textures; and resize artboards with another Premedia script.
Step 1. Constructing the bowl from overlapping objects. Since the Shape Builder can both unite objects and delete parts of intersecting objects, using it can be much simpler and quicker than either drawing precisely with the Pen tool, or using Pathfinder commands. To follow along with the figures in this lesson, set the fill and stroke to the default (press the D key), then set the fill to None (X toggles focus between fill and stroke; the / key sets the style to None); then, with the Ellipse tool (L), draw a series of ovals that align at the center. (To help you do this quickly and efficiently, make sure that Smart Guides are on (C-U/Ctrl-U), use the modifier keys Option/Alt to draw from the center, and use the spacebar key to adjust the position of the oval as you draw.) It’s easier to control your use of the Shape Builder tool if each object you’ll be working with is a different color. A quick way to do this is to use the Premedia Systems WOW! Colorizer script (install instructions and scripts are also on the WOW! DVD). With the script installed, select everything and choose File > Scripts > WOW! Artwork Colorizer. In the script dialog, enable “No colors” to let the script select colors and save the used colors as a swatch group (your colors may differ from the ones shown here). Figure 1. Drawing the oval objects and using the Premedia WOW! Artwork Colorizer script to give each object a different color  For the next step, you’ll be using the Shape Builder tool (Shift-M) to hover over the selected shapes, looking at the highlighted areas to see how they will connect. If the areas that you wish to maintain aren’t visible (for instance, the purple oval needs to be on top in order to form the foot of the bowl), then adjust the stacking order by cutting and using Paste in Front/Back. With Pick Color From Artwork enabled (double-click on the Shape Builder tool for options), drag from the red bowl through the upper half of the purple oval. To delete the side pieces of the foot and the top of the bowl, hold down Option/Alt while clicking on them. Figure 2. Dragging to unite the shapes that make up the bottom of the bowl; then deleting side pieces on foot and top shape (cursors magnified)
  Step 2. Completing the composition. You can select each shape (which is now a separate object) and recolor the bowl, and you can even marquee-select all the objects and set the Stroke to None. To quickly place a background behind all objects, select the Draw Behind drawing mode, either by clicking its icon in the Tools panel, or by pressing Shift-D until you see the icon. Draw rectangles for the background objects. (I drew one rectangle filled with the Plaid 2 Pattern, and another with blue.) Figure 3. Recoloring the bowl with the Grays swatch group; then choosing None for the objects’ stroke
  Figure 4. Draw Normal, Draw Behind, Draw Inside
  Step 3. Finishing touches on the bowl. Select one bowl object (you can only select one at a time), along with the Brush tool, and choose Draw Inside mode (Shift-D), which places dotted corners around the object. Deselect the object and load the Bristle Brush library. Choose a Bristle Brush and paint on the object; Draw Inside constrains your brush strokes within the selected object. When you want to paint another object, you must first exit Draw Inside mode (Shift-D, or double-click with a selection tool). Select the next object and choose Draw Inside again (you can even draw inside a pattern, like the bowl’s shadow). Figure 5. Using Draw Inside to constrain the Mop Bristle Brush to a single, selected object, denoted by the dotted corners
  When I was done, I wanted to crop the image for the demo she would output to PDF. The easiest way was to resize all the artboards by 72% using the Premedia Systems WOW! Artboard Resizer. This script (also on the WOW! DVD) resizes any or all artboards from the center. Figure 6. Using the WOW! Artboard Resizer by Premedia Systems to resize selected artboards smaller
  Tip: Easily view drawing modes. You can see (and therefore easily click) each drawing mode if your Tools panel is in double-column view; click the double-arrow in the title bar of the Tools panel to toggle the view between single and double-column. Check your drawing mode if your objects are not going where you intended. Tip: Artboards for a presentation. To save a project in stages for a presentation, duplicate the current artboard in the Artboards panel by dragging it to the New Artboard dialog. Double-click on its name to fit the duplicate in the window (double-click the icon to rename) and continue working.


