Building WordPress Sites with Dreamweaver CS5: Part 3

So far in this series, you’ve learned how to set up a working copy of WordPress on your desktop computer and then how to modify a WordPress theme to customize its appearance. Now for the last part of the puzzle: getting your WordPress site from your local testing machine to your Web server for all the world to see.
Unfortunately, the process isn’t quite as straightforward as copying the files from your computer to a Web server, and the exact steps will depend on a few things:
• Do you already have WordPress installed on your server?
• Do you want to put your new design up on the Web and have your client begin adding content to the site?
• When designing your WordPress site, did you also add content such as blog posts and pages that you want to move to your Web server?
I’ll address all of these scenarios, but first, let’s make sure WordPress is up and running on your Web server.
Installing WordPress on the Server
If WordPress is already installed on your Web server, skip to the next section of this article, “Uploading a Custom Theme”. But, if you need to install WordPress on your server, keep in mind that you can’t just copy your WordPress files onto the Web server and expect them to work. Because WordPress depends on a database, you need to do two things before copying the WordPress files from your computer to your Web server:
1. Set up a database on your Web server. This process varies between Web hosting companies, so contact your hosting company and ask how to set up a database on your particular Web server. You’ll need a database name, as well as a database username and password.
2. Edit the wp-config.php file in the WordPress folder on your local computer. This configuration file was created when you installed WordPress in the first part of this series. You can open the configuration file in any text editor.
You’ll need to add the database name, username, and password to this file. To add the database name to the configuration file, look for code like define('DB_NAME', 'new_blog'); . In this example, you’d change ‘new_blog’ to the name you supplied for your database.
To add the database user name to the configuration file, search for for code like define('DB_USER', 'blog_admin'); . In this example, you’d change ‘blog_admin’ to the name of the database user.
To add the database user password to the configuration file, look for code like define('DB_PASSWORD', '12345'); . In this example, you’d change ‘12345’ to the password of the database user.
You may also need to change the MySQL hostname in this configuration file. Many Web hosting companies run a MySQL server on the same computer as the Web server—just like MAMP and WAMP work on your desktop computer. However, some hosting companies run MySQL on a separate computer with its own hostname. If that’s the case, change this line of code: define('DB_HOST', 'localhost'); . Replace ‘localhost’ with the hostname provided by your Web hosting company. It might look something like db2.hostingcompany.com, or simply be an IP address like 65.33.221.11. If you don’t know whether your Web host uses a different computer, try ‘localhost’; if that doesn’t work, contact your Web hosting company.
Once you change the wp-config.php file, you can move all of the WordPress files from your local computer to your Web server using an FTP program. If your entire site is going to be run with WordPress, put the WordPress files in the root folder on the Web server. If the blog is separate from your Web site (https://you.com/blog/, for example), put the WordPress files in a folder inside your Web server’s root folder (for example, in the blog folder).
Once the files are online, launch a Web browser and visit the blog home page. Go through the basic configuration steps discussed in the first article: Provide a name for the blog, an admin username and password, and your e-mail address.
You’ll also need to turn on your theme, which I’ll cover in the section “Activating a Custom Theme” later in this article.
Uploading a Custom Theme
Once WordPress is installed on your Web server, you’ll want to put your design online. Fortunately, that’s a simple matter of locating the files you need to transfer from your desktop computer and to your Web server.
As I mentioned in Part 2, theme files are stored inside the themes folder inside the wp-content folder. On Windows, themes are in C:wampwwwblogwp-contentthemes . On Macs themes are in Applications:MAMP:htdocs:blog:wp-content:themes.
Inside this folder you’ll find your theme folder—if you followed the tutorial in the previous article, you should have a creativepro folder containing a customized design. Move this entire folder to the copy of WordPress on your Web server. Put your theme folder in the wp-content/themes folder on your Web server.
Activating a Custom Theme
Now that your theme is in place on the server, you must activate it. That’s true even when you copy all of the WordPress files from your local computer to the server. Because WordPress keeps information about its setup (such as which theme is active, the name of the site, installed plugins, and so on) in the database, you need to activate the theme on the Web server using WordPress’ admin panel.
1. Go to your Web browser and visit the WordPress admin panel on your Web server. For example, if your Web site is at https://my-site.com, then the admin panel is located at https://my-site.com/wp-admin.php. (If the blog is in a subdirectory then make sure you include that directory in the URL: https://my-site.com/blog/wp-admin.php, for example).
2. You may need to login using the name and password you used when setting up WordPress. You should now see WordPress’ dashboard.
3. In the left navigation bar, click the Appearance button. This takes you to the Manage Themes page. You’ll notice that your newly uploaded theme appears.
4. Click the Activate link below the theme you uploaded. That theme is now listed at the top of the page as the new active theme.
At this point, your new site is active and you or your client can begin blogging and adding content. (See Part 1 for help on posting blog entries with WordPress.)
Moving Content from One WordPress Installation to Another
If you added content (for example, blog posts or additional WordPress pages) to your local copy of WordPress, you’ll want to move that to your Web server as well. Unfortunately, a MySQL database isn’t a regular file like a Web page, JPEG image, or Flash movie—you can’t just copy it to your Web server and expect it to work.
While it is possible to export a MySQL database from one computer and import it to another, this usually won’t work with a WordPress database. because some local settings in the desktop version of your database won’t match settings on your Web server. Happily, WordPress provides an easy-to-use tool to export and import blog content. You can export all blog posts, pages, user comments, navigation menus, and other content you’ve already added.
To export content from your local copy of WordPress, take the following steps:
1. Go to your Web browser and visit the WordPress admin panel on desktop computer; for example, https://localhost/wp-admin.php. (If the blog is in a subdirectory, make sure you include that directory in the URL: https://localhost/blog/wp-admin.php, for example).
2. You may need to login using the name and password you chose when setting up WordPress. You should now see the WordPress dashboard.
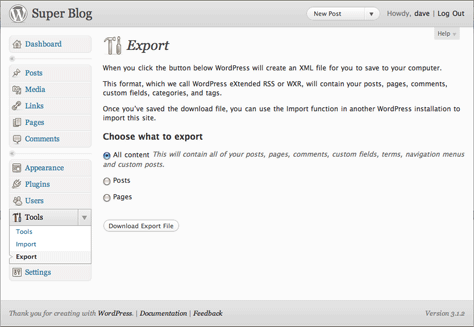
3. In the left navigation bar, click the Tools button to expose the Tools submenu, then click the Export button. The Export page appears (Figure 1).
Figure 1. Back up all your WordPress content with the Export tool. Click the image below to see a larger version.

4. Click the Download Export File button. Your Web browser will then download an XML file. The file’s name will be the name of your blog, with the current date: superblog.wordpress.2011-05-10.xml, for example. This is the file you’ll import to your Web server.
To import content to your WordPress blog, you’ll need to add the WordPress import plugin, and then import the XML file you downloaded earlier. Here’s how:
1. Open a Web browser, visit https://wordpress.org/extend/plugins/wordpress-importer/, and click the download button. You’ll have a wordpress-importer folder on your computer.
2. Using an FTP program, transfer this folder to your Web server. Place the folder inside the wp-content/plugins folder.
3. Using a Web browser, visit the WordPress admin panel on your Web server. For example, if your Web site is at https://my-site.com, then the admin panel is located at https://my-site.com/wp-admin.php. (If the blog is in a subdirectory, include that directory in the URL: https://my-site.com/blog/wp-admin.php, for instance).
4. You may need to login using the name and password you used when setting up WordPress. You should now see WordPress’ dashboard.
5. In the left navigation bar, click the Plugins button. This takes you to the Plugins page, which lists all available plugins. You need to activate a plugin to make it work.
6. In the list of plugins, locate the WordPress Importer plugin and click the Activate link. Now you can import content to the site.
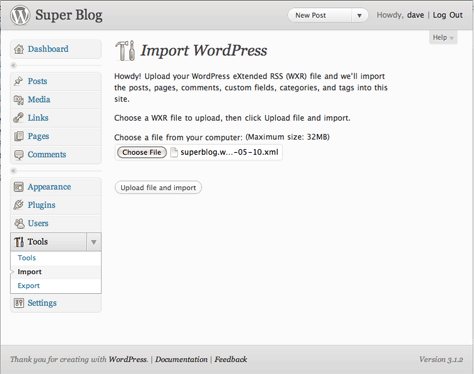
7. Click the Tools link in the left-hand navigation bar. Click the Import link, then choose WordPress option. The Import WordPress page opens (Figure 2).
Figure 2. Importing WordPress content. Click the image below to see a larger version.

8. Click the Choose File button and find the XML file you imported from your local copy of WordPress. Click the Upload File and Import button.
9. You’ll be asked to assign authors to any content you upload. You can create new users with a new name, or you can choose an existing user. For example, say you had a user named “Bob” on your local setup and used that account to create several blog posts. When you upload that content to the Web server, you can create a new user named Bob, or choose a user from the “existing user” drop-down menu.
10. Click the Submit button. WordPress uploads the content to the database and presents you with a message that the upload is completed.
At this point, the Web server should have your new design and all of the content you created during the development phase. Now you or your client can use the WordPress Admin panel on the Web server to add more content. Note that you can always use the Export feature from the Admin panel to make a backup of your Web site’s content. That’s a wise precaution, worthy doing every week to make sure a server problem doesn’t wipe out your finely crafted Web site.
After moving the site to the Web server, you can keep the local copy around for continued design and development. For instance, you can tweak the CSS on the local copy, or alter the theme files as you learn more about how WordPress works and want to add functionality to the site. You’ll only need to upload the theme folder (or even just the individual files you change in that theme folder, such as the style.css file) to have those changes take effect on the Web site.
While there are certainly a lot of details to keep in mind when working with WordPress, its flexibility and power makes it a powerful tool for Web designers who wish to offer their clients a complete content management solution.
This article was last modified on January 8, 2023
This article was first published on May 18, 2011
Commenting is easier and faster when you're logged in!
Recommended for you

CreativePro Ask the Expert Video: Diane Burns
In this “Ask the Expert” video, David Blatner chats with InDesign expert Diane B...

A Script to Flag Certain Words in InDesign
Free script to flag risk words in InDesign, so you can spot them easily and remo...

Making Yearbooks With Jostens Monarch
Scott Citron profiles a company bringing innovation and efficiency to high schoo...


