Checking Density Values in Photoshop
When it comes to reproducing photographs, it could be debated as to what is worse—shadows and three-quarter tones with little or no detail or highlights and quarter-tones close to being blown-out? For most images—and for most subject matter—neither is desirable and usually results in the image being assigned to the outtake pile.
In a previous post, Bringing Out Shape & Detail in the Darkest of Colors, I addressed the issue of recovering shadow detail and gave a sneak peek at recovering highlight detail. Now, I’d like to delve into the topic of highlight recovery a bit deeper with a few more examples.
Bridal Gowns: Satin & Lace
The two images presented here are pulled from the pages of Grace Ormonde Wedding Style magazine. Brides and bridal gowns are always a challenge to photograph. Whether the photos are candid shots of a bride on her wedding day, images from the photo pit at bridal runway shows, or carefully planned and executed studio shoots, the challenge is always the same—holding detail in the white and off-white fabrics.
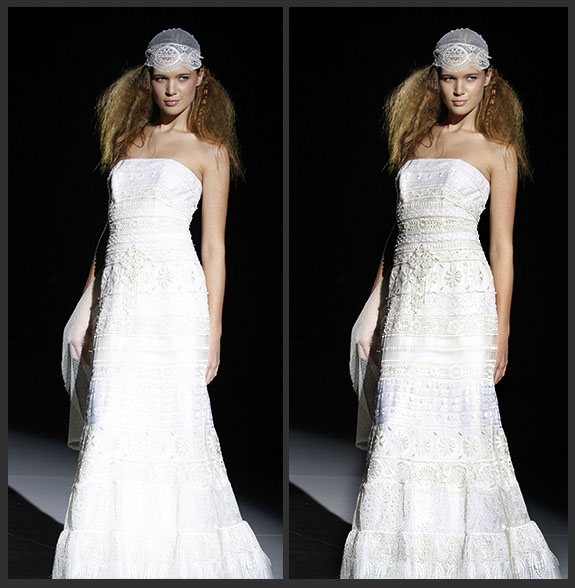
In this first example, the editors at Wedding Style magazine wished to include this image of a YolanCris gown in the regularly featured Bridal Runaway spread. In its original form, with the loss of all detail of the gown’s delicate eyelet and embroidery work, it was unsuitable for publication. Reproduced as is, it would not have served the bridal designer as a flattering representation of her work, nor would it have been useful to the magazine reader searching for her dream wedding gown. Moreover, from a magazine production standpoint, the image did not meet the quality standards I had established for the publication. (At the time, I was the Production/Imaging Director for Wedding Style magazine.)

Before/After — Photoshop Retouching by Martha DiMeo
The amount of recovered detail viewable on-screen is highly dependent on the quality of your display. See “Test Your Display” below.
As illustrated in the After view, with carefully considered Photoshop retouching and tonal manipulation, the shape and delicate details of the gown’s design was restored. As a result, the image was reclaimed from the outtake pile and then handsomely reproduced in the magazine.
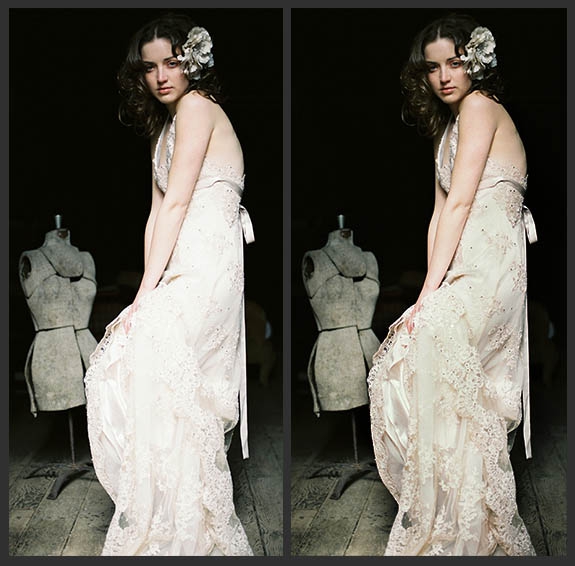
The second example is very similar in nature. It was nicely composed and styled, but the dress suffered from loss of detail in the satin and lace. It would have been a disservice to run the photo in its original state. Once again, the outtake pile was averted by solving the problem in post-production.

Before/After — Photoshop Retouching by Martha DiMeo
Can Your Over-Exposed Images Be Saved?
If you are questioning whether an over-exposed image can be improved in post-production, it is quite possible the answer is “yes”. Even with just a few percentage points of density in the areas that appear blown-out, you can usually do a lot to restore detail. And if the image was captured as a RAW file, all the better; that gives the Digital Imaging Specialist even more to work with.
Checking Density Values in Photoshop
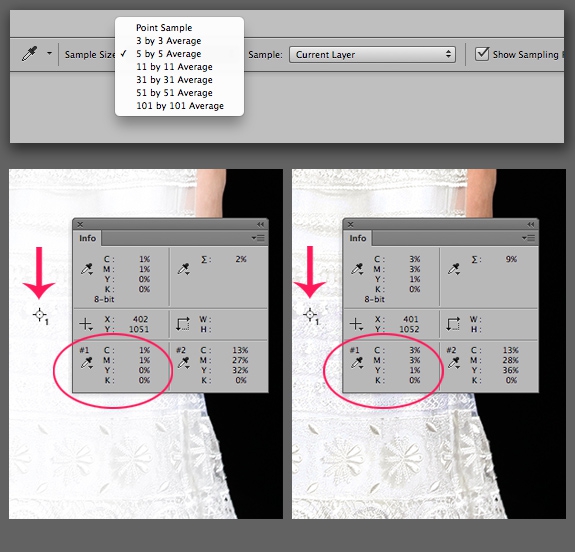
The process of checking the density values in an image is quite simple. First, in Photoshop’s Option Bar, set the Eyedropper Tool to sample either 5 by 5 Average or 11 by 11 Average. Next, with the Info panel visible, move the Eyedropper over the areas of the image that appear blown-out. In the Info panel, take note of the density readings as you move the cursor around the image.
Using the first image as an example, as seen in the screenshot below, the “Color Sampler #1” pixels in the Before image had a density of C1, M1, Y0, K0 (or in RGB 251/251/253), thus producing a total ink density of just 2%.
Amazingly, 2% was enough to work with. In the After image, the same area now has a total ink density of 7%—C3, M3, Y1, K0 (or in RGB, 243/243/246)—a sufficient amount of density to restore the eyelet detailing in the fabric and most importantly, to hold that detail on press.

Top: Photoshop’s Eyedropper Options. Bottom: Density values before and after retouching work
More Examples
To see more examples of the extend that images can be “saved” visit the Improving Stock and the Improving Color + Light portfolio galleries at ChromaQueen.com.
Lets Work Together
Would you like to take advantage of our complementary image evaluation service to have over-exposed, under-exposed—and everything in-between—reviewed? Use the upload page to submit files, or visit our Contact Us page for the various ways to get in touch. We would be delighted to work with you on your next project.
Finally, thanks for reading. Leave a comment. Share with a friend—social media buttons above—if you found this article to be helpful, informative, or just interesting to read!
Test Your Display
It is a given that a high-quality, color-calibrated display is mandatory for graphic design and photo professionals. If you are reviewing images on an uncalibrated, aging, or low-end monitor, you may not be seeing what is actually in the file.
Eizo, a manufacturer of high-end displays, published an informative article about display quality and display evaluation. To determine how your display is performing, download the test images provided with the article. Once on your local drive, open them in Photoshop or another photo-editing program. If the results are less than satisfactory, consider investing in a better quality display, especially if your work involves image editing or image evaluation.
© Martha DiMeo 2014
Photos © Respective Image Owners


I thought this was going to be an informative article on “Recovering Highlight Detail in Photoshop” as the title states. But it appears to be an ad for Ms. DiMeo’s design services instead. I hope I’m just missing something, otherwise I would be annoyed with CreativePro.
So, how do you do it?
“Can Your Over-Exposed Images Be Saved?”
Apparantly…but, uh, how?
How is this article helpful or informative?? I was lead to believe this was a “how-to” tutorial/article.
Instead of recovering my images or getting better as a creative pro, I guess I should just send my files to Ms. DiMeo. What a sham!!
Is this article supposed to be informative??? thanks for the knowledge that you can save over exposed images somehow, how do you do it again??
I just re-read this article twice… looking for the How To … waste of time… I was looking for tips on recovering highlight detail in an image… not how to change info tool selection matrix – I know how to do that. Must’ve been a slow week for How To articles so you threw this in as a filler, even though it is not a How To article. Thanks anyway.
Agree with all comments below/above.
Also thought this will teach us about how to restore an overexposed image but we finally get an article for reading at coffee / tea time. Quite dissapointed with the way editor managers and dealing with this section in CreativePro. Please go back to the origins,
thanks
Roberto (and everyone else who posted above): Yes, we hear you, and we apologize for the misleading title. We have changed the title to reflect what little information is explained in the article. But we are also reviewing our policy for these kinds of articles and we will strive to offer more value in future articles. Thank you for your patience!