
Conquer Photoshop Cropping

Excerpted from “The Adobe Photoshop CS3 Book for Digital Photographers.” Used with permission of Pearson Education, Inc., and New Riders.
After you’ve sorted images from a shoot, one of the first editing tasks you’ll probably undertake is cropping a photo. There are a number of different ways to crop a photo in Photoshop. Here are two: using the rule of thirds, and cropping to a specific, predetermined size.
Crop Using the Rule of Thirds
The “rule of thirds” is a trick that photographers sometimes use to create more interesting compositions. Basically, you visually divide the image you see in your camera’s viewfinder into thirds, and then you position your horizon so it goes along either the top imaginary horizontal line or the bottom one. Then, you position the subject (or focal point) at the center intersections of those lines. But if you didn’t use the rule in the viewfinder, no sweat! You can use Photoshop to crop your image using the rule of thirds to create more appealing compositions.
Rule of Thirds: Step One
Open the photo you want to apply the rule-of-thirds cropping technique to (the shot here is the shot in Figure 1 is poorly composed, with the subject right in the center, and too much headroom above — it just screams “snapshot!”). So, start by creating a new blank layer by clicking on the Create a New Layer icon at the bottom of the Layers panel.
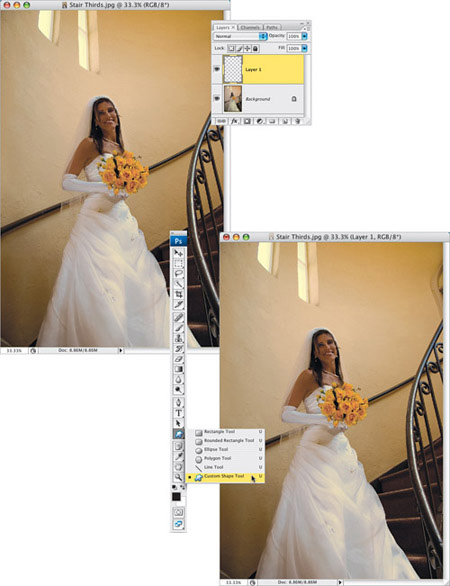
Figure 1.
Rule of Thirds: Step Two
Now, go to the Toolbox and get the Custom Shape tool (as shown above), or press Shift-U until you have it.
Rule of Thirds: Step Three
The Custom Shape tool’s options will appear up in the Options Bar. First, click on the third icon from the left (so your shape will draw pixels, instead of a Shape layer or a path). Next, click on the downward-facing triangle to the immediate right of the current shape, and the Shape Picker will pop down (as shown in Figure 2). In the default set of shapes there is a Grid shape, and that shape is already divided into equal thirds, so click on that shape to choose it.

Figure 2.
Rule of Thirds: Step Four
You’re going to need to see the exact size you want to crop down to, so go under the Window menu and choose Show Info. This brings up the Info panel (shown in Figure 3), which displays the Width and Height for any shape you draw. So now take the Custom Shape tool and drag out a grid, and as you drag, keep an eye on the Info panel’s Width and Height fields (our goal is to print a 13×19″ print, so we’re going to want our final grid size to be 13″ wide by 19″ tall). Now, start dragging. (Don’t worry about positioning the grid right yet — just keep your eye on that Info panel, and your wrist steady, so you can drag out exactly a 13×19″ grid. Also, don’t worry about damaging your photo — that’s why we created that new blank layer in Step One, so your grid will appear on this new layer.)
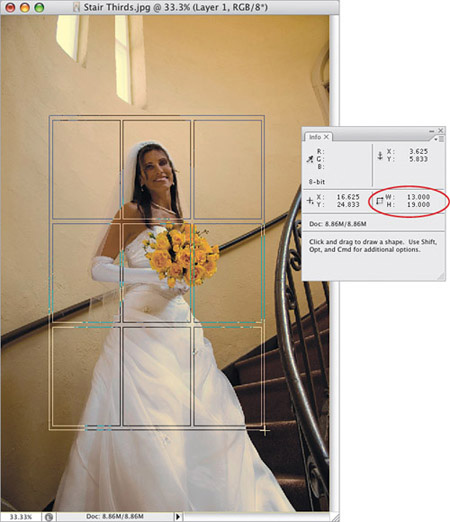
Figure 3.
Rule of Thirds: Step Five
Press the letter V to switch to the Move tool, and click-and-drag your rule-of-thirds grid into the position you’d like it. (Ideally, your subject, or point of interest, would appear at one of the four places within the grid where the lines intersect. I’ve marked all four in Figure 4 as a visual reminder.)

Figure 4.
Rule of Thirds: Step Six
Once the grid is positioned right where you want it, get the Rectangular Marquee tool (M) and click-and-drag out a selection that is the exact same size as the grid (as shown in Figure 5).
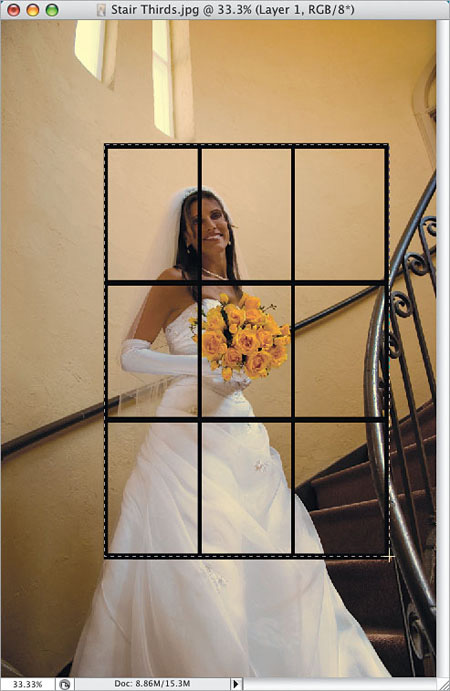
Figure 5.
Rule of Thirds: Step Seven
Now go under the Image menu and choose Crop (as shown in Figure 6).
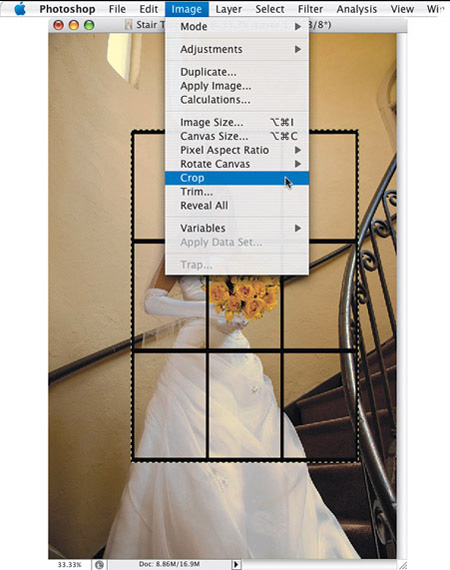
Figure 6.
Rule of Thirds: Tip
You can also use the Crop tool to make your canvas area bigger. First, open a photo, then press the letter F (to make the gray area outside your photo visible). Take the Crop tool (C), and drag out over a small area inside your photo. Now, you can drag any corner or side point of your cropping border right outside your image area, off into that gray area surrounding your photo (so you can visually position where you want more canvas area). Then, when it’s right where you want it, press the Return (PC: Enter) key and the area outside your image area now becomes white canvas area. Not bad, eh?
Rule of Thirds: Step Eight
When you choose Crop from that menu, it crops the photo based on your current selection, so basically it crops the photo down to the edges of your grid. Now, go to the Layers panel and drag Layer 1 (your grid layer) into the Trash (at the bottom of the Layers panel) to delete it. You can now see your final cropped photo — cropping using the rule of thirds. In the example shown in Figure 7, I added my Three-Step Portrait Finishing Technique to sharpen the photo, soften the photo, and burn in the edges.
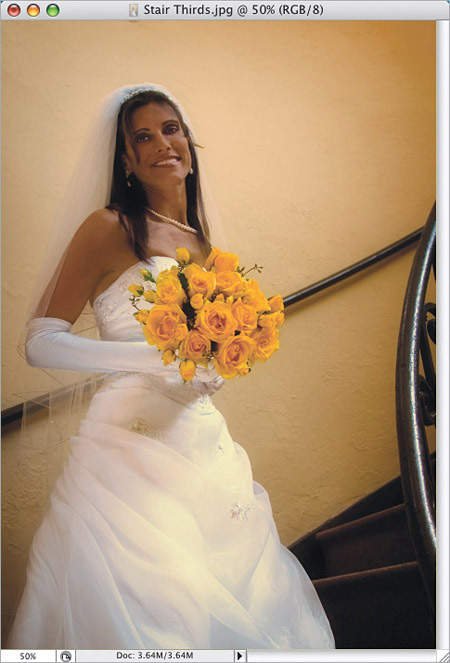
Figure 7.
Cropping to a Specific Size
If you’re outputting photos for clients, chances are they’re going to want them in standard sizes so they can easily find frames to fit their photos. If that’s the case, you’ll find this technique handy, because it lets you crop any image to a predetermined size (like 5×7″, 8×10″, and so on).
Specific Size: Step One
Let’s say our image measures 15×10″, and we want to crop it to be a perfect horizontal 10×8″. First, press the C key to get the Crop tool, and up in the Options Bar on the left, you’ll see Width and Height fields. Enter the size you want for the width, followed by the unit of measurement you want to use (e.g., “in” for inches, “px” for pixels, “cm” for centimeters, “mm” for millimeters, etc.). Next, press the Tab key to jump over to the Height field and enter your desired height, again followed by the unit of measurement.
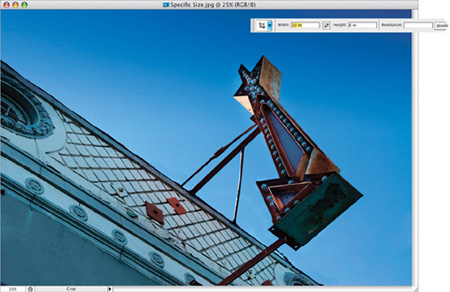
Figure 8.
Specific Size: Step Two
Click within your photo with the Crop tool and drag out a cropping border. You’ll notice that as you drag, the border is constrained to a horizontal shape, and once you release the mouse button, no side points are visible — only corner points. Whatever size you make your border, the area within that border will become a 10×8″ photo. In Figure 9, I dragged the border so it almost touched the top and bottom to get as much of the subject as possible.

Figure 9.
Specific Size: Step Three
After your cropping border is onscreen, you can reposition it by moving your cursor inside the border (your cursor will change to an arrow). You can now drag the border into place, or use the Arrow keys on your keyboard for more precise control. When it looks right to you, press Return (PC: Enter) to finalize your crop, and the area inside your cropping border will be 10×8″. (For Figure 10, I made the rulers visible by pressing Command-R [PC: Ctrl-R], so you could see that the image measures exactly 10×8″.)
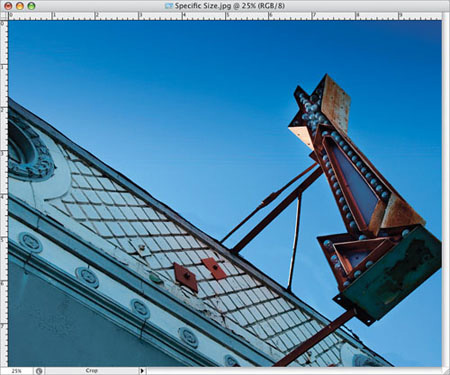
Figure 10.
Specific Size: Tip
Once you’ve entered a Width and Height in the Options Bar, those dimensions will remain in place until you clear them. To clear the fields (so you can use the Crop tool for freeform cropping to any size), just go up in the Options Bar and click on the Clear button (while you have the Crop tool active, of course).

Figure 11.
Specific Size: Cooler Tip
If you already have a photo that is the exact size and resolution that you’d like to apply to other images, you can use its settings as the crop dimensions. First, open the photo you’d like to resize, and then open your ideal-size-and-resolution photo. Get the Crop tool, and then in the Options Bar, click on the Front Image button. Photoshop will automatically input that photo’s dimensions into the Crop tool’s Width, Height, and Resolution fields. All you have to do is crop the other image, and it will share the exact same specs as your ideal-size photo.

Figure 12.
Excerpted from The Adobe Photoshop CS3 Book for Digital Photographers by Scott Kelby. Copyright © 2008. Used with permission of Pearson Education, Inc., and New Riders.
This article was last modified on January 18, 2023
This article was first published on October 3, 2007
Commenting is easier and faster when you're logged in!

Recommended for you

Create Patterns With Adobe Capture CC
How do you create beauty? There’s the old fashioned way: First, create the...

How to Create Seamless Textures in Photoshop
Learn the simple solution for making any texture seamless.

CreativePro Tip of the Week: Previewing Graphic Styles in Illustrator
This CreativePro Tip of the Week onPreviewing Graphic Styles in Illustrator was...