
Create Custom Photo Layouts in Lightroom 3

In Lightroom 3, Adobe has given us better options for assembling images for printing. In particular, the custom package layout style lets you organize one or more images in a layout that you can print or save to a file. You can also save your design as a template to use anytime. In this article, I’ll explain the basics of working with the custom package layout style in Lightroom, some things to watch out for, and a couple of tricks for getting the most out of it.
Plan for Success
To organize images for printing in Lightroom, create a Collection (Library > New Collection) and fill it with the images you plan to print. Switch to the Print module and select your new collection from the Collections panel. The images in the collection now appear in the filmstrip view.
From the Layout Style, choose Custom Package. If any cells or images appear in the main display area, open the Cells panel and click Clear Layout to start from scratch.
Figure 1. Start with a collection of images and a blank design. Click the image to see a larger version.

The ways to specify a page size to print differ depending on whether you intend to send the image to a printer or to a file.
If you intend to output the image to a physical printer, click the Page Setup button in the bottom-left of the screen and select a paper size and orientation. Mac users will see a Page Setup and a Print Settings button; Windows users will have all the options accessible from the one Page Setup button.
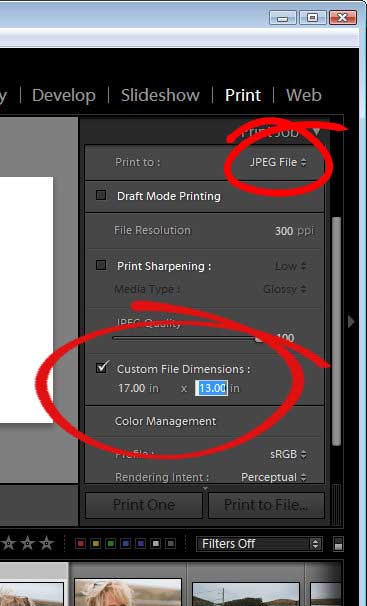
If you plan to print to a JPEG file, open the Print Job panel on the right of the screen and choose JPEG File from the Print to dropdown list. Enable the Custom File Dimensions checkbox and set the dimensions of the file you want to create.
Figure 2. Before you begin to print to a file, set the file size in the Print Job panel.
It’s important to set the page or file dimensions before you start because if you arrange the images first and then change the paper or file size, you may lose your arrangement and will have to reorganize everything to properly fit the new size.
To control the guides and information on the screen, click the Rulers, Grid & Guides panel and enable the Show Guides checkbox. You can select to view Rulers, Page Bleed, Page Grid, Image Cells, and Dimensions. Rulers and Page Grid are useful options, and I suggest you set Grid Snap to Grid so you can neatly line up images.
Figure 3. To help you layout the print job, configure the guides to show onscreen and the Grid Snap options.

Add Images to the Layout
To add an image to the layout, either drag and drop it from the filmstrip onto the layout or go to the Cells panel and click the size cell to add to the layout and then drag and drop your image into the cell.
To resize an image, regardless of how you added it to the layout, drag on its handles. If it resizes in proportion and you don’t want it to, go to the Cells panel and deselect Lock to Photo Aspect Ratio. This setting applies automatically to all images.
If the image is larger in one dimension than the cell it’s in, you can scroll the image within the cell by holding the Ctrl/Command key and drag on the image. The image will always fill one dimension of the cell, so a portrait orientation image placed in a landscape orientation cell will always fill it widthwise but can be scrolled vertically so you can choose what portion of the image you see.
Figure 4. To control what portion of an image displays in a cell, hold Control (Command) and drag on the image. Click the image to see a larger version.

Tip: There is no way to enlarge an image in a cell and drag in both dimensions to view only a portion of the image. If you need this functionality, return to the Develop module, crop the image to select only the area you want to print, and then return to the Print module and add the newly cropped image to the layout.
To replace one image with another, drag and drop the replacement image into the cell.
If you have positioned cells so the images overlap each other, you can alter their stacking order by right-clicking a cell and choosing either Send to Back, Send Backwards, Send Forwards, or Send to Front.
Click the Rotate to Fit option in the Image Settings panel if you need to rotate a landscape image to fit a portrait placeholder or vice versa.
Create a Background Image
To create a background image for your page, size a cell to fill the page’s printable area, place an image inside the cell, and right-click and choose Send to Back.
To place more photos on top of the background, add a cell using the Cells panel, drag it on top of the background image and then click the Close button for the new page to remove it.
Figure 5. When you place an image behind all the other images and size it as a full page, it appears as a page background. Click the image to see a larger version.

Work with Multiple Images
When you’re working with multiple images, such as a diptych or triptych, you can create same-size cells in a couple of ways. You can create one cell the size you want and then hold the Alt/Option key and click and drag a second copy of the cell away from the first. You can now drag and drop a different image into this cell.
You can also drag a cell of a preset size from the Cells panel. If the preset sizes don’t fit your needs, click the dropdown list to the right of one to change, choose Edit and create your own size cell to use.
Figure 6. To make cells of the same size, you can copy and paste one or set up your own custom sizes. Click the image to see a larger version.

Customize the Page
To change the page background color, open the Page panel, check the Page Background Color checkbox, and click on the color selector bar to the right. Be aware that the page background color will be used for photo borders also if you select this option in the Image Settings panel. If you want black photo borders, set the Page Background Color to this and check the Page Background Color checkbox. If you don’t enable the Page Background Color option in the Page panel, Photo Borders will be always be white regardless of the color you selected for the Page Background Color. However, there is a workaround for this problem–Inner Stroke–that I’ll get to shortly.
In the meantime, to add a photo border, go to the Image Settings panel, select the Photo Border checkbox, and adjust the width of the border. Note that Lightroom will add the border to the inside of the cell, reducing the overall size of the image.
Just below the Photo Border options are the Inner Stroke settings. The inner stroke sits around the very edge of the photo–inside any photo border–and it too eats into the image. You can select the color of the Inner Stroke, so if you want photo borders and you want these to be a specific color but you don’t want to also set a page background color, can apply an Inner Stroke instead to get the desired effect. The Photo Border and Inner Stroke settings apply to all images on the page; you can’t customize them for individual images.
When you have selected a page background color and are outputting to a physical printer, you may see a white border around the edge of the page. This represents the nonprinting area on the page, which differs from printer to printer and appears when your printer can’t make borderless prints. If you later switch to printing to a JPEG image or to a printer that can print borderless, this white border disappears.
Figure 7. This example has a dark grey page background color and a black Inner Stroke around the photos. Click the image to see a larger version.

Identity Plates
One custom feature you can add to your print layout is an identity plate. It can contain text or a graphic and be anywhere on the page, including over the top of an image. To add an identity plate to your page, open the Page panel and select the Identity Plate checkbox. Just below this is a box with a dropdown arrow; click it to select an identity plate if you’ve created one already.
To create a new text identity plate, open the Page panel, select the Identity Plate checkbox, and use the box with a dropdown arrow to navigate to Edit… The Identity Plate Editor dialog box will appear. Select the Use a Styled Text Identity Plate radio button and type the text into the box. Select all or portions of the text to format it with your choice of font, font size, and color. When you’re done, click the Custom dropdown list and choose Save As and type a name for this identity plate. Click Ok and it will be applied to the design.
Back in the Page panel, you can click Override Color to replace the color of text in an identity plate with a different color text. This means you can create a black text identity plate to use on a page with a light background but overwrite its color and select white when the background is dark.
Figure 8. For this example, I added an existing identity plates, sized it, changed and its color to white. Click the image to see a larger version.

This is also the place to adjust the opacity and scale of an identity plate using the Opacity and Scale sliders. You can also click and drag on the identity plate on the screen to resize it or move it.
Choosing the Render on Every Image checkbox makes the identity plate appear in the middle of every image on a single or multiple page layout– typically not what you want.
If you deselect the Render on Every Image option, Lightroom places the identity plate only on the first page of a multi-page layout. Therefore, if you want to use the identity plate for every page you print, it’s best to create only single page layouts.
Use a Custom Page Background
One way to add interesting borders and fancy text effects to your prints is to use a program like Photoshop to create a background, then save it in a format Lightroom can read, such as JPG, TIF, BMP, PNG, or GIF. You can make the image an Identity Plate by choosing Use a Graphical Identity Plate in the Identity Plate editor.
If you want the design to fill the entire page, make your Photoshop image the same size as the page, or make it the same size ratio and orientation as the page in Lightroom, then scale it appropriately.
For the Photoshop image to appear behind the image as a border, make sure to select the Render Behind Image checkbox.
Figure 9. Here the image I saved out of Photoshop as a PNG file has become a graphic identity plate that creates an image border. Click the image to see a larger version.

Watermark Images
You can add watermarks to your images via the Page panel’s Watermarking option. Select the Watermarking checkbox and click the dropdown list opposite to select a previously created watermark, or click Edit Watermarks to make your own. Unlike an Identity Plate, the placement of the watermark on an image is part of the watermark design itself and is not controlled by any option in the Print module.
Print Your Layout
When you’ve finished fine-tuning the layout, open the Print Job panel and check that Print to: is set to the desired output form, either Printer or JPEG File. For quick prints and contact sheets, Draft Mode Printing is a good choice. Otherwise, leave Draft Mode Printing disabled and select the desired Print Resolution (File Resolution if you are printing to a file) and Sharpening amount. If you’re outputting to a printer, select the media type you’ll be printing on and the Color Management options and click Print.
If you choose to print to a JPEG File, you can select the JPEG quality, File Dimensions (although you should have set this already), and Color Profile. Then click Print to File.
Save a Template
Now that you’ve designed a layout you like, save it as a printing template to use again. First, click the plus sign opposite the Template Browser panel name on the left of the screen and type a name for your template. Click Create and Lightroom will add the new template to the preset list. One handy feature of templates is that paper size information is stored with them. So, if Print to: Printer is enabled in the Print Job panel–or if you have Custom File Dimensions disabled for printing to a JPEG file–you won’t have to set this up each time.
Figure 10. Save your designs as templates so you can use them anytime in future. Click the image to see a larger version.

The Lightroom Print module has a lot of features for customizing your prints, and this column covers just the basics of creating, printing, and saving a print template. Play around and you’ll find that you can use many of these options with the Single Image/Contact Sheet and Picture Package Layout Styles, too.
This article was last modified on January 6, 2023
This article was first published on June 9, 2011
Commenting is easier and faster when you're logged in!

Recommended for you
Scanning Around with Gene: The Joke's on You
Before Hollywood brats got “Punk’d,” and before political oppo...
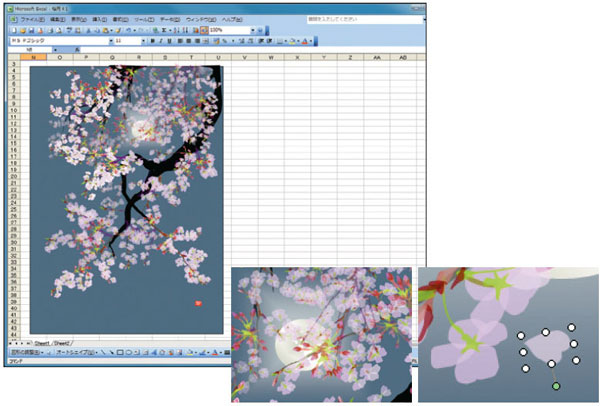
Painting with…Excel?
Probably not too many folks are familiar with the term “golden hammer,...

The CreativePro Guide to Graphics File Formats
Learn about graphics file formats, their pros and cons, and how to choose which...