

In Part 1 of this tutorial, I showed you how to turn a plain gray box into a realistic-looking photo frame in silver, gold, or wood. You also learned how to place a photo into the frame and play with perspective so that the framed image looks like it’s skewed to the right or the left.
As you know if you followed along with Part 1, it takes quite a few steps to get to the final effect. But here’s the good news: If you record the process as a Photoshop Action and make that into a Droplet, you can apply that droplet to another image and generate six framed versions of the new image with a single click. It’s the power of automation.
Step 1: Prepare the documents
You’ve seen how you can create a picture frame in three different finishes, facing in two different directions, and fill it with a photograph as a Smart Object that will face both ways. Now it’s time to make an action that will let you automatically generate all six different versions of the frame by clicking only one button.
Start with only your Frame document open in Photoshop. Make sure that the only visible layers are the background, the shadow, the gold frame, and the Smart Object photograph behind it. All the other layers should be hidden.

Step 2: Open a photograph
Pick a photograph — any photograph. Seriously, it doesn’t matter what you use here as long as it’s in landscape proportions, to match your frame. This one’s just for recording purposes. Make sure this is the front-most document, in front of the Frame file.

Step 3: Start the Action
Click the pop-up menu in the corner of the Actions panel (choose View > Actions if it isn’t visible) and choose New Action. Give it a name and assign a Function Key trigger to it if you like. If you do, then you’ll be able to trigger it with the keystroke you define here.
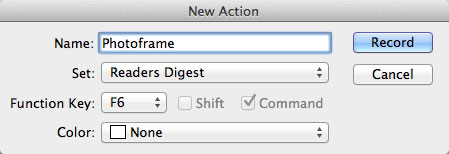
Photoshop will record everything you do from this point as an Action.
Step 4: Size the image
To make certain that the new photo is the right size to match the Smart Object, choose File > Automate > Fit Image and set the size of your Smart Object image here. (You did make a note of the size last time around, right?) Click OK.

Step 5: Record the Action
Take a deep breath, because you’re going to have to concentrate now. You’ll have to record every single step of the process, in one go. But there’s no time limit, so you don’t have to rush. (Note that Photoshop plays back this recording far faster than you could ever perform each bit of it.)
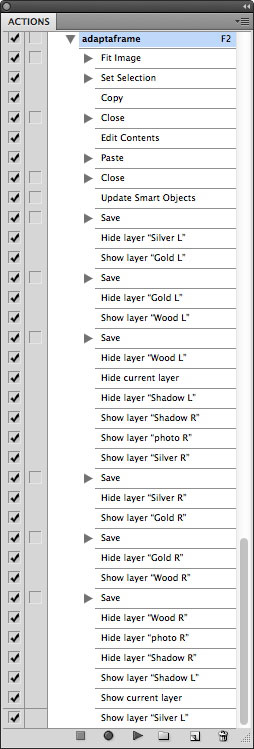
First, Select All and Copy the replacement photo image, now that it’s the right size. Close the window but don’t Save — you don’t want to overwrite the original with the resized version. Your frame document should now be the only one visible. Double-click either Smart Object layer and Paste your image into the document that opens; it should fit exactly. Close the window, clicking OK when you’re asked if you want to Save it. You should now see the new image in perspective, inside one of your frames.
Choose Save As and save the document as a JPEG file, giving it an appropriate name, such as “Frame Left Gold”. Then hide the gold layer and reveal the silver layer, and choose Save As once more. Repeat with the Wood layer, and Save As again.
Hide all the layers facing in that direction, and make visible a frame layer facing the other way, together with its shadow and Smart Object picture. Save As once more, then reveal in turn the other two frame layers facing this way, using Save As each time.
When you’ve finished, press the Stop button at the bottom of the Action panel. You can now test the Action: Open a new photo and press the hotkey you set up when you created the Action. If anything goes wrong, you can either edit the Action or, easier, record the whole thing again.
Step 6: Make the droplet
Once the Action is working properly, you can make the Droplet. Choose File > Automate > Make Droplet, and you’ll see a dialog asking you to choose the Action you want to use. Select the one you’ve just created. Save the Droplet wherever you like on your computer.
Click the image below to see a larger version:

Step 7: Try it out
This is the Droplet icon you’ll see on your computer:
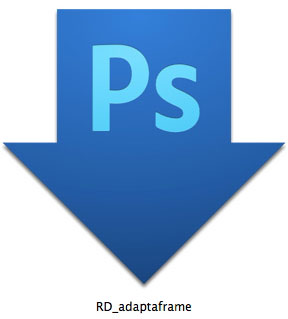
It’s actually a Photoshop file that triggers the Action. You may need to double-click it before the first use in order to make computer to associate it with Photoshop properly.
To apply the Droplet, open your frame document in Photoshop, then switch out of Photoshop and drag any image file from your desktop onto the Droplet. In just a couple of seconds, you’ll have six frames filled with that image. Success!

This article was last modified on January 6, 2023
This article was first published on February 6, 2012
Commenting is easier and faster when you're logged in!

Recommended for you

Out of Gamut: Photoshop, Previsualization, and Print Prediction
In my last column, I addressed the question, “How can I get Photoshop to m...

How to Make a Portrait out of Type in Photoshop
When a person’s image is well-known, it can be recognized even under sever...

How to Make Layer Comps in Photoshop
Learn how to create combinations of layers and items in Photoshop called Layer C...