
Professional portrait photographers often use muslin or other textured fabric as a background in portraits. But if you don’t have these fabrics when you shoot your subject, or if someone else gives you a photo with a background you don’t like, you’re not out of luck. Instead, you can create many different backgrounds in Adobe Photoshop CS3 and CS4.
Step 1
Begin by opening a photo of a person with a background you want to extract. (For my example, I used an iStockphoto.com image by Tyler Stalman.)

Press Cmd-J (PC: Ctrl-J) to duplicate the Background layer. Name the duplicate layer Layer 1. Keep the original Background layer as is in case you make a mistake along the way.
Step 2
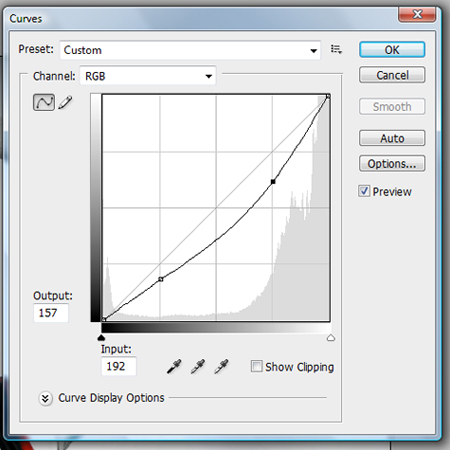
My example needs more contrast between the subject and the background. To increase the contrast by darkening the subject, select Layer 1, go to Image > Adjustments > Curves, and change the Output to 157 and Input to 192.
Step 3
Click the Eye icon next to the Background layer so it’s invisible, then select Layer 1 and choose the Quick Selection Tool.

Step 4
Click-and-drag around the subject. When the background is somewhat simple, this doesn’t take too long. However, the Quick Selection Tool isn’t perfect. When it selects too much, press Option (PC: Alt) to turn the cursor into a subtract sign, then click-and-drag over an area to remove it from the selection. You can also use the Lasso Selection Tool to manually remove (press Option [PC: Alt]) or add to (press Shift) the selection.
To zoom in and zoom out as you select the subject, press the Cmd (PC: Ctrl) and the plus or minus sign. Press the spacebar and click-and-drag to move around the canvas while zoomed in.
After you’re done, the selection should look something like this:

Step 5
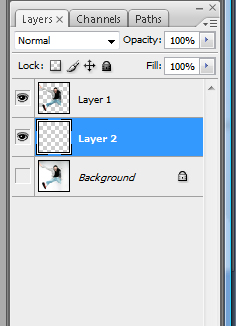
Click the Create New Layer icon on the bottom of the Layers palette to create a new layer, which Photoshop names Layer 2. Click-and-drag this layer below Layer 1 but above the Background layer.
Click the toolbar’s Eyedropper tool and sample a color from the subject, then click the Gradient tool and click-and-drag across the canvas to add a gradient to Layer 2.

Step 6
Ctrl-click Layer 1 to select its pixels. Go to Select > Inverse, which selects the area around the subject, and then go to Select > Modify > Feather and set it to 1 pixel. Making sure Layer 1 is selected, press Delete (PC: Backspace).

Step 7
Now let’s create another background that looks like a muslin backdrop you’d see in a photographer’s studio. Click the Eye icon next to Layer 2 so that it’s invisible. Click the Create New Layer icon on the bottom of the Layers palette to create a new Layer 3 and drag it below Layer 2.

Step 8
With the new Layer 3 selected in the Layers palette, set the Foreground color to something that works well with your subject. Press Option-Delete (PC: Alt-Backspace) to fill the layer with the color.
Go to Filter > Render > Clouds.

Step 9
With Layer 3 selected, press Cmd-J (PC: Ctrl-K) to duplicate it. Now select the new layer (called Layer 3 copy), switch to the Move Tool, and check Show Transform Controls in the Options palette. Hover over a corner of the canvas and the cursor should turn into a double-sided arrow. Click and drag to rotate it 90 degrees so it’s sideways, stretching the clouds a little bit so they cover the canvas. Stay in Layer 3 copy change its Layer Blending Mode to Color Burn.

Step 10
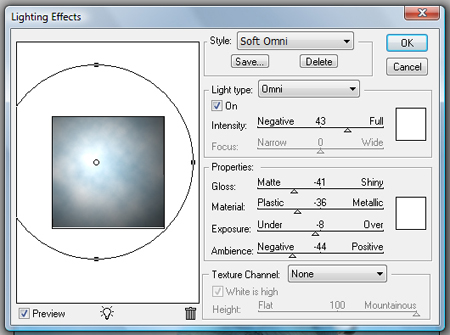
Go to Filter > Render > Lighting Effects and change the lighting Style to Soft Omni and the settings to those shown below:
Step 11
The end result is a professional-looking muslin background.

This article was last modified on January 5, 2023
This article was first published on December 1, 2008
Commenting is easier and faster when you're logged in!

Recommended for you

How an Accordion Controls Photoshop’s Levels Command
The following is an excerpt from Speaking Photoshop CC by Dave Bate. Reprinted,...

Organizing Illustrator Files With Layers
We’ve all done it. We’ve all been so involved in the creative process that we do...

PhotoSpin Expands Their Lifestyle Collection With New Images By Yuri Arcurs
PhotoSpin, www.photospin.com, a leading royalty free stock subscription company...