Create Rich Media with Acrobat and Flash
Courtesy of:

Acrobat 9 brings Flash and Acrobat together in very interesting ways—no Flash player required. All Acrobat 9 and Adobe Reader versions use an internal Flash player, embedded as part of the program. Updates? No problem. The players update automatically on the same schedule as the external Flash player.
Comparing Program Capabilities
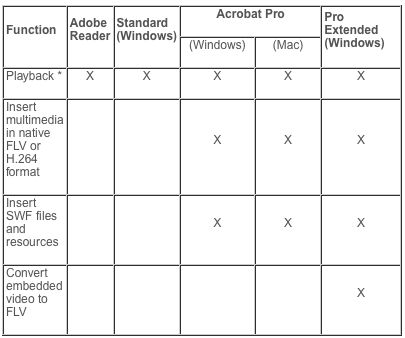
Although Adobe Reader 9 can play back virtually all media embedded in a PDF file, only Acrobat 9 Pro Extended (Windows) can format and embed a SWF file as a Flash video file (FLV).
Functionality for manipulating multimedia varies according to the Acrobat version. To keep things straight, refer to the matrix shown in Table 1.
Table 1: Program version functionality

* Video formats for playback in supported players: Windows Built-in Player, Windows Media Player, QuickTime (Win/Mac), Flash (Win/Mac), Atmosphere, Windows Real One Player. Mac does not support Windows Media Player.
Note: You can embed media files directly into PDF documents within Acrobat, or add the media to a source file—such as a Word document—and then convert the file (Windows). Read more in my previous article, “From Office to PDF – Wow.”
Adobe Reader 9 can play back any content developed in Adobe Flash and different types of video files that are H.264 compliant. H.264 is an MPEG video codec (MPEG-4 part 10) that produces high-quality video at compact file sizes.
Inserting Content in Acrobat
Embed or link to a movie file from a PDF document using Acrobat 9 Pro or Pro Extended. An embedded movie integrates into the PDF document itself, while a linked movie uses a link from the PDF to its source file. An embedded movie doesn’t require any accessory files, although the PDF document is larger. Use a PDF file stored online linked to an FLV file (also stored online) for streaming and faster display.
To insert a FLV (Flash video) movie file in a PDF document, follow these steps:
1. Open the PDF file you want to use, and choose Tools > Multimedia > Show Multimedia Toolbar (Figure 1). Select the Flash tool on the Multimedia toolbar and draw a marquee or double-click the page to open the Insert Flash dialog.
Figure 1: Choose commands from the Multimedia toolbar.

2. Click Browse to locate and select the file you want to use, shown in the File field. Rather than embed the media, you can create a link to it by typing a URL referencing a video file or streaming media file. URL options include HTTP, HTTPS and RTMP. HTTP and HTTPS servers support FLV files, as well as H.264-compliant MOV and MP4 files. Use RTMP to serve FLV and H.264-compliant media from Flash Media Servers (FMS).
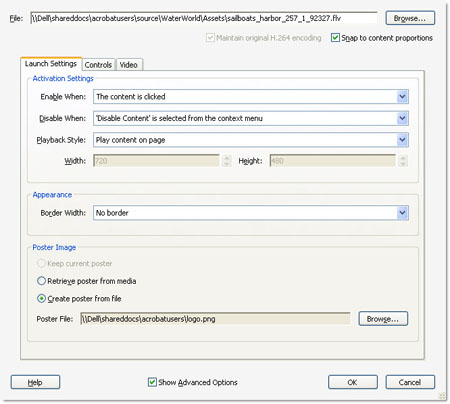
3. Select the Show Advanced Options check box to display additional settings. Configure the appearance and behavior of the video in the dialog:
On the Launch Settings tab, choose options for initial display of the movie. Start and stop the movie using Activation Settings and define whether to use a fixed page location or a floating window. Select a border if you like, and specify a Poster Image from a frame of the movie or a separate file (Figure 2).
Figure 2: Specify movie display options. Click the figure to see a larger version.

On the Controls tab, specify the playback controls. Choose a set of controls from the Skin pop-up menu, and select its color and opacity. To hide controls, leave the Auto-hide controls check box selected or deselect the checkbox for persistent controls.
Note: Other tabs may display, depending on the media type. For example, the Flash tab—that displays when you insert SWF files, offers options to use additional content. Add ActionScript variables in the Flash Vars field; replace the Acrobat context menu with that of the original SWF file by selecting Pass Context Menu Click to Flash Movie. The Video tab, displayed when the inserted content is a non-FLV movie, offers options to trim the video and use chapter points to control actions.
4. Click OK to close the dialog and insert the FLV video on the page (Figure 3).
Figure 3: FLV movie and controls on page.

5. If you want to make adjustments, click the movie with the Select Object tool to activate the frame; drag the movie to reposition it on the page, or drag a handle to resize the movie’s play area. The adjustments apply to SWF, FLV, and other movies and sound files.
Using a Movie as a Control Interface
Suppose your company sells a line of home coffee grinders. Wouldn’t it be interesting if visitors to your website could open a PDF file to watch a movie of the grinder in action, see an illustrated model of the grinding blades, check out a map of the Guatemala highlands where some of your beans come from, and access a PDF form to order said coffee grinder? I think it would, and in Acrobat 9 Pro Extended, you can do all those things.
Insert chapter points. You don’t have to configure a video in an external application and then import it into Acrobat in order to use frame markers from which you can launch an action. Use these markers, called chapter points, to initiate actions ranging from internal program commands like Print or Save, to opening web pages or displaying a map view.
Follow these steps to define chapter points:
1. Embed the video file, and choose Video from the Advanced options tabs. Open the video preview dialog and drag the marker above the preview slider to display the frame where you want to add the chapter point.
Figure 4: Define the frame to receive the chapter point.

2.Click the Chapter Points plus sign to add the notation. Add additional chapter points as necessary. At this point, you can’t assign any actions, as the movie has to be configured within Acrobat first.
3. Click OK to close the dialog box and insert the movie.
Associate actions with chapter points. Once the movie is embedded, transcoded and otherwise configured, you can return to the dialog box and assign the actions. Follow these steps:
1. Double-click the movie with the Select Object tool from the Advanced Editing toolbar, or the Movie tool on the Multimedia toolbar to open the Edit Video dialog box. The dialog box contains the same settings as those available for inserting the video, with the exception of selecting the video file.
2. Click the Video tab to display the chapter points specified as part of the configuration settings (Figure 5).
Figure 5: List of specified chapter points.

Tip: In the Edit Video mode, you can click the minus sign to remove an existing chapter point, but can’t add additional chapter points.
3. Select a chapter point and then click Actions to open the Chapter Point Actions dialog box. Click the Select Action dropdown arrow and choose an action; click Add.
Figure 6: Add and configure actions for a chapter point.

4. Choose settings as required by the selected action. Click OK to close the Actions dialog box, and return to the Edit Video dialog box.
5. Repeat for any remaining chapter points.
6. Activate the movie in the PDF file and watch the action. Depending on the actions you inserted, you may see dialog boxes, such as permission to launch a file (Figure 7).
Figure 7: Actions may require permissions. Click the figure to see a larger version.

The chapter points in the finished product guide the display and function of your PDF file. For example, in Figure 8, once the poster image is clicked, the movie starts to play; at its chapter points, the embedded actions:
Make a field visible (showing the message)
Hide the field
Launch acrobatusers.com
Figure 8: Actions initiate at chapter point frames.

Click to check out the demo in my downloadable sample file.
Quick Conversions
If you want to use a SWF file in Acrobat as a single item (rather than embedded into another document), the easiest way to convert the file is to drag it from its folder location to the Acrobat interface. The Insert Flash dialog box opens, with the SWF file identified as the content. Click the Show Advanced Options checkbox to make adjustments on the Launch Settings, Flash and Resources tabs. Click OK to convert to FLV, and save the movie as a PDF file.
You can start any multimedia insertion the same way—simply drag the file from its folder location to an open PDF document to embed the file, or drop it into a blank Acrobat window to convert the file without surrounding content.


I wonder why there’s no Acrobat Pro 9 Extended version for Mac? Seems like Adobe would have the resources to develop it alongside Windows as they do most other apps. Maybe some technology is not available on Mac that Windows has, or another major blocking issue? Or, most likely, a lame business decision.