
Create "Star Wars" Scrolling Text in Flash

Adobe Flash CS4 Professional introduced two important 3D tools, the 3D Translation and 3D Rotation Tools, which give you new skewing and perspective possibilities.
Recently, I took advantage of these possibilities to create a presentation introduction that mimicked the scrolling yellow text that begins the Star Wars movies. Here’s how to create this effect yourself.
Step 1: Gather the Assets
For this tutorial, you need only a background, a text block within a movie clip, and guides to aid the design process.
I created a starry background in Photoshop using filters and curves, but you can use any photograph of the night sky, or even a solid background.
I used the typeface Trade Gothic for my text block, the same one used in the films. The text block must reside within a movie clip because Flash CS4 Professional’s 3D tools work only with movie clips. My text block also extends well beyond the stage at this point.
The final element is the guides, which help keep the scrolling text on course. You can angle the guides as you like; mine are angled 20 degrees in either direction, and I found that 30 degrees was too steep to be legible. The vanishing point will be where the guides intersect. I used Flash’s Align panel to align the guides to each other and center them in the stage with the panel’s To Stage button.
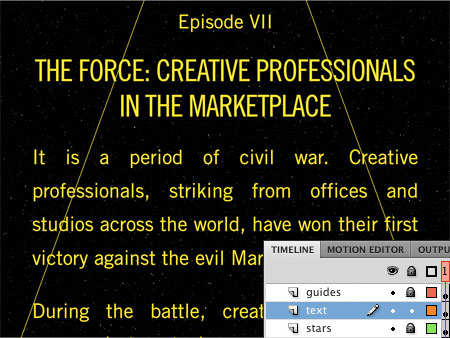
Place each of these elements on Frame 1 of their own layer and lock the guide and background layers (Figure 1).
Figure 1. In the beginning, each element (guides, text, and stars) resides on Frame 1 of its own layer (inset).
Step 2: Use the 3D Rotation Tool to Add Perspective
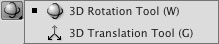
The 3D Rotation Tool (Figure 2a) is a complex tool that does four 3D effects, depending on which axis control you manipulate:
• Green axis control = rotates objects around the y-axis
• Red axis control = rotates objects around the x-axis
• Blue axis control = rotates objects around the z-axis
• Orange axis control = allows free rotation around all axes simultaneously
Figure 2a. Flash CS4 Professional’s 3D toolset.
The Star Wars text effect creates perspective along the horizontal x-axis, so you can use the red or orange control to add perspective until the movie clip’s edges align with your guides (Figure 2b). Drag either end of the red axis control around the center point, or drag any point on the orange axis control straight up.
Figure 2b. Rotating the movie clip with the 3D Rotation Tool. Note the overlay with four colored axis controls.
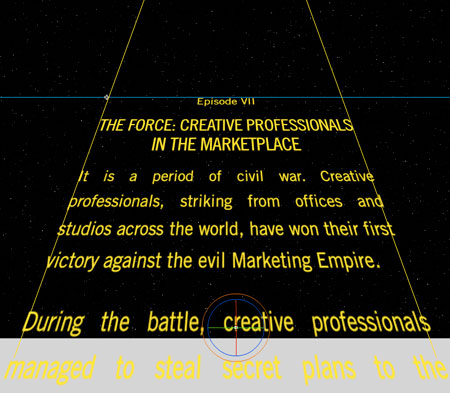
Note that Shift-dragging with the red axis control will snap the control to 45-degree angles, but Shift-dragging the orange axis control has no effect. So if you do use the orange axis control, be careful not to skew the text left or right.
If you want your text’s edges to lie perfectly along your guides after perspective is added, find the points where the sides of the movie clip intersect with your guides and then move the axis controls’ center point so it aligns horizontally with those points. Because the 3D Rotation tool pivots everything around the center point, doing this will keep those points aligned with the guides even after perspective has been added.
Step 3: Create Movement with the 3D Translation Tool
At this point, your text should have the right amount of perspective to align with the guides in 3D space and behave as though it’s in a three-dimensional space. The movie clip will conform to the stage’s Perspective Angle, a property that dictates the angle of view. A higher Perspective Angle will make all 3D objects on the stage appear closer to the viewer. To change the Perspective Angle, select the 3D movie clip and change the Perspective Angle setting, which is in the 3D Position and View section of the Properties panel. The default setting of 55 degrees worked for me, but you may want to tweak your own setting depending on your typeface.
3D movie clips in Flash Professional CS4 also have Vanishing Point settings, found with the Perspective Angle setting, and will recede in depth toward the Vanishing Point coordinates. If your guides are long enough to visually intersect at the vanishing point, you can use the intersection coordinates for your Vanishing Point settings and precisely control the vanishing point’s position. As with the Perspective Angle, the Vanishing Point settings are global settings that affect all 3D movie clips.
Move the clip with the Selection or Free Transform Tools and it will distort and “revolve” around the vanishing point, basically maintaining its z-axis depth while changing its position on the y-axis. To create the illusion of receding into space, the clip must change its z-axis depth and maintain its y-axis position. You can do this with the 3D Translation Tool.
Selecting the 3D Translation Tool will reveal an overlay on the 3D movie clip consisting of two arrows that control the x-axis and y-axis, and of a blue center point that controls the z-axis. You can’t handle the clip itself with the 3D Translation Tool, just the arrows and center point. Drag either arrow to move the clip along the x-axis or y-axis and to duplicate the Selection or Free Transform Tools’ behavior.
Figure 3a. Moving the movie clip with the 3D Translation Tool. Note the overlay with two colored arrows and the blue z-axis control point.
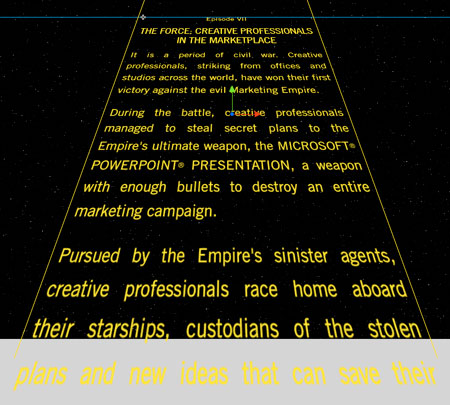
To create the Star Wars text effect, click and drag the blue center point. The 3D movie clip’s z-axis value will change and the text will appear to recede in 3D space towards the vanishing point. You can do the same thing by changing the Z value of the 3D center point in the Transform panel. These 3D properties can be tweened, so now you can create the animation:
A. Create a span of frames as needed, depending on the desired duration and frame rate.
B. Choose Insert > Motion Tween or right-click the frame span and select Create Motion Tween.
C. Move the playhead to the first frame and use the 3D Translation Tool to drag the z-axis control point down until the text is just below the stage.
D. Move the playhead to the last frame and use the 3D Translation Tool in the same way, dragging up until the text has receded beyond the top of the stage.
Note that these directions are based on the object-based tweening model that’s new to Flash CS4 Professional. You may run into two difficulties with this technique:
• Even if the text aligns with the guides at the beginning, they may drift away from them (or beyond them) when the 3D translation is created. This will happen if you didn’t align the text with the guides perfectly. Imperfections are magnified along with the change in depth. If this bothers you, work with the movie clip or guides to align them exactly.
• Large objects such as this movie clip get much larger once they’re translated to 3D, and as you drag the 3D movie clip around you may find that the control overlay disappears or the clip boundaries show up in weird places. This is because elements are literally going off the pasteboard, and it’s common when dealing with huge changes in position or depth. If this happens, use the Transform panel to control the clip.
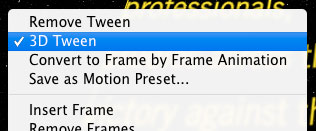
Figure 3b. If you right-click the frame span, you’ll notice that Flash CS4 Professional has tagged the tween as a 3D Tween.
At this point, you can polish the animation with an opacity tween near the end of the frame span, which fades out the text as in the Star Wars movies. You can also add a mask layer to hide the text at a certain point, or simply let the text scroll beyond the stage. If it appears that your text is scrolling too fast in one part of the movie and too slow in another, select the tween by clicking on the frame span and change the Ease setting to ease the animation either in or out.
My completed animation is Figure 4 below. You can post links to yours by clicking the Comments button below.
Figure 4. Click the screengrab below to see the text scroll. You’ll need to download the Flash Player 10 to view this Flash movie properly.

This article was last modified on January 5, 2023
This article was first published on December 22, 2008
Commenting is easier and faster when you're logged in!

Recommended for you

Update of Linotype's Premiere Collection: Linotype Gold Edition 1.7.1
Linotype has just released an update of Gold Edition 1.7, its premiere collectio...
PaperSpecs Gives A Gift That’s All Heart
Press release Palo Alto, California – February 4, 2013 – “In this era of over co...
How to Import Images as Photoshop Layers
Load multiple image files as separate layers into a single Photoshop file!