

If you always do everything perfectly the first time and never change your mind, then you won’t need this chapter. Of course things often go wrong. We change our minds, and the project often changes in direction; but nothing challenges you more to think creatively than having to fix what went wrong.
There’s rarely only one right way to do anything in Photoshop. If you gave a group of Photoshop experts a set of problems to solve, they’d probably come up with completely different solutions. I’ll often solve a similar problem differently from one day to the next.
So when things don’t go as planned, try to focus on each problem as a creative challenge. If you can make this Zen adjustment of attitude, in which you are always in pursuit of finding what kinds of things are possible, then you might even enjoy the process of clean-up and correction.
 Detail of before and after unifying color and value, cleaning up blurred and double-image, and patching up image holes.
 Detail of before (left) and after (right) enlarging Jeff’s head and integrating it with the remaining image.
In this chapter, I’ll be resolving a range of common clean-up issues (primarily on images detailed in other chapters) regarding layers, adjustment layers, and Layer Masks. Although the structure of the chapter might give the illusion that I progress sequentially throughout a project, this is far from the truth. Much of the time I jump around from issue to issue and often will return to something and fix a problem that I thought I had resolved earlier.
Again, I want to remind you not to focus on the specifics of these projects or how I solved a certain set of problems. The most important thing is for you to envision how finding solutions can be an integral part of your creative process.
Last Minute Scaling
I strongly recommend that you avoid scaling anything larger in Photoshop; when you scale things up, they can become fuzzy as a result of Photoshop guessing how to add pixels. However, the practical reality is that you can usually get away with scaling things up a little.
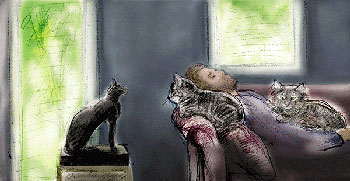
This image of “Jeff and the Cats” was begun by compositing three drawings in Photoshop (see Chapter 1, “Compositing and the Creative Process,” for details). I then created what I thought was a final colored version of the image using techniques discussed in Chapter 3, “Improvising with Color Using Layers.”
While looking at a proof of this image, someone pointed out to me that Jeff’s head was too small, or the cats were too big (see figure 1).
 Figure 1: In this original final version, Jeff’s head was too small.
So I decided to scale up Jeff’s head. Because the file was multi-layered at this point, Jeff’s head actually existed on multiple layers. You can save a flattened version of a layered file in TIFF format and then open and scale the flat version.
Alternatively you can scale a flat copy of a layered file. Make your selection (or Edit> Select All) and then choose Edit> Copy Merged (Command+Shift+C for Mac or Ctrl+Shift+C for Windows). To place this copy into a new layer, click the layer you want it to be pasted above and paste it. For Jeff’s head I used the Lasso tool to select the area around the head, set the Feathering to 3, and chose Copy Merged.
I then clicked on the top layer in the Layers palette and pasted this merged copy. The new layer with just Jeff’s head was now the top-most layer (see figure 2).
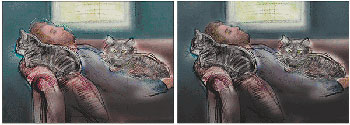 Figure 2: After selecting and copying Jeff’s head, I pasted it, which placed the head into its own layer.
One way to scale the contents of a layer, if it’s not the active layer, is to click it in the Layers palette and then choose the Free Transform command (Command+T for Mac or Ctrl+T for Windows). You can adjust the size of the active transformation from any handle (to scale up a layer proportionately, grab a corner handle, and drag outward while holding the Shift key down). To rotate the selection, move your cursor outside of a corner until you see the Rotate icon and then click-drag to rotate.
I used the Free Transform command and then grabbed the upper-left corner to enlarge Jeff’s head slightly, while keeping it attached to his neck on the lower right (see figure 3).
 Figure 3: Scaling Jeff’s head a little bit larger using the Free Transform command.
If you need to, you can create a Layer Mask for this scaled layer and soften the transition between the enlarged area and the rest of the image on the layer below. To blend Jeff’s new head into the image, I created a Layer Mask for the Head layer by clicking the Layer Mask icon in the Layers palette. I then used the Paintbrush tool to paint into the Layer Mask to hide portions of the layer I didn’t want using black and using white (or the eraser if white is the Background color) to make corrections to my mask (see figure 4).
 Figure 4: Jeff’s head after scaling, the mask for the Head layer (shown as an overlay using the key), and the final head shown cropped.
I saved a copy of the final version as a flattened TIFF file for easy placement into a page layout program.
This article was last modified on January 3, 2023
This article was first published on December 13, 2002
Commenting is easier and faster when you're logged in!

Recommended for you

10 Essential Tips for Adobe Camera Raw
Adobe Camera Raw is an incredibly powerful and flexible tool for applying adjust...
Top New Features in Photoshop
A little over a week ago, Adobe rolled out updates for Photoshop, Muse, and the...

Choosing Which Graphic Design Program to Use
One of the things a lot of graphic designer struggle with is what tool to use in...