


© 2011 Pearson Education, Inc. All rights reserved.
One of the most impressive aspects of the interactive features introduced in InDesign CS5 is the way it visually resembles the way I work in Flash. Being a Flash developer for nearly 10 years, I construct many of my projects using multi-frame movies clips, animations, buttons, videos, and hyperlinked text.
Over the past few years, much of my Flash work has existing solely in code, controlling animations, movie clips, sprites, and video with pure ActionScript (the code used to control Flash interactivity). While this is a fast and efficient way to develop Flash experiences, it is not a very visual way to work. This can slow down my creative process, because I have to constantly publish my work to see what it looks like.
With the addition of such features as multi-state objects and the Animations Panel, among others, InDesign allows me to design interactive content in much the same way I would if I were coding it in Flash. What’s more, I feel like I can now “see” my interactive process. I’m really excited about the possibilities being opened up with InDesign CS5, which inspired me to develop the video series Creating Interactive Documents, as well as this article.
NOTE: The examples and video excerpts are excerpted from the video workbook series Create Interactive Documents, available from Peachpit Press.
Cross-Platform and Cross Media
The first interactive capabilities of InDesign did not begin in CS5. Earlier versions of InDesign contained interactive features that carried over to PDF files, including buttons, bookmarks, and hyperlinks. InDesign CS4 gave us the first version of the SWF export feature (the file format that Flash and Catalyst publish to), which supported hyperlinks and buttons. This meant that you could design a document in InDesign, and then print it, publish to PDF, or publish to SWF—all from the same document! Given that both Adobe Reader and Flash Player exist on multiple operating systems (both desktop and mobile devices), this makes InDesign the premiere design tool for a cross-media design and deployment.
Recent announcements by Adobe also show InDesign as the center of its new Digital Publishing Magazine Workflow, which will allow designers to publish their InDesign documents to Apple iOS devices (iPhone, iPad, and iPod Touch). The conversation also includes plans to support for Google’s Android and possibly HP’s webOS platform as well.
These are truly exciting times for designers, and InDesign is sitting at the heart of the possibilities.
Cross-Media Interactivity
One of the most powerful aspects of the InDesign workflow is the ability to develop your interactive experience independent of the publishing medium. This allows you to design your document in your existing workflow, then add the interactive elements that help you tell your story. On the back end, InDesign will create the necessary Flash or PDF programming, depending on which you choose during export. And of course, all of the print fidelity is still preserved, so your document can still go to press or be made available for on-demand printing.
When adding interactivity, InDesign will give you indications when certain interactive elements are only available for PDF or SWF. As we continue, we’ll see evidence of this when setting up a table of contents or assigning actions to buttons.
Automated Interactivity
InDesign contains many features that help you manage your document’s content. The Index and Table of Content features are two examples. The Index panel allows you to tag items for inclusion into the document’s index. As you design your content, select a word or phrase, and click the Add New Index Entry button in the Index panel. InDesign will keep track of that entry, and include it in an alphabetized listing when you generate the index for your document.
When you are finished designing your content, choose the Generate Index button at the bottom of the Index panel, and InDesign will create a text-loaded cursor with the document’s full index, ready to be added to your document. When exporting your document to PDF, InDesign will make the Index numbers clickable to the corresponding PDF page where that phrase appears.
The Table of Contents (TOC) feature actually builds content based on the paragraph styles applied in your document. Start a TOC for your document by choosing Layout > Table of Contents. This will bring up a dialog box where you can assign specific Paragraph Styles to be included in your TOC (see Figure 1).
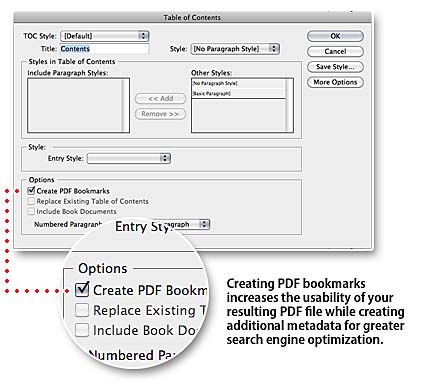
In the bottom left, notice a checkbox allowing you to Create PDF Bookmarks. After you finish assigning your styles for inclusion, click OK, and InDesign will create a text-loaded cursor with the text that appears in each applied style and the corresponding page number. When exporting your document, InDesign will create PDF bookmarks in the document in addition to creating a hyperlink of each TOC item to its corresponding page.
InDesign also has a feature called Nested Styles, where we can nest a character style into a paragraph style under certain circumstances. This can be a very powerful tool for letting InDesign automatically style your document based on its structure. We’re going to use this feature to add one more element into our TOC:
1. Create a paragraph style for the TOC and name it TOC Body, which includes tab stop positioning.
2. Create a Character Style, named Link, that colors the text differently form the body style, and add an underline.
3. Because InDesign always places the text, then a tab, then the page number in the TOC text it generates, lock onto that to create a nested style. This will allow us to have InDesign color and underline the TOC labels for our users, giving them a visual cue, in both Adobe Reader and Flash Player that they can click on the TOC listings.
4. Edit the paragraph style TOC Body and go to Drop Caps and Nested Styles. Under the Nested Styles section, we want to set the Link style up to 1 tab character, which will, in turn, add the link style to the TOC panels up until it reaches the first tab character.
Buttons and Actions
Though InDesign introduced a button tool a few versions back, InDesign CS5 improves on this capability with the introduction of the new interactive features. The most notable change is the renaming of states to appearances in the Button panel. This labeling change makes the ides of button rollovers distinguishable from the new Multi-State objects, discussed later.
Any object in InDesign can have button properties assigned to it. After selecting an object, click on the Convert to Button Object from the Button panel. With the panel opened, activate the rollover appearance to make any design change that will take effect when the user rolls his mouse over the button. There is also an appearance option for Down, which allows you to change the appearance when a user clicks on the button. When you select, or activate, an appearance when a button is selected, InDesign allows you to change any aspect of the button in that appearance. This includes such things as changing text, imported artwork, strokes and fills, and even changes to effects, including drop shadows, gradient overlays, and transparency settings, to name a few.
The Actions section, however, is where the real purpose of buttons is realized. By using a very intuitive interface, InDesign allows you to add the interactive programming to your button. An action can be assigned to various mouse interactions. The most common is the On Mouse Release, which is when the user clicks on your button and then releases the mouse button. The is the most common because if a user click on the button, then moves the mouse away and releases the button, the action will not trigger. This is consistent with most user experiences.
Once you have decided which mouse behavior to assign your action to, InDesign provides a drop-down menu allowing you to select from a range of interactive capabilities (see Figure 2). This menu list groups actions common to both PDF and SWF at the top, then separates the remaining actions into SWF only and PDF only.
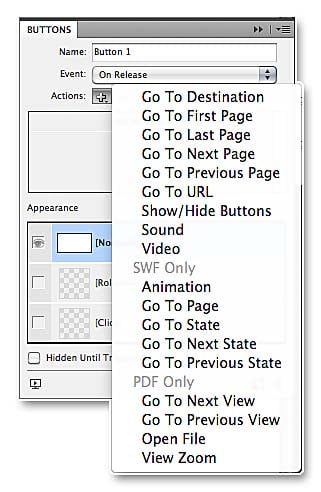
If you want to be able to publish a single InDesign document to both formats, be sure to choose actions that work in both formats, otherwise you can focus on the actions specific to your intended export format.
Working with Audio and Video
InDesign CS5 now has the ability to work with audio files and both Flash video formats (FLV and F4V). Earlier versions of InDesign supported formats compatible to QuickTime (including audio and video), and were played pack in Acrobat using the QuickTime Player. When Adobe introduced Acrobat and Reader 9, with its own embedded Flash Player, FLV and SWF files became two new formats supported by Acrobat.
Exporting documents with linked FLV and SWF files results in the media assets either being embedded in the resulting PDF, or referenced from a “resources folder” for the SWF to load in at runtime.
NOTE: With the announcement of Acrobat X by Adobe Systems on October 18, 2010, Acrobat X and Reader X supports F4V video.
With video placed in your document, the new Media panel gives you options to add a video controller, set whether or not the video plays automatically, and set a poster frame for the video. In addition to control options for the video, the Media panel gives you the ability to add navigation points to your video. To add a navigation point, use the playhead jogger in the preview area at the top of the media panel to find a specific point in the video. Next, click the add navigation point button, then give it a name.
With navigation points assigned to your video, you can assign a video action to a button that accesses those navigation cue points of your video. InDesign gives you a fully visual way to assign video actions, including a drop-down menu that displays all videos available, and if a video has navigation points, a second drop-down appears with available navigation points you have assigned.
Creating Animations (SWF Only)
Any object in InDesign can now have animation properties applied to it. The new Animation panel gives us a fast way to apply animations through a series of animated presets. Simply select an object, open the Animation panel, and choose a preset form the drop-down list. Once you assign an animation, you’ll notice a dotted arrow showing you the direction and distance of your animation. Additional properties allow you to control the duration, easing properties, looping options, and whether the animation starts, or ends, at the current position of the object to which it is applied. Additional properties can also be added to the animated preset in the lower area on the Animation panel. Changing values such as scale and rotation make it possible to further customize your animations.
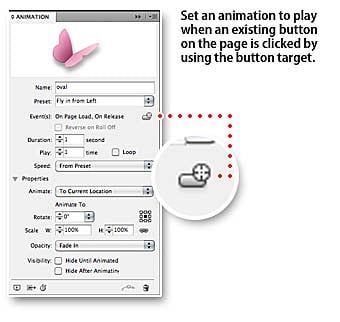
Animations can be set to play accordion to a few different events. The most common is On Page Load, where the animation plays when the user goes to that particular page (see Figure 3). Animations can also be triggered by button actions, rolling over the object, clicking on the object, or by clicking anywhere on the page. By setting these triggers, you gain even more control over the user experience.
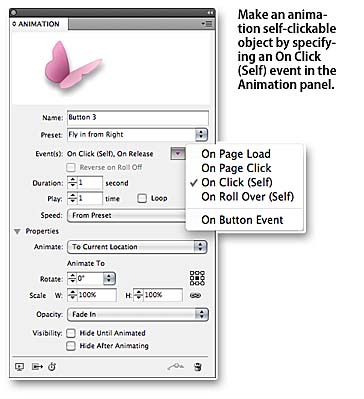
Assigning the onClick (self) option will create an object in the resulting SWF that animates the very object on which a user clicks (see Figure 4).
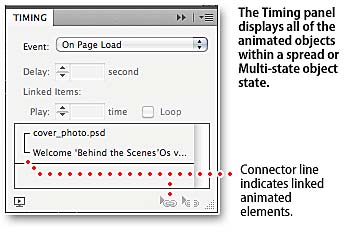
Timing Panel (SWF Only)
When more than one item is animated on a page, or spread, the Timing panel gives you the ability to control the order in which the animated objects play. Each animated item is listed in the panel, and you have the ability to drag the items up and down the list to control the order in which they play. If you select multiple items and click the link icon in the lower-right corner of the Timing panel, those objects will begin animating at the same time (see Figure 5). There is also a delay feature, which can be assigned to each object, and allows you have multiple animations playing at the same time, but with different start times.
Multi-State Objects (SWF Only)
This feature is extremely useful, in that it allows a single object to have many possible views, or states. With multiple objects selected, open the Object States panel and click the New Multi-State Object button. This creates a new grouped object where each of the original objects is represented as states in the Object States panel. Selecting each of the states activates that particular view for the multi-state object. This behavior is similar to the different appearances options found in the Button panel; however, you can create as many states as you like.
What’s more, multi-state objects can be manipulated with a Button action. When you assign the Go To State action to a button, you are presented with a drop-down menu listing all available multi-state objects available on that page, or spread, as well as another drop-down menu listing the available states you can activate.
There are two more multiple-state button actions: Go To Next State and Go To Previous State. These actions are contextual to the multiple-state’s current appearance. This means that if a multiple-state object is currently displaying its second state, a button action assigned to go to the next state will set the object appearance to its third state.
One more checkbox allows the action to allow the multiple-state loop around to the first, or last, state if a user clicks the button more times than there are state to represent in the multiple-state object.
Combining Interactive Features (SWF Only)
The most powerful thing about the interactive features is that they can be used in conjunction with each other. For example, each state of a multi-state objects can have an animation on it. When this is the case, the On Page Load options become On State Load, allowing you to trigger the animation when the state of the multi-state state objects becomes visible. If you add multiple animations to a state of a multi-state object, the Timing panel will change from page animations to state animations, allowing you to change the timing of the animations playing in that state.
Animations can also be triggered by buttons, which gives you the opportunity to create remote interactive elements, such as animating one object with the same button that is changing a multi-state objects state at the same time. With an animated object selected, click the Create Button Trigger button in the Animation panel, then click on any object in your spread.
Preview Panel
In typical interactive workflows involving interactive PDF or SWF, you need to publish, or export, your work to see the final result. The Preview panel in InDesign will compile a SWF file of either an object, spread, or the entire document in order to give you immediate feedback on the creation of your animations, buttons, interactivity and imported media. This will significantly decrease the time it takes to create your interactive experience.
© 2011 Pearson Education, Inc. All rights reserved.
800 East 96th Street Indianapolis, Indiana 46240
This article was last modified on January 18, 2023
This article was first published on February 23, 2011
Commenting is easier and faster when you're logged in!

Recommended for you

Removing Space Along the Left Edge of Text
Every character has a "left side-bearing" but few people notice... until it bite...
This Week in InDesign Articles, Number 88
CS6 and Creative Cloud, of course, but lots of other great articles for InDesign...

Heavy Metal Madness: Decalcomania Mania
One of my favorite specialty printing methods is that of the water-transfer deca...