

Part 1: Budget, SLR vs. point-and-shoot, and resolution
Part 2: Exposure controls (program modes, shutter speed, aperture, white balance, and ISO)
Part 3: Light meters, lenses, image stabilization, autofocus, and flash
Part 4: Viewfinders, shutter lag, start-up time, histogram, exposure lock, and autobracketing.
“Buying a Digital Camera, Part FOUR?!” Okay, so this isn’t exactly a pocket guide to buying a digital camera, but there are a lot of decisions involved if you want to be happy with your camera choice for years to come.
Some of what I’ll cover in this installment may seem like silly luxuries. However, once you’ve spent a little time with them (gotten a little exposure, so to speak), you’ll realize that these features can make you a more productive photographer. They’re worth considering when you’re looking for a new camera.
Camera Design and Viewfinder
One of the most important basic design features to consider is the camera’s viewfinder. Many point-and-shoot style cameras include both an optical viewfinder and an LCD viewing screen.
Unfortunately, most vendors don’t put a lot of effort into their optical viewfinders. By “optical viewfinder,” I mean the simple rangefinder viewfinders provided by most point-and-shoot cameras. The true, through-the-lens viewfinders on an SLR are not susceptible to the problems discussed here.
The typical optical viewfinder shows about 85 percent of your actual scene, so your final image will have a much larger crop than what you see. In addition to creating extra post-production work, this difference means that you’re effectively throwing out 15 percent of the pixels your camera is capturing. After spending all that time fretting over how much resolution you need, having your viewfinder crop 15 percent of the image away is a bit frustrating. What’s more, optical viewfinders don’t always provide terrific clarity, nor do they display camera settings or show the effects of lens extensions and filters.
An LCD viewfinder, on the other hand, usually shows 99 to 100% of the scene, displays the effects of any extensions or filters, and provides comprehensive feedback of all of the camera’s settings. However, LCD screens can be difficult to see in direct sunlight unless they’re exceptionally bright. Some LCD screens use trans-reflective technology or anti-reflective coatings to improve bright-light performance, but even these screens can be compromised when shooting outdoors. LCD screens can also be hard to use in very dark situations: The image onscreen will simply be black. Furthermore, LCD viewfinders can show only 10 stops of light in a single scene, while your eye can perceive a range of 18 to 20 stops of light.
Because both type of viewfinders have drawbacks, the ideal solution is to have both optical and LCD viewfinders. Tiny cameras usually don’t have room for optical viewfinders and so rely solely on LCD screens. If you’re drawn to pocket-sized cameras, carefully consider whether you can work with just an LCD viewfinder.
Whatever arrangement your candidate cameras have, spend time evaluating their viewfinder options. If you prefer holding a camera up to your face to block out the world while you’re shooting, then you’ll want to lend more weight to the optical viewfinder. If you appreciate the flexibility of an LCD viewfinder — the ability to shoot over your head, or at waist level, for example — consider LCD quality and the construction of its screen (fixed or positioned on a rotating mount).
Many cameras, especially cameras with telephoto lenses, have electronic viewfinders — essentially an eyepiece viewfinder with a little LCD screen in it instead of an optical system. These systems are basically the same type of viewfinders that you find on a video camera, and they offer many of the advantages of an LCD screen viewfinder — good scene coverage, and thorough status displays.
Unfortunately, most of these mechanisms offer poor detail and freeze an image when the camera is focusing. If you’re considering a camera with an electronic eyepiece viewfinder, test it on wide-angle scenes and those with fine detail to assess whether you can see the amount of detail you need to frame the shot well. Also note that these types of viewfinders will suffer from the same dynamic range limitations as a normal LCD viewfinder.
If you’re shopping for an SLR, you won’t have to worry as much about these options. With the exception of a few Olympus models, SLRs don’t let you use their LCD screens as a viewfinder. Because the light passing through the lens is being reflected by a mirror into the optical viewfinder, rather than onto the sensor, it’s not possible for the LCD screen to be used as a viewfinder. Some Olympus models use either a beamsplitter or a separate image sensor to provide an LCD viewfinder option.
However, if you’re comparing different SLRs, it’s worth spending a little time comparing their viewfinders. Some SLRs have larger viewfinders than others, and some offer better brightness. A large, bright viewfinder is much more comfortable to shoot with. It’s also worth paying attention to the viewfinder’s status display. Ideally, you want a full exposure readout, as well as ISO, and exposure-compensation displays.
Whether you’re shopping for an SLR or point-and-shoot, it’s best to have a separate LCD screen that displays the camera’s status. Although LCD viewfinders can provide a lot of detailed information about the camera’s status, having to turn on and look at the LCD screen can be a bit of a hassle when you only want to know how many exposures remain on your card.
Shooting Performance
Many different characteristics contribute to a camera’s overall performance, and you’ll want to weigh each to determine if a camera model can keep up with your shooting habits, or if you’ll miss shooting opportunities.
Shutter lag. The most frustrating performance problem is shutter lag: a delay between when you press the shutter release and when the camera actually captures an image. Shutter lag, once a problem with many digital cameras, is less likely in today’s models but still a potential weakness. Pay particular attention to the camera’s shutter response when testing. (To be sure you’re pressing the shutter release properly, read this: https://creativepro.com/story/feature/22141.html.)
After shooting, a camera needs to do a lot of computation to process the image and store it on the media card. Most cameras stash away a few images for processing in memory buffers while you continue to shoot. If you overrun this buffer, your camera is hung up with processing chores and can’t shoot new images. Buffer size and processing speed inform how quickly a camera can recycle itself and prepare to shoot.
Though you can try to precisely measure and time these factors, the easiest way to test a camera’s performance is to shoot as many images as you can in rapid succession. Keep shooting until the camera is finally hamstrung with processing and refuses to shoot. Then take note of how many seconds pass before you can shoot again. If the camera offers a burst mode — the ability to shoot a series of images quickly — shoot in bursts until the camera runs out of buffer space.
Simple tests like these will give you an idea as to whether a camera can keep up with your shooting needs — a valid question if you’re planning on shooting sports, wildlife, or other subjects that require the ability to shoot rapidly.
If you plan on shooting in the Raw format, test performance issues with the camera in Raw mode. Because of difference in file sizes, cameras that are speedy when shooting JPEGs can bog down when shooting Raw.
Start-up time. It’s also important to test how long the camera takes to start. camera’s boot time is too long, you’ll likely miss fleeting shots. Most cameras also have a sleep mode. If you don’t use them within a certain interval, they go into a lower power mode. A half-press of the shutter release is usually all you need to wake them up. The quicker the wake-up speed, the better.
Histogram
A histogram is a bar graph of the distribution of tones in an image. It’s an indispensable tool when shooting because it lets you see if you’ve over- or under-exposed an image and gauge whether you’re capturing the maximum dynamic range (see Figure 1).
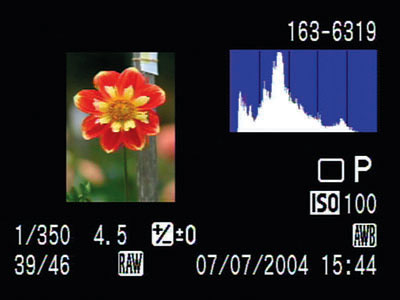
Figure 1: An in-camera histogram lets you easily see if an image is over- or under-exposed, as well as assess whether you’ve captured the maximum dynamic range.
Most decent cameras these days let you view a histogram of any image you’ve shot. Because the camera’s LCD screen doesn’t accurately display color or contrast (many cameras intentionally brighten the image shown on the LCD, as well as boost the contrast, to make the screen easier to view in bright light), a histogram is often the only way to tell if you’ve over- or under-exposed your shot. With the histogram, you can also tell how much contrast you’ve captured. If you’ve opted for a camera with any type of manual control, a histogram is a must.
When evaluating histogram features, look for a clear, easy-to-read histogram that highlights over- or under-exposed areas. A three-channel histogram — that is, a display that shows separate histograms for the red, green, and blue channels — is nice but not a necessity.
Some point-and-shoot cameras offer a live histogram that displays a histogram on the camera’s LCD in real-time, so you can immediately see the effects of exposure adjustments while you’re shooting. I’m not a fan of live histograms because they take up space in your viewfinder and are hard to read.
Exposure Locks and Panorama Controls
Every time you press the shutter button on a camera in automatic mode, the light meter analyzes the scene and calculates an appropriate exposure. While this is a great convenience and a tremendous time-saver, there will be times when you don’t want the camera to meter off of the scene that it’s looking at.
For example, when shooting a multi-shot panorama — a series of images that will later be digitally stitched together — you usually don’t want the camera to re-meter for each shot, as this will create an uneven exposure across your final composite picture. With exposure lock, you can lock the camera at its last metering, allowing you to re-frame and shoot additional images.
Some cameras include special panoramic shooting features that, in addition to locking exposure, provide guidelines on the camera’s LCD that help ensure your images overlap properly in preparation for a good panoramic-stitching operation later.
An exposure lock is handy for everyday shooting situations, as well. It lets you separate the camera’s auto-focus mechanism from its auto-metering, so you can meter and focus on different areas. But an exposure lock isn’t critical if your camera has multiple focus spots and several metering modes.
Auto Bracketing
Bracketing is the process of shooting the same frame with different exposures. It’s an important practice when shooting film, and there’s no reason not to bracket when shooting digital because it doesn’t cost you any more than shooting a single frame.
An auto-bracketing feature automatically adjusts exposures as you shoot. If you configure your camera to auto-bracket three shots, each one step apart, then your camera will shoot the next shot as metered, then the shot after that overexposed by 1 stop, then the shot after that underexposed by 1 stop. If you turn on your camera’s burst mode, you can simply press and hold the button to get a series of bracketed images.
I find auto-bracketing to be an essential feature, so I want easy access to it. An external control is ideal, but a quick trip to the menu is also acceptable.
Unfortunately, most camera makers are stuck with their film ideas about bracketing, so most cameras restrict you to auto-bracketing up to three shots. If you plan on lots of HDR (high dynamic range) shooting, look for a 5- to 7-shot bracketing range.
More Bells and Whistles
Finally, there are a number of other specialized features that can be very handy for particular shooting habits or needs. Some of these features may feel like mission creep — after all, you buy a camera to take pictures, do you really need voice recording? Nevertheless, you might be surprised how handy some of these extras can be:
- Video
If you’re interested in shooting video, you really should buy a video camera. Nevertheless, many newer digital cameras now offer very good video modes and can output full-frame (640 x 480 pixels) QuickTime movies with sound at 30 frames per second. - White balance and focus bracketing. Similar to exposure bracketing, these features shoot a series of images with slightly varying focus and white balance, for those times when you’re not sure about your white balance or focus choice. Because getting good focus is particularly difficult when shooting macro photos, a focus bracketing feature is a great tool if you expect to spend a lot of time shooting in macro mode.
- Remote control. If you do a lot of studio work or self-portraits, a good remote can be very handy. Few cameras ship with remotes, but it’s worth checking to see if your candidate cameras offer remote options. Wireless remotes have the advantage of longer range, but not all cameras support them. The remotes on some cameras also allow for programmed operation of the camera, facilitating time-lapse photography, remote bracketing, and other special shooting operations.
- Remote computer control. For studio or fieldwork, the ability to control the camera from your computer can be a great convenience.
- Voice annotation. When you need to document your shots, being able to record a voice memo with each one can be very handy, although you will pay for this feature with storage space.
- Neutral density filter. A neutral density (ND) filter lowers the amount of light entering the camera’s lens without changing its color. ND filters can be great for opening up more exposure options by cutting the amount of light entering the camera.
- Pixel mapping. It’s possible for pixels on your camera’s image sensor to go bad and get stuck in “on” mode. A camera with pixel mapping can automatically disregard broken pixels and replace them with interpolated pixels.
- Noise reduction. Because noise gets much worse as exposure time lengthens, many cameras offer automatic noise reduction routines that kick in when you select an exposure of more than 1 second. These features can be essential for low-light photography.
- User sets. If you find you routinely have to reconfigure your camera for different shooting situations, look for the ability to store collections of parameters in sets you can easily activate.
- Automatic image rotation. Some cameras can sense whether you’re holding them in portrait or landscape mode and automatically tag the image appropriately. Many image editors and cataloging applications can read this data to automatically rotate your images upon opening.
- Custom tone curves. If you’re shopping for a high-end SLR, keep an eye out for the ability to customize the camera’s tone curves. This gives you more control over the camera’s contrast and color response when shooting in JPEG mode.
- Intervalometer. If you’re interested in time-lapse photography, a built-in intervalometer will let you set up your camera as a stand-alone time-lapse machine. Look for an intervalometer that lets you control the number of shots and the duration between shots.
- Slow sync flash control. Most cameras provide a special “Night shot” shooting mode that combines a flash firing with a long exposure to capture images that have well-exposed foregrounds and backgrounds. If you’re looking at a higher-end camera that doesn’t provide special scene modes, ensure that it still has some way of configuring a slow sync flash exposure.
- Repeating flash modes. Another cool flash feature is the ability to configure the flash to fire several times during a long exposure. This lets you shoot long exposure images that have several flash firings in them.
- WiFi. You can now find built-in WiFi on many point-and-shoot cameras and on some extremely high-end SLRs. If you regularly shoot in a studio, or use remote cameras that are difficult to connect to, wirelessly transferring images from camera to computer might be an important consideration.
Obviously, some of these considerations will be higher on your list than others, depending on the type of shooting you do. If you want to get a camera quickly, then you don’t need to wade through all of these concerns. If you tend to buy gear and keep it for a while, you’ll want to get the best selection of features that you can afford.
Next time, the last step: evaluating image quality.
This article was last modified on January 18, 2023
This article was first published on July 5, 2006
Commenting is easier and faster when you're logged in!

Recommended for you
How to Prevent Photo Loss From Your Digital Camera
Photographers’ worst collective nightmare is probably the failure of technology....

Say “iCheese,” with the ioShutter Camera Remote
Imagine if you could have an app on your iPhone that you could use to control yo...
The Creative Zone: Taking Your Photography to the Next Level
Excerpted from Canon EOS M: From Snapshots to Great Shots by Jeff Carlson. Copyr...