
Digital Camera How-To: Expanding Dynamic Range

This story is taken from “Exploring Digital Photography” (Element K Journals).
Creativepro.com readers can subscribe to Element K Journals at a discount. Click here to learn more.
Shooting outside on bright, sunny days can be problematic with a digital camera, especially when you run into areas of high contrast like the dappled shade shown in Figure 1. Even if you meter with the help of a gray card, these types of lighting situations are challenging because you have both shadows and bright highlights that contain detail, but that detail is difficult for the camera to capture because of the limits of its dynamic range. We’ll show you how to deal with situations like this to get better results with your outdoor photography.
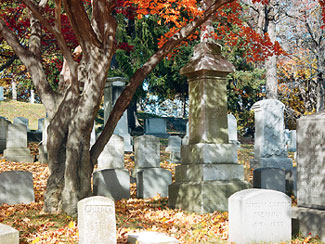
Figure 1: Our meter said the exposure on this shot was okay, but it’s missing detail in the shadows.
In this article, we’ll show you a technique that can help you manage lighting situations like the one shown in Figure 1. First, we’ll give you some background on what dynamic range is and how it affects your digital camera. Then, we’ll show you how to take two images of your scene, exposing each one for optimal highlight or shadow detail. Finally, we’ll step you through the process of combining the two images in Photoshop to generate one with greater detail. We’ve included some sample images to download so you can follow along.
What is Dynamic Range?
The dynamic range of a scene is the difference between the brightest point and the darkest point. When you’re outside shooting on a sunny day, this range is huge and more than the digital camera can handle. Digital cameras actually shoot best in what could be described as bright shade. Shooting on a sunny day, with no direct sunlight hitting your subjects, will typically give you the best outdoor results, but that isn’t always possible. You have to learn to manage scenes that have a wide dynamic range.
If you were shooting with film, you’d expose for the shadows and then develop for the highlights. You can expose for the shadows on a digital camera as well, but your highlights are likely to be blown out, as is the case in our image in Figure 2. In this case, we overexposed to capture more shadow detail in the trees and stones, but our tombstones in direct sunlight have almost no detail at all.

Figure 2: Exposing for the shadows gives us more tree detail but our tombstones look ghostly.
Choosing a Subject
This technique isn’t suitable for all outdoor subjects. For one, your subject has to be stationary. Keep in mind that clouds and tree branches will shift slightly between shots and during processing this causes areas that aren’t in register to blur or create strange overlaps. However, some of this can easily be cleared up in Photoshop. Some of it may not be troublesome either, as a little blur in leaves could indicate movement and not detract from the scene.
Setting Up for a Shoot
There are three important factors for this technique to keep in mind while shooting. You must use manual mode and the timer on your camera and always shoot with a tripod. The reason behind this is that you need to keep your images in perfect register, so you must keep things as stable as possible. Moving your camera in the slightest will cause your images to be out of register, which will render this technique ineffective.
Why use the timer? It’s important to use the timer because it gives you a chance to press the shutter and then back away from the camera and tripod and allow any slight vibrations to settle down before the image is shot. This is especially important if you have a light tripod, as they’re more prone to flex or vibrate as you press the shutter.
Why use manual? It’s also important to use the manual mode on your digital camera. This is because you’ll need to change shutter speeds for your two shots and many digital cameras automatically adjust the aperture to correspond to your shutter settings. This has two problems. The first is that it makes it harder to get the right shutter speed. The second is that if the aperture changes, then the depth of field in your images will be different. It will look silly to combine images and discover some subjects in one image are blurry while they aren’t in the second image.
Take the Shots
If you keep those tips in mind, you should be able to get the shots you need. Now, take two shots back to back. The first should be set to capture shadow detail as we did in Figure 2, while the second should be set to capture the highlight detail as we did in Figure 3. You can determine your exposure based on metering or by looking at the LCD on your camera. As you can see, our tombstones have a lot more detail, but our tree is very dark. Now that we have our two shots we’ll move on to what to do with your images once they’re in Photoshop.
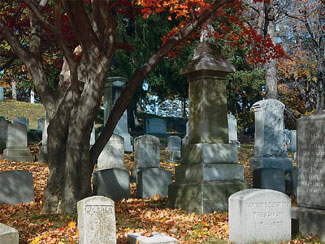
Figure 3: In your second shot, let the shadows go and concentrate on capturing good highlight detail.
Working in Photoshop
To get started in Photoshop, open your two images (use your own or download sample images here. Rename the one with the good shadow detail Shadow.tif and then rename the one with good highlight detail Highlight.tif. Now, there are three or four different ways to go about combining the two images. We’ll show you one of the easiest methods and then go over an action that can automate the process for you.
Register your images. The first thing you need to do is register your two images. To do so, copy and paste the highlight.tif image in the shadow.tif document. This means your dark image should be on top of your light one.
The easiest way to register two images is with the help of the Difference blending mode. If you’re using your images directly off the camera, they may already be in perfect register, but you should still check. If you’ve cropped your images or resized them, you can still register them again.
Set the blending mode of Layer 1 to Difference. This blending mode shows you what’s different between two images. If two images are out of register, you’ll see halos and color around objects, as shown in Figure 4. When they’re in register, you image should look like a grayed out version of the original. Select the Move tool and use the keyboard arrow keys to adjust the position of Layer 1, if necessary. If most of your image looks registered, it should be fine to continue.
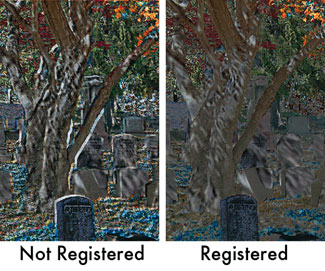
Figure 4: The Difference blending mode enables you to align images pretty easily.
Making a mask. Once your images are registered, you can get to work. Select Layer 1 and then press [Ctrl][Alt]~ ([command][option]~ on the Mac). This generates a selection based on the composite channel of the image, which is basically just a grayscale version of the selected layer. Now create a layer mask based on the selection by clicking the Add Layer Mask button at the bottom of the Layers palette. The mask’s effects are apparent instantly. The two images are blended instantly but the scene looks rather flat. This can be fixed by tweaking the mask.
Modifying the mask. You can see the effects of the mask but not the mask itself. If you look at Layer 1, you can see there’s a mask icon where there’s typically a brush icon. If the mask icon isn’t showing, click on the linked layer mask on Layer 1 and it should pop up. As long as the mask icon is showing, anything you do to the image is occurring on the mask and not on the layer itself.
At this point, you need to blur the mask to make the transition between the two images smoother. To do so, choose Filter > Blur > Gaussian Blur. We used a setting of 20 points, but keep in mind this setting will vary depending on your images. You can see our results in Figure 5.

Figure 5: Once we blend our two images, we get better detail than we had with a straight shot.
Direct modification. If you aren’t entirely happy with the results, you might want to look at the mask directly to see if anything can be modified. First, look to see how much of Layer 1 is contributing to the resulting image. To do this, simply turn off the Background and you’ll see the masked Layer 1 all by itself, like ours on the right in Figure 6. To do so, click on the Channels tab to switch to the Channels palette. Then, click in the empty box next to the Layer 1 mask to turn it on. Turn off all the other channels by clicking on the eye icon next to the RGB channel. Now, you can see your mask. It should look like ours on the left in Figure 6.
To make changes, select the Paintbrush tool and a good sized, feathered brush. Set the brush Opacity to 20% or less and then you’re ready to paint. By painting white on the mask you’ll preserve more of the Layer 1 image, while painting in black allows more of the Background image to show through. We painted in a little additional white on the two front tombstone areas to retain a little more detail in our final composite.
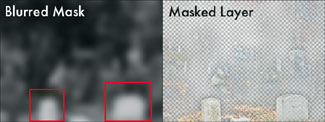
Figure 6: The white areas in the mask preserve detail in the highlight detail we want in Layer 1.
Color Tweaking
Your result looks better as far as detail goes, but it’s also likely to look a little flat. You’ll need to adjust the contrast and color balance of the image as you would with any image. While the specifics of color enhancement are beyond the scope of this article, this can be as simple as choosing Image > Adjust/Adjustment > Auto Contrast or using something with more control like Curves. The Selective Color and Hue/Saturation controls are also good ways to tweak certain colors in your scene. You can see our final image in Figure 7.
Figure 7: Once we tweak the colors and contrast, you can really tell how our blended image is superior to Figure 1.
Actions Make It Easy
Does this all seem like too much hassle? Once you get used to the process, you can make an action to speed up the process. Alternatively, you can buy a tried-and-tested Photoshop action to do it all for you. At Fred Miranda’s Web site, you can buy an action to expand dynamic range in a manner similar to what we stepped through in this article. Miranda’s DRI action uses a slightly different method, but it’s very effective as well as very reasonably priced at only $8.50.
If you choose to purchase, we recommend turning on the dialog boxes so you can tweak settings. Miranda’s action defaults to a 100-pixel feather, which was too much for some of the images on which we tried it. If you click the dialog box icon on the Actions palette, as shown in Figure 8, you’ll be able to enter your own settings where necessary.
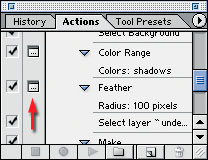
Figure 8: Turn on dialog boxes to modify the DRI action’s settings.
Not Out of Range
Now you have an understanding of dynamic range and some steps you can take when shooting outside on bright sunny days. Whether you do it by hand or with the help of the DRI action, the same shooting principles apply if you want to get the best results from this technique.
This article was last modified on January 3, 2023
This article was first published on April 4, 2003
Commenting is easier and faster when you're logged in!

Recommended for you

Lightroom 4 Ships with Lower Price
After two months in public beta, Adobe Photoshop Lightroom 4 is now shipping. Th...

Design How-to: Endless Pattern Possibilities
This story is taken from “Before & After” Magazine. You can subs...
Batch Process Images with PhotoBulk
If you work on a Mac and regularly have to process images to size, optimize, or...