
Digital Camera How-To: Shooting Snowy Scenes

Winter is a great time to get out and take some pictures with your digital camera. While there’s certainly no shortage of subjects to capture, getting the shot right can be tricky. Variable light conditions, reflections off bright snow, and hazardous weather conditions combine to make winter the most challenging, yet rewarding, time of year to photograph.
In this article, we’re going to give you some tips for achieving great winter photography. First, we’ll go over how to get good exposure even when bright snow is plotting against you. Then, we’ll get into when to use your flash and when it’s best to turn it off. Finally, we’ll show you how to best compose your shots to take advantage of the winter scenery.
Shoot for Proper Exposure
The light meter in your digital camera is a highly sophisticated piece of electronics, but it can be completely mystified by a bright field of snow. When shooting an intense scene like that, your camera tries to adjust for the midtone in the scene and will most likely underexpose slightly. The result is gray, murky-looking snow. This can be fixed by increasing the exposure compensation before you take the shot. How much of an increase depends on the lighting situation and the sensitivity of your camera, but a setting between +0.3 and +1.0 EV should do the trick. The slight overexposure will return the snow to its proper whiteness, as shown in figure 1.
Backlighting and Silhouettes
The fine line between a portrait and a silhouette is another exposure challenge when dealing with backlighting. The brightness of a snowy background can cause details in your foreground to be washed out, creating a silhouette effect. If you’re shooting for detail in your subject, position yourself so the background has less influence on your shot. Move in closer and fill the frame with your subject. If possible, reposition yourself to frame the subject against a background of trees or a building. This will help keep the subject properly exposed and reduce the chance for unwanted silhouettes.
The Importance of Time of Day
The time of day can have a dramatic effect on your images, especially when you’re shooting in snow. The early morning and later afternoon hours will provide warm, pastel tones while the bright light of midday offers cooler and more neutral tones, as shown in figure 2. If you’re looking for color in your photography, avoid the middle of the day and use the warm light of dawn and dusk to your advantage.
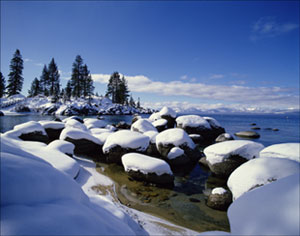

Figure 2: The time of day can have a drastic effect on your winter shots. For cooler shots, shoot closer to midday, (top) while early morning and late afternoon offer warmer tones (bottom).
Throw Some Light on the Subject
Conventional photographic wisdom states that your flash is pretty much useless outdoors. However, when shooting in snow, firing a flash can provide highlights and bring out details your camera might not have picked up on. The high reflection factor of the snow allows the flash to add texture and interest to a flat field of snow. The flash might also pick up any falling snow in the scene, adding depth and a sparkling sense of place, as shown in figure 3.
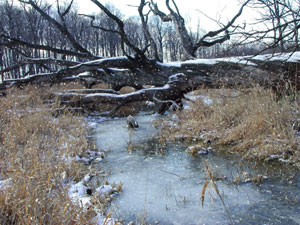
Figure 3: We captured the falling snow’s sparkle by forcing the flash to fire.
Many digital cameras have what is called “fill flash.” This type of flash works well in winter scenes, as it’s designed to “fill” shadows and backlit subjects (for more on fill flash, see “Bit by Bit: A Digital Fill-Flash Technique for Improving Images.”) You might also try using the Slow Synchronized (often called Slow Sync) option, if available. This flash mode is designed for poor lighting situations and would work well if you’re shooting later in the day. However, Slow Sync mode means that the camera’s shutter will automatically operate at slower speeds to capture the illumination behind the flash-lit subject, so using a tripod to reduce camera movement is recommended.
Note: Avoid using flash when shooting close-up or macro shots with a bright background. The reflection will greatly reduce any detail in your image and can cause distracting hotspots.
Composing your Shots
All the same rules apply when taking shots in winter, but there are a few techniques you can concentrate on to utilize the environmental conditions. While we’ve already discussed some of the technical aspects of winter photography, let’s take a look at some ways to compose your shots to do justice to the frosty scenes.
Look for contrasts. The bright, uniform nature of snow gives the chance to use contrast to your advantage. Look for colorful subjects and textures to juxtapose against the monochromatic snow and gloomy winter skies. If you’re shooting snow in the foreground, such as a snowman, frame the shot with a contrasting background such as a blue sky or a group of trees to pull out as much detail as possible.
Use the available light. Light is scarce in the winter, so if you have the good fortune of dramatic lighting, seize the chance to get some interesting shots. Look for low angle light to create long, contoured shadows or use backlighting to set up a silhouette. Figure 4 shows a mix of silhouetted tree branches on a bright blue sky with the low shadows cascading over the snow and rocks, making for a dramatic, textured shot.
In the absence of light, take your tripod out and shoot some longer exposures to capture the cool tones of twilight on the snow. With the ever-changing nature of winter light, you’ll have plenty of opportunities to experiment with different setups and figure out what type of illumination appeals to you.
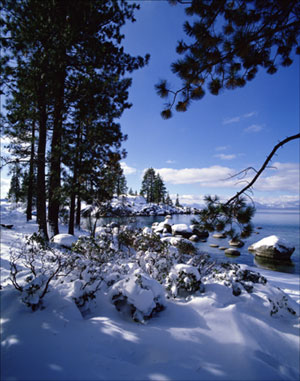
Figure 4: Shadows and light show up well on the snowy ground.
The quiet after the storm. One of the best times to shoot in the winter is after a weather event. From a simple frost to a full-fledged blizzard, the aftermath can allow you to produce stunning photography. Subjects that were once mundane are now incredible, such as the ice-covered branches shown in figure 5, or high, sculpted snow drifts. Plus, these shots are wonderful documentary pieces when you’re looking through your images in the middle of July.
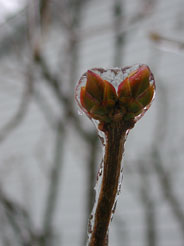
Figure 5: Harsh weather like an ice storm can offer unique shooting opportunities.
Strive for simplicity. Trying to keep your pictures simple is a goal for every shot, but in the winter it takes on even more importance. Draw your viewer’s eyes to your subject using string lines and color contrasts. Create visual appeal with uncomplicated subjects that stand out from the background. You might even want to consider shooting in black-and-white mode to simplify the scene even further.
Use a filter. There are many filters for digital cameras that you can use to improve your winter photography. Consider using a graduated filter to reduce the contrast between the sky and the ground, or a polarizing filter to reduce reflections from the snow. A good UV filter is always recommended when shooting in sunny conditions. Keep in mind that many of these adjustments could be made in an image-editing program, but getting the shot right in the field is always desirable.
Get Out in the Cold
The rewards of shooting in winter speak will for themselves every time you view your images. Once you develop your style for shooting in colder weather, you’ll find winter to be one of the most exciting times of year to make use of your digital camera.
This story is taken from “Exploring Digital Photography” (Element K Journals).
This article was last modified on December 11, 2025
This article was first published on January 17, 2003
Commenting is easier and faster when you're logged in!

Recommended for you
Top Tips for Illustrator Book Now Available!
Our most popular Illustrator tutorials collected in a convenient PDF book format

Scanning Around With Gene: The Old Way of Photo Retouching
Originally posted March 16, 2012 I’ve never been much of an artist, though I did...

The Lytro Goes Retail
Remember the Lytro, that strange-looking camera that let you choose where to foc...