
Digital Photography How-To: Building a Light Tent

Perhaps you need to shoot a watch for an online auction. Or photograph your wedding ring for insurance purposes. Or get an image of an antique coin. In any of these cases, you’re going to need to take pictures of something that’s small, shiny, and hard to photograph. Often people resort to professionals to capture these reflective objects, but there’s no reason why you can’t do it yourself using your digital camera. With the use of a light tent and a few photographic techniques, you can get quality images of your shiny stuff.
In this article, we’ll show you how to get great results when photographing small, shiny objects like jewelry by building your own light tent. First, we’ll show you different approaches for building different types of light tents, using materials that you can probably find around your house. Next, we’ll discuss how to light your object to bring out its natural sparkle while avoiding reflections. Finally, we’ll set up our camera and take some steps to maximize image clarity and get the best picture possible.
Know your Goals
One of the most important aspects of any photography project is to understand the goal of the shoot. When photographing reflective, diminutive objects, you need to analyze each piece and determine which attributes you want to capture. Knowing whether you want to showcase the bright highlights of a diamond or the smooth texture of an antique silver pin will allow you to make intelligent decisions on light placement, background color and texture, and camera angle. In this article, we’ll make a few setups that you can use for many different types of objects, but keep in mind that the presentation of your objects is subjective, so take some chances and experiment with different techniques.
Take your Camera Camping
Our main goal for this article is to show you how you can make your shiny stuff look great without having to go to a professional photographer or take out a small business loan. Sure, you could just slap the object down on your desk and snap a picture, as we did for the first shot in Figure 1, but this shot is riddled with problems. There are bright highlights from the flash, mixed lighting from the fluorescent overhead lights, a distracting background, odd shadows — overall, just a poor representation of our object. The second shot is much better.

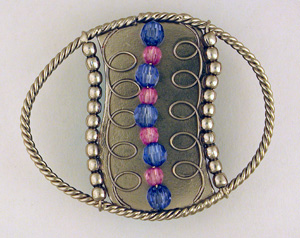
Figure 1: The first picture suffers from many problems that a light tent and some proper setup fixed.
It won’t be hard to improve this shot if we change our shooting technique. To do this, we’ll build a light tent using objects that you can find around the house, or easily pick up at the local hardware store. A light tent is an enclosed area made of a translucent material that provides seamless, diffused lighting. Designs for light tents vary, but they generally fall into two categories: hard or soft. The hard designs utilize materials such as cardboard boxes, translucent plastic sheets, white foam, and more to diffuse and reflect light. The soft setups use woven materials such as tissue paper, pillowcases, or bed sheets to give you that seamless surrounding that you can easily reposition and adjust.
You can buy small light tent setups from professional camera supply companies, and they do a great job. However, these setups are often expensive and can be difficult to adjust. The biggest challenge faced when photographing objects such as jewelry is minimizing reflections, so building your own setup lets you respond best to the nuances of your object. Plus, you’ll get more involved with the process and have more fun learning how to get the best shot.
In the next part of this article, we’ll show you how to build several different configurations of a light tent. We’re going to skip over the lighting setups and camera settings for now, but we’ll get into that later in the article.
The Fast-and-Cheap Method
The first light tent setup we’ll build involves nothing more than your camera, some tape, and a couple facial tissues. Set your camera up on your tripod to minimize camera movement, and then place your object on a white sheet of paper to provide a neutral background and minimize reflections. Next, position your camera over the object and tape the tissue around the lens to form a tent over the object, as shown in Figure 2. The result is an instant improvement over our first attempt, as shown in Figure 3.
This simple “soft” light tent works great for small objects as it provides a simple, seamless environment that diffuses light adequately and costs pennies to create. However, it can be tricky to adjust and the short length of regular tissues mean you’ll have to get very close to the object. For digital cameras without a macro lens, this can result in blurry images.
Note: Instead of tissue, try using a pillowcase. The thicker fabric helps evenly diffuse the light and the larger size allows for bigger objects and greater adjustability.
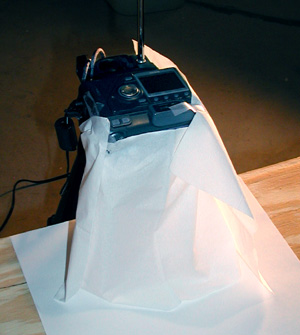
Figure 2: With only a few facial tissues, you can build a quick light tent.

A More-Flexible Setup
Once you have a light tent set up, you’ll probably be able to use it for years, so why not take a little time and get it right? This next light tent uses a cardboard box to provide the structure and various materials as the diffusing agent. As shown in Figure 4, this light tent is large enough to allow for bigger objects and can be easily adjusted to meet the demands of many different shots.
Building this type of light tent involves a fair amount of improvisation, as you can use many different household objects to build it. For this setup, we first cut holes in the sides of the box, leaving enough cardboard to provide support for the rest of the box. We then covered the holes with white pillowcases secured with duct tape. For the interior of the box, we used spray adhesive to apply white pieces of paper to cover any exposed surface. This provides a seamless background and ensures that any reflections from the interior of the box are white. For the front of the box, we taped a white, plastic garbage bag and cut a slot for the camera lens to fit through. The whole process took about 20 minutes — now we have a versatile light tent that can be used for many sessions. It also produced an acceptable image, as shown in Figure 5.

Figure 4: A cardboard box, a pillowcase, and a white garbage bag are the main elements of this versatile light tent.

Figure 5: The larger size of our diffuser materials allows for even light distribution and the white interior produces few reflections.
Keep your Eyes Open
You can make a light tent out of almost anything that’s translucent. Be open for opportunities to use other objects as quick light tents. For example, we found the paint can liner shown in Figure 6 at our lo
cal hardware store. It makes a great light tent as the semi-transparent plastic diffuses the light while the curved top creates a seamless environment. Plus, it’s durable and should be available for many sessions. There are lots of everyday objects that can be used as well — we’ve heard of plastic garbage cans, clear storage containers, empty beer balls, and even white lampshades, as shown in Figure 7, as being excellent options.
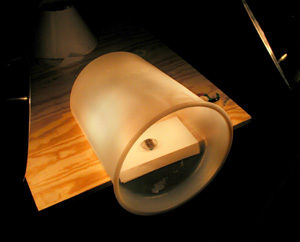
Figure 6: This translucent paint can liner made a unique light tent.
Lighting your Object
Once your light tent is built, you can concern yourself with providing adequate illumination for your object. Continuing with our do-it-yourself-cheaply theme, we’re going to avoid using studio lights. These expensive lights are usually made from tungsten or quartz and provide a very bright, balanced light. However, these lights would be too bright for our setups, as the 500-watt infernos would overwhelm the small size of the objects. Instead, we’re going to use regular 100-watt incandescent light bulbs, which will provide even lighting at a fraction of the price.
Note: Many photographers swear by the natural illumination of a bright, overcast day. While it’s true this light makes for great shots, you’re limited to daylight for your shooting and the changing light conditions can make for challenging exposure selections.
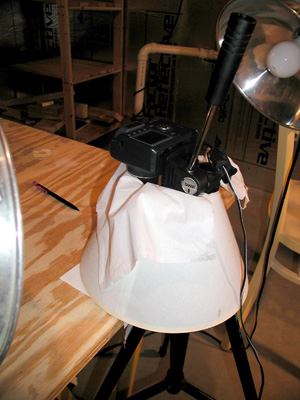
To hold our lights, we’re using simple clamp reflectors bought at the hardware store for $5 each. As shown in Figure 8, these lights will be placed on the sides of the light tent, as this provides a more dramatic look while minimizing reflections. Having only one light would cause too much contrast on one side of the object and cause uneven illumination. Overhead light greatly increases the possibilities for unwanted reflections and can cast unwelcome shadows that distract from your object. We’ve also chosen to place one of our lights higher than the other to vary the angle of the incoming light and encourage soft shadows.
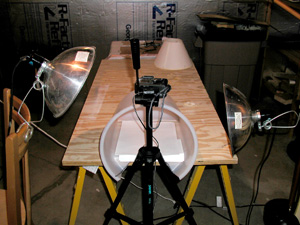
Figure 8: We used inexpensive clamp reflectors to direct our light at the light tent. Note that they’re placed at different levels to vary the light angles.
Why not use the flash?
The flash on your digital camera is designed to illuminate a large area evenly. When you’re working with close-up photography, the bright burst from the flash will overwhelm your object and cause hotspots and reflections. Plus, adding another light source to your shot can wreak havoc on your color balance. It’s best to turn off your flash and rely on external illumination.
Balancing the white
One of the benefits of shooting these objects digitally is that you can adjust the white balance on your camera. Each type of light gives off a different color-cast, so adjust your camera’s settings to match the type of light you’re using. Try to avoid using fluorescent lighting, however, as it tends to make metal turn bluish green. Of course, because all of your shots are digital, you can always bring your shots into an image-editing program and correct any color casts later, but it’s best to make this adjustment when you shoot if possible.
Setting up your Camera
Now that your light tent and lights are set up, you can prepare your camera to get the best shot possible. The first thing to determine is the focal range of your camera. You’re going to want to fill the frame with your object, so get as close as possible without risking blurry images. You can certainly optically zoom in on the object, but avoid using digital zoom as it degrades the quality of the image.
Digital cameras that have a macro lens can usually get closer that other lens types, but don’t be dismayed if your camera doesn’t have this ability. Check with the manufacturer to see if there’s a macro lens accessory that you can add to the lens. These work great, but be aware that any add-on lens is going to reduce the amount of light entering the lens, so adjust accordingly.
As we mentioned earlier, you should mount your camera on a tripod to get a steady shot. You can also use the camera’s self-timer or remote control to activate the shutter, reducing the possibility of camera movement. At close range, even the slightest vibration can be very noticeable.
As far as your exposure settings, you’ll have to respond to your environment. In general, you’ll want to shoot with the largest f-stop possible, as this will use a smaller aperture and create a greater depth of field. When shooting small objects, having a wide depth of field ensures that your entire object will be in focus. You also might want to bracket your shots +/- 1.0 EV to give yourself a range of shots to select from.
Finally, use your digital camera’s LCD to your advantage. The view from the back panel is going to give you the best representation of what the image sensor is going to record, and give you a good idea if the object is in focus, colors are accurate, and reflections are in check.
Preparing the Object
Your objects should be clean and free of fingerprints when you photograph them. If necessary, handle them only while wearing gloves to minimize the risk of smudges. If you’re shooting a particularly shiny object, you might want to consider using a dulling spray to reduce reflections. A cheap way to achieve the same effect is to pop your object in the freezer for a few minutes. When you remove it, a thin layer of condensation forms and dulls the surface slightly. This effect is short lived, but can be repeated indefinitely.
When setting up your shot, consider the color and texture of the object. Use lighting that will highlight the attributes of your object. For example, a white gold and diamond ring will probably look better against a gray background than a white one, as the highlights will be more obvious and the reflections slightly darker. Also consider how the light creates shadows in your shot — good shadows produce a soft edge and give a 3-D effect. Bad shadows distract from your object and cause harsh edges and leave your image looking flat.
You can use clay, wax, or a similar substance to hold your object in place for your shot. Get it off the ground to give your object as much dimension as possible. This can require some creative rigging, or you can buy positioning clips such as the ones fishermen use for fly tying to hold objects in place.
Shooting your Object
Once all the pieces are together, shoot away. Since you’re shooting digitally, take as many images as possible. It’s always easier to erase an unnecessary image later than have to set the shot up again. Fill your frame with the object, but make sure you include any shadows cast by the object. Shoot at the highest resolution possible, even if your final destination for these images is the Web. Not only will you get better color accuracy and image quality, you’ll always have a high-res backup that you can use for other purposes such as printing. Experiment with different angles for both your light and camera — try to minimize reflections and bring out the favorable attributes of your object. However, be aware that your lens can also cause a reflection on your object, so keep an eye out for any unfavorable manifestations.
Anyway you do it, get the shot. Our favorite image, shown in Figure 1 and belo
w, surprisingly ended up being shot using the lampshade light tent. Techniques such as these can teach you a lot about your digital camera and photography techniques without costing you a lot of money. Shooting small, shiny objects doesn’t have to be hard if you take the time to create a favorable lighting setup that minimizes reflections and gives your object the opportunity to sparkle.
This story is taken from “Exploring Digital Photography” (Element K Journals).
This article was last modified on January 6, 2023
This article was first published on March 14, 2003
Commenting is easier and faster when you're logged in!

Recommended for you

Photography Fundamentals: Work the Scene
Excerpted from The Passionate Photographer: Ten Steps Toward Becoming Great by S...

New FinePix S6000FD Digital Camera Marks Debut of FujiFilm's Face Detection Technology
Fujifilm continues to make top-quality picture-taking a snap for consumers with...

Turn your iPhone into a pro-quality light meter with Luxi
If you ever struggle to choose the right exposure settings on your camera, but y...