


One of the most misunderstood Photoshop tools is the pen tool, which creates vector curves and paths. The pen tool is very powerful and accurate. With a little know-how and practice, it will be your ally for the rest of your career.
Vectors Explained
Vectors are lines, with curvature, thickness, and length all determined by mathematical formulae. But you don’t need to know any math; Photoshop does it for you. It might seem odd to find vector-drawing tools in a pixel-pushing program like Photoshop; vector drawing is usually associated with programs like Illustrator. Photoshop can’t create entire vector documents. It uses vector elements and stores them in layers and as paths. But be grateful that Photoshop offers this feature; it can come in handy in a number of situations.
Most commonly, vectors are used for cutting something out from its background in a photograph. I cut out the car in the figure below using vectors. The pen tool is great for these kinds of cutout tasks because of the clean, controllable, reusable nature of vectors.

You might also want to use Photoshop’s vector tools for a large poster, because you can create it small and then scale it up without losing quality. And vectors are great when you have to change a design many times because there’s no degradation each time you change something. Vectors also work well for text and box heavy designs because the edges print nice and sharp.
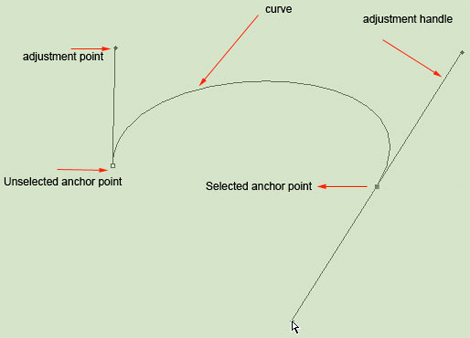
Below, you’ll see the different parts that make up a curve. A path is a series of curves joined together.
Drawing with the Pen Tool
When it comes to creating a path from scratch, the pen tool is the most common option. This tool may look familiar to you because it’s almost identical to the pen tool in other Adobe apps, including Illustrator, InDesign, and Flash.
It’s not, unfortunately, a very natural process, especially to anyone who grew up drawing with markers or crayons. This is because unlike the pencil tool, you are creating your shape with points and handles.
You don’t just draw on the page: You have to add points and manipulate them to create your shapes. The pen tool is the way that you add these points; the way you drag the tool as you create the points determines how they look.
The fewer points, the smoother a path will be. Imagine moving a pencil in a single motion to produce a smooth curve. If you attempt that same curve with many short strokes, you’ll wind up with not such a smooth curve—and that’s what you get if you add too many points do to path.
Tip: You might find that creating paths is like eating spaghetti: You can’t seem to stop it from coming off the plate. To stop adding to your path, hold the Ctr/Cmd key and click anywhere inside the document window. The path is now complete.
Here’s a rundown of how to create several common line/curve shapes. Once you have mastered these basic shapes, you will be able to draw almost anything with the pen tool.
Straight Line Paths
Drawing a straight line is easy. Choose the Pen tool on the toolbox. Select the drawing option from the options bar to draw either a path, Shape layer or fill pixels.
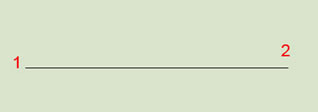
Click once to mark the starting point, then Ctrl-click/Cmd-click somewhere else (without dragging) to mark the ending point. In the figure below, a straight line connects the starting point (1) and ending point (2).
You can also keep clicking to keep adding straight line segments—to create, for example, an irregular straight-line enclosed shape. Just remember to Ctrl-click) at the point where you want the line-adding to end.
Notice as you click a point it changes color and becomes black. This is called “filled or selected” and indicates that you can now modify this portion of the path.
U-Shaped Curve
Curves are more difficult than straight lines, but they come with practice.
The key is to drag after placing each point. That is, as you create a point, don’t just click; rather, click and drag in the direction that you want your curve to go. The further you drag, the larger the arc will be between the current point and the next one that you create.
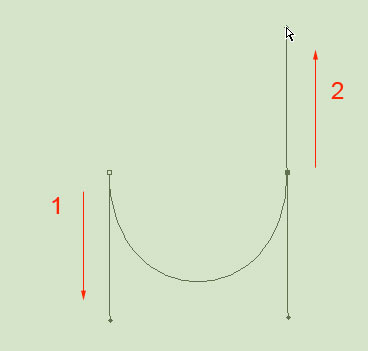
1. Drag downward. As you drag you will see that two handles are being created. These handles determine how acute the curve will be.
2. Move your pointer to the right, parallel with the first point that you made. Click and drag up and you will now see a U shaped curve being generated. The curve goes in the direction that you are dragging. Don’t worry if it’s not perfect; you can modify any curve. The further you drag. the bigger the curve will be.
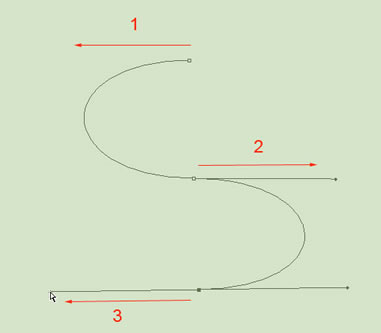
Simple S Curve
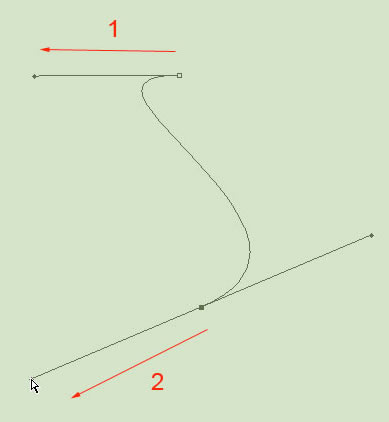
To create an S-curve, drag to the left. Position your pointer underneath the first point. Drag to the left again. Now you have a loose S curve. As you change the angle of your dragging, you change the shape of the curve.
Complex S Curve
Don’t be misled by the name; the complex S curve is actually easy to create. It’s called “complex” because it involves three points instead of two. In the previous examples, there were only two points that controlled the whole curve. A third point adds greater control.
1. Choose a starting point; drag to the left.
2. Position your pointer underneath the first point and drag to the right. So far, you’re creating a U curve.
3. Move the pointer underneath the second point and drag left once again. You are now creating the equivalent to two U curves in different directions. This is the S shaped curve.
4. Ctrl-click away from the path to stop drawing.
M Curve
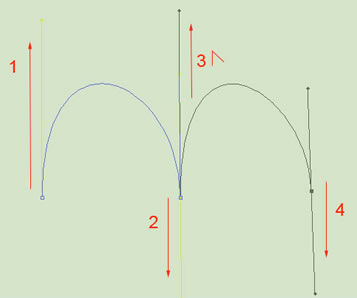
The M curve is a little trickier because it involves a new tool: the Convert Point tool, which you’ll find under the pen tool in the tool box.
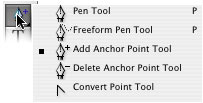
1. From your starting point, drag upward to create the direction handle.
2. Move to the right and parallel, then drag downward to create an inverted U curve.
3. Now the tricky part: Hold the Alt (Option) Key and drag upward. This changes the direction handle for the next curve.
The way the pen tool works is this: First you define a direction with a direction handle (the initial drag of the mouse). The next click actually draws the curve based on the direction of the first drag and the second. If you want a sharp curve (called a cusp), you need to first change the direction of the handle without affecting the previously drawn curve. The Convert point tool is the tool for this task. The Alt (Option) Key is a quick way to temporarily choose the Convert Point tool.
4. Position your pointer to the right of the second point and drag down. You’ve just made an M curve!
5. Ctrl-click (c-click) away from the path to stop drawing.
Tip: While holding down the Ctrl (c) key on your keyboard, you can drag any point to a new position.
Closed Paths
The paths described so far are open paths: that is, they’re not fully enclosed shapes. They’re just lines, and therefore you can’t use them to select areas of your image, nor can you fill them with solid colors.
A closed path, on the other hand, can be filled with color, texture, or patterns. It can be turned into a selection to use on an image. Say you want to apply an adjustment or a filter to an isolated part of your image. You will need a closed path for that.
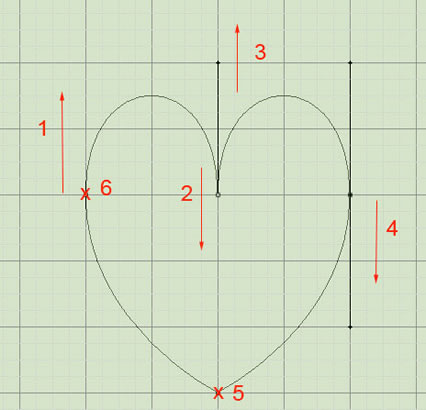
In the image below, X marks the start/end point of a closed path. I turned on the grid under the View > Show > Grid menu.
Here’s how to create a closed path:
1. Repeat the steps for the M curve excerptstep 5 — don’t deselect yet.
2. Click to add a point beneath the other three points. In the middle, the shape of the heart begins forming.
3. Point to the first point you created, without clicking. A small circle appears by the pointer. It tells you that your mouse is hovering over the initial starting point. Click on the circle to close the path and form a closed loop.
4. Click the point to close the path and complete your heart.
The pen tool will automatically stop drawing on completion of a closed path. You could now select the path from the Paths palette and convert it to a selection, export it to Illustrator, or save it for later use.
Bonus Tip
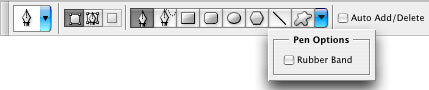
The Pen tool offers two behavior-modification options in the Options bar:
Auto Add/Delete. If this option is turned on, when you point to a path without clicking, you see a + sign, meaning that you can add a point here by clicking. If you point to an existing point, you see a – sign, meaning that if you click here, you will delete the existing point.
Rubberband option. If you turn on this option, then curves start to form as you move the cursor around the screen—a sort of real-time preview of the shape you’ll get when you plant the next click. It’s a useful guide for creating paths. This is found under the Geometry option in the options bar.
This article was last modified on January 5, 2023
This article was first published on October 8, 2009
Commenting is easier and faster when you're logged in!

Recommended for you

Basic Tips for Color Management
In early December, a community of conference-goers explored best practices and n...

The 7 Skills Every Design Professional Needs Today
Today more designers are finding themselves having to be well rounded with diver...

Scanning Around With Gene: Pay Up, or Else!
I’m at an age in life where my finances should be totally secure, but like...