
Dreamweaver How-to: Create "You Are Here" Navigation Links

One principle of good information architecture is to always let your site’s visitor know where they are. One way to do that is the “bread crumb” trails you see on some sites (for example, Home > About Us > Driving Directions).
Another technique is to highlight the button on the navigation bar that indicates which section of the site you’re in (Figure 1). This is a common task, and there are several ways to highlight a button in the navigation bar. I’ll show you a technique that’s simple and straightforward, and then I’ll explain how to incorporate these techniques into Dreamweaver CS3’s productivity-boosting Template system (which, unfortunately, requires a not-so-obvious method).
Figure 1. The Products button in the navigation bar near the top of this page is highlighted to let visitors know which section of the site they’re in.

A Simple and Straightforward Approach
The simplest way to give a link a “you are here” look is to create a class style named something like .highlight or .here with the CSS properties you wish to use, then apply the class to the link.
To follow along as I step you through the process, download this compress folder of files:
highlight_nav_site.zip
After you unzip the files, you’ll have a folder named highlight_nav_site, which contains the files for this tutorial. Start up Dreamweaver.
- Choose Site > New Site. Click the Advanced tab in the Site Definition window, type Highlight Nav for the site’s name, and click the folder icon to the right of the “Local Root Folder” field and select the folder you downloaded: highlight_nav_site. Click OK to finish defining the new site.
- In the Files panel, double-click the file page.html (or choose File > Open and open the file page.html in the highlight_nav_site folder).
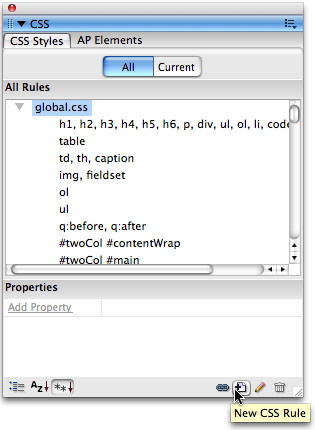
- Now it’s time to create a “you are here” style. Make sure the CSS Styles panel is opened (Window > CSS Styles) and click the “New CSS Rule” button in the bottom right of the Styles panel (Figure 2). The New CSS Rule window appears.
Figure 2. The CSS Styles panel is your command-and-control center for all things CSS. The New CSS Rule button (the third icon from the right at the bottom of the panel) is a fast way to start creating a new style.
- In the New CSS Rule window, click the Advanced radio button; in the Selector field, type “#navbar a.here”, and choose global.css from the Define In menu. Click OK to create the new style. The selector #navbar a.here translates to a style that will format any <a> tag (the tag used to create links) that has the class here applied to it—that’s the a.here part—but only when that link is inside some other tag with an ID of navbar (that’s the #navbar part). In other words, this style will only apply to a link inside the navbar and only when that link has the specified call applied to it.
- In the Type category of the CSS Rule Definition window, set the Color property to #990000. This will make the text on the button bright red.
- Click the word “Background” in the left-hand Category pane and set the Background color to #E6E2AF; click the Browse button and select the file link_bg.png, which is inside the images folder. Choose no-repeat from the Repeat menu. Now your CSS Rule Definition window should look like Figure 3. These three setting will change the background color and add a background image to the “you are here” button.
Figure 3. The Background category of the CSS Rule Definition window lets you not only apply a background color, but also a background image to a tag on a page.

- Click the Box category and set the width to 100 pixels, and the Left padding to 25 pixels. This adjusts the size and makes room on the left side of the button, so that the background image you added in the last step won’t be covered by the button’s text.
- Finally, click the Border category, and add a solid, 4-pixel bottom border with the color #990000. This will change the dark blue underline that appears on the regular buttons to bright red. Click OK to complete the style. Now you just need to apply it.
- On the Web page, click anywhere inside the “Products” button in the navbar. In the Property Inspector, choose here from the Style menu (Figure 4). The link is now highlighted to indicate “You are on a products page.”
Figure 4. Use the Style menu from the Property Inspector to apply a CSS class style to any tag on a page.

Using this Technique With Dreamweaver Templates
Dreamweaver Templates make building and updating Web sites more efficient. I’ve written about templates before, so I won’t go into any detail here about how to use them.
One of the key ideas of Templates is that some areas of a page are not editable—that is, parts of a page that should remain consistent throughout the site are locked and can’t be edited on a page-by-page basis. But you can edit those locked areas in the original Template file, and when that happens all of the pages in the site update. For example, a site’s navigation bar is usually a locked region on a template, so that the designer can quickly update the navigation bar (by adding another button, for example) and have the entire site update.
Unfortunately, since a navigation bar is locked, it doesn’t seem possible to customize the links to create the different “you are here” buttons required by each section of the site. After all, if the nav bar is locked and can’t be changed, how can you apply a class to one of the links? Here’s a little secret: you can, but you need to use a not-so-well known Template feature called editable tag attributes. I’ll show you how this works:
- With the page.html file still open in Dreamweaver, chose File > Save As Template. The Save As Template window appears. Click the OK button to create a new template named page.
- Click anywhere inside the main text area of the page (for example, inside the bulleted list) and choose Insert > Template Objects > Editable region. In the window that appears, type main and click OK. You’ve just created an editable region: the part of the page that can be changed when a new page based on this template is created. (See my previous template article for details.)
Now comes the tricky part. You don’t want to make the entire navigation bar editable. Instead, you just want to be able to change a single attribute of each link—in other words, to make it possible to add a class name to each link. The class name is the .here style you created earlier.
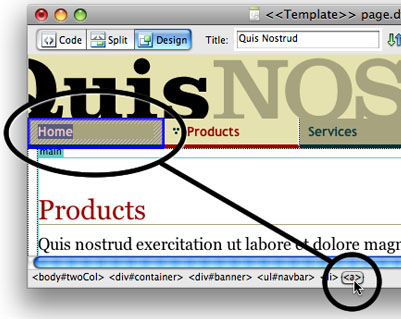
- Click inside the word Home in the navigation bar, then click the <a> in the tag selector (Figure 5). This selects the link itself.
Figure 5. The Tag selector at the bottom of the document window is one of your best friends in Dreamweaver. It’s the most accurate way of selecting a HTML tag. Just click the tag in the tag selector (in this example, <a>) to select the HTML tag (in this case, the Home link).
- Choose Modify > Templates > Make Attribute Editable. The Editable Tag Attributes window appears (Figure 6). This window lets you make any property of the selected tag editable; in other words, this little tool lets you make the tag’s Class property editable, so that you can change it as you start creating pages based on this template.
- Click the Add… button. Type class in the window that appears, and click the OK button. In the Label box, type Home Link and then click OK.
Figure 6. The Editable Tag Attributes feature lets you keep a tag locked on a template-based page, but make one or more properties for the tag editable.

- Click inside the Products link in the navigation bar. In the Tag selector, click the <a> tag to select the link. Remove the here class style by selecting none from the style menu in the Property Inspector. Then repeat steps 4 and 5, but this time use the label Products Link in the Editable Tag Attributes window.
- Repeat steps 4 and 5 for the remaining two links, using the labels Services Link and Contact Link.
- Save the Template file and close it. Choose File > New. In the New Document window, select “Page from Template” from the left-hand list of options. The “page” template you created should automatically be selected in the middle column. Click Create to create the new page.
- Choose File> Save and save this page as services.html. This page represents a real page on your site. It’s based on the template, so only the main text area can be changed. The other sections of the page are locked.
- Select the headline text Products and change it to Our Services. Now it’s time to highlight the Services button in the nav bar.
- Choose Modify> Template properties. The Template Properties window appears, listing the 4 editable attributes you created earlier (Figure 7). Select Services Link and type here in the text field near the bottom of the window. This step adds the class name here to that link. Click OK; the button is now highlighted.
Figure 7. The Template Properties window lets you set values for editable tag attributes.

That’s all there is to it. To create a page in the Products section, just create another page based on the template, and choose Modify > Template properties to set the Products Link class name to here.
Editing the Navigation Bar
The nice thing about using Dreamweaver’s Editable Attribute feature is that the navigation bar remains locked, so that you can edit it in the template file and the navigation bar changes are duplicated in all of the pages built from that template. I’ll show you how to do that next.
- Close the services.html page and open the page.dwt file—that’s the template file, and you’ll find it in the Templates folder in the site. You’re about to add one more link to the end of the navigation bar.
- Click just to the right of the “s” in the Contact Us button. Hit return and type Site Map. The text will look really small, but select it and link it to the file sitemap.html using your favorite Dreamweaver technique for creating a link. (For example, select the text Site Map, and in the Property Inspector click the folder icon to open the Select File window; locate and select the sitemap.html page.)
- Use the tag selector to select the <a> tag that’s associated with the link you just created. You need to give this link an editable tag attribute as well.
- Choose Modify > Templates > Make Attribute Editable and follow the steps above to add an editable class attribute for the tag. Use Sitemap Link for the label.
- Save the Template file. Dreamweaver will ask if you want to update the pages that use this template. Click Yes and Dreamweaver now updates the navigation bar on the services.html page. Open services.html and you’ll see that the Sitemap link now appears.
The editable tag attribute feature of Dreamweaver’s Template tools is a handy way to control properties of an otherwise locked region of a page. It’s particularly useful for applying custom class and ID names to tags. For instance, you can create an editable class property for a template page’s <body> tag, then on a page-by-page basis change the class name applied to the <body>; in this way, you can apply class names like about, products, and services to identify the section of the site the page belongs to and then use complex descendent selectors, such as .about p to customize the appearance of tags on pages for different sections of the site.
This article was last modified on January 8, 2023
This article was first published on June 13, 2008
Commenting is easier and faster when you're logged in!

Recommended for you

Markzware Q2ID v3 for Microsoft Windows XP
Designers, printers, creative professionals struggling with re-creating intricat...
TypeTalk: Learning to Use Nested Styles
Learning InDesign’s Nested Styles has been one of those ‘typographic’ peas I’ve...

dot-font: Then & Now: Jack Stauffacher & Hermann Zapf
dot-font was a collection of short articles written by editor and typographer Jo...