

In this first of an ongoing series on CreativePro.com, Adobe Illustrator CS6 WOW! Book author Sharon Steuer and the WOW! team will present in-depth explorations into a variety of digital art techniques. And where better to start than one of the most highly touted features introduced in Illustrator CS6: the Pattern Editor. There are of course a lot of things to learn here, so for this first foray into pattern-making, co-author Cristen Gillespie and Sharon will get up-and-running by walking you through creating variants of existing patterns. And in this case, it’ll be a set of cool “Vonster” patterns created for Adobe by artist Von Glitschka. (Please look for more details about Von, his artwork and his projects, at the end of this article!)
If you’ve ever attempted to manually construct a repeating pattern in Illustrator, you know it isn’t easy. The most powerful thing that Illustrator CS6’s new, user-friendly Pattern Editing Mode (PEM) does for you, is that it will now automatically take care of duplicating the necessary elements in a pattern tile, making it fairly painless to create a seamless repeating pattern. Dig into the feature set, though, and you’ll find you don’t even have to settle for simply repeating within a standard grid pattern—PEM also allows you to create user-specified offsets for your pattern using parameters for Brick and Hexagon repeats. You can enter PEM with an already-created pattern, create a new pattern by entering PEM with selected objects, create a pattern entirely within PEM, or any combination of the above. Illustrator’s 64-bit performance upgrade has made much of this power possible, but be aware that the more complex your patterns become, the more you may experience slow screen redraws. In future lessons we’ll look at different ways to approach creating a pattern from scratch, but by using the Vonster patterns as a starting point, you’ll be able to quickly dive right into the new features.
The Vonster patterns are automatically installed with Illustrator CS6, and you can open them by choosing Swatches > Decorative > Vonster. After creating a new document—Ctrl-N (Win)/Command-N (Mac)— click on a pattern in the Vonster library to add it to the Swatches panel, or select all of them and choose Add to Swatches from the library’s pop-out menu. In order to protect an original pattern swatch, drag it to the New Swatch icon in order to duplicate it—then you’ll be working on the copy.
1. Entering Pattern Editing Mode (PEM)
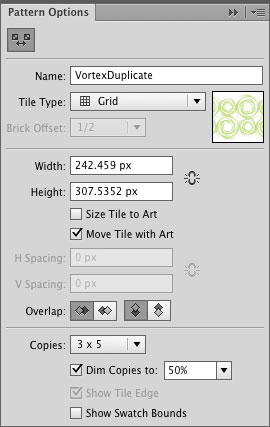
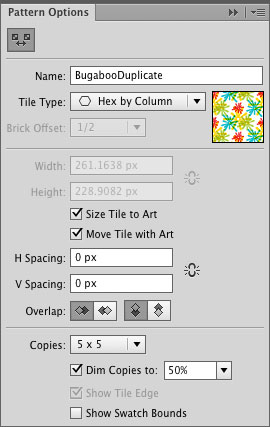
Simply double-click on a duplicated swatch in order to open the Pattern Options panel. By default, this puts you in a special kind of Isolation mode as it opens the Pattern Options panel, generates a repeat of copies, and dims the repeats (copies) to make it easier for you to see and select the actual objects you’re editing.
You can freely change most of the Pattern Options panel settings to suit your current needs, and the latest adjustments you make here will persist from one session to the next. Large or complex elements can take a long time to redraw as you make edits to your pattern, so you may want to reduce the number of copies. Very small patterns may need several repeats to show you what they’ll look like in use. Dim the copies by a larger amount when you want to rework the pattern objects themselves, and by a smaller amount, or at 100%, when you want no distractions while viewing the pattern as it will appear when repeated in use.
You can do just about anything to your pattern elements while you’re in PEM isolation mode. Almost all Illustrator object creation and editing tools work normally within PEM, so you can delete objects and create them from scratch in PEM. You can use the artboard as your scratchpad, and only elements within (or at least touching) your tile bounds will be included in the pattern. Be aware that elements that you place on the artboard outside of the tile bounds will be deleted when you exit PEM, so in order to save elements not included in your pattern, copy and paste them into another document before you exit PEM.
And speaking of exiting PEM, if, while experimenting with patterns, you end-up with a pattern variation that you wish to save, or wish to exit PEM, skip to Step 4, “Saving pattern swatches and exiting PEM.”
2. Interactive pattern adjustments with the Pattern Tile tool (PTT)
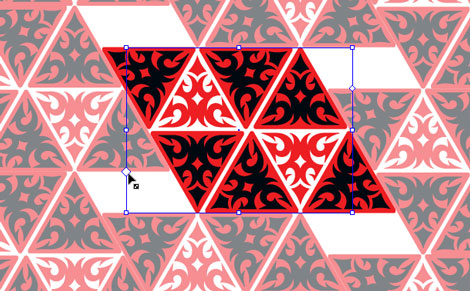
When you open the duplicate of Vonster’s “Vortex” pattern, the repeat you see by default is based on a simple grid. We’ll get to experimenting with other types of repeats, but for now, stick to the Grid Tile type and concentrate on modifying the tile’s dimensions, and changing the size, rotation, and position of the objects themselves within the tile. If Size Tile to Art is not enabled, enable it now. You’ll see the tile boundaries encompass all your objects. Any spaces between elements become blank, transparent areas of your pattern, which will allow you to later place your pattern over different backgrounds.


You begin editing this initial pattern by simply moving and transforming the objects themselves. Within PEM, you can still use Illustrator’s tools to modify your artwork, undo your mistakes—Ctrl-Z (Win)/Command-Z (Mac)—and reposition elements anywhere along or within the tile’s boundaries. As long as Size Tile to Art is enabled, you’ll notice that if you attempt to drag an object to overlap the tile boundary, the tile will automatically resize to again encompass all the objects.
However, if you want to drag an object so it overlaps the tile boundary without resizing the tile, Size Tile to Art has to be disabled. To see what that does, why don’t you now disable Size Tile to Art and drag an object so that most of it falls outside the Pattern Tile. As long as any portion of your object touches the tile boundary, you’ll see it automatically “wrap” to the opposite side of the tile.
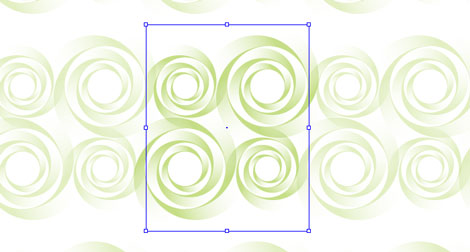
You can adjust the spacing around the repeat closer together or further apart by selecting the Pattern Tile tool from the upper left corner in the Pattern Options panel, then dragging on an edge to make the tile larger or smaller along that edge. Hold down the Alt/Option key to drag two sides at the same time, and use the Shift key to constrain the tile’s dimensions on all sides while dragging. (When you use PTT, Size Tile to Art is automatically disabled. A small peculiarity in CS6 is if you start with it enabled, you won’t see the checkmark disappear when you modify the tile’s dimensions. In fact, to make the tile once again the same size as the art, you’ll now have to disable the command, then re-enable it. Because it can be confusing to see the command enabled without having any effect, make a habit of disabling it when you don’t need it.)
3. Adjusting a tile’s dimensions and spacing repeats by the numbers
Although most often you’ll use the PTT to adjust the tile’s dimensions (and the repeat offset when you choose the Brick or Hexagon tile type), you can instead adjust the dimensions numerically if your pattern tile has to be a precise size. With Size Tile to Art disabled, Width and Height input boxes become active to let you enter a numerically specified size. You can enter different measurement units as well, and Illustrator can even compute mathematical equations entered here.
For those times when you know exactly the size and spacing you want, or you dislike working with odd numbers such as 213.814 pt and would really rather change that to 214 pt, you’ll want to use the input boxes for precision. However, in order to numerically control the spacing by entering values into the H and V spacing fields, you’ll have to enable Size Tile to Art. You create overlaps by entering a negative number.
4. Saving pattern swatches and exiting PEM
Once you’re comfortable with using the PTT and arranging your pattern elements both within and along (touching) the edges of the tile, you’re ready to learn to save a pattern swatch. If you look in your Swatches panel, you can see that a pattern swatch is already in there. It was placed in your Swatches panel as soon as you entered PEM, and it’s that swatch you have been editing. If you’re done with editing this pattern, there are three ways to keep the pattern in its current state and exit PEM: 1) you can click Done; 2) click the far left arrow in the isolation bar; or 3) press Esc.

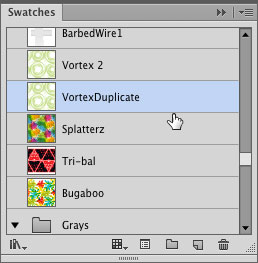
However, chances are you’ll want to experiment with your pattern elements, saving several versions you might want to later use, before you quit PEM. So to save the current swatch and remain in PEM, click the Save A Copy command in the isolation bar, give the copy a distinct name so you can remember what version it is, and then continue adjusting the original swatch. To instead exit PEM without saving any changes to the pattern swatch you originally experimented with, click Cancel.
5. Adding complexity with offsets
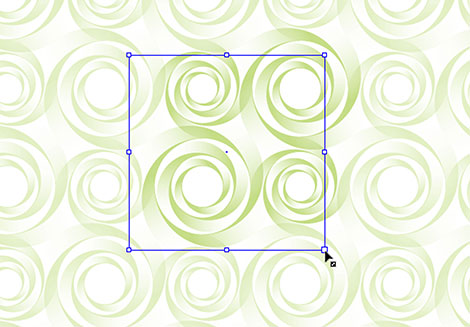
The Grid Tile Type is an extremely flexible and easy-to-use format for creating patterns, but once you’re comfortable with this standard method, try changing your Tile Type. When you choose Brick (by Row or Column), you also want to choose the amount by which to stagger (offset) the pattern. You can either use the drop down list and choose an amount (from 1/4 to 4/5), or you can use the PTT to adjust the offset interactively. As long as this tool is active, you’ll see a diamond-shaped anchor on the horizontal edges (Brick by Row) or the vertical edges (Brick by column). Drag this diamond to either side of center to change the default offset of 1/2.

Hexagon by Row or by Column offers even greater complexity when adjusting a pattern’s offset. You won’t get a drop-down list of offset increments, nor see any diamond-shaped anchors when you have the PTT active. Instead, anchors on each segment are modified exactly as you modified tile dimensions on the Grid tile type, and the hexagons are offset by as little or as much as you determine. The orientation of the hexagon shape changes when you switch between Row and Column as your Tile Type. Although this is a very complex tile type to design manually, experimenting with it in PEM is easy. You can add complexity to many of your patterns just by creatively overlapping the hexagon repeats, even when the objects don’t appear to lend themselves to easily repeating in a hexagon shape.

6. When objects overlap
As you adjust the tile dimensions with any Tile Type, objects may begin to overlap other objects. You can control which object overlaps others using the Overlap icons. These icons determine whether the object at left overlaps the object at right, or vice versa, and the same with an object above another object. Don’t forget that you can further adjust which objects overlap others by dragging their layers above or below others in the Layers panel.
In future lessons, we’ll look at the process of creating a pattern from scratch, arranging the objects in PEM, and creating color variations, all of which would have been very difficult and time-consuming to construct before Illustrator CS6. Being able to design precisely and experiment with complex repeating patterns will soon become very simple when you learn to harness the powerful Pattern Options panel.

Von R. Glitschka: Von is the head of Glitschka Studios, a multi-disciplinary creative firm that melds design with illustration. His studio works with a wide variety of clients, ranging from small business to multi-national corporations, providing them with original materials for diverse projects, including brand identity, typography, iconography, and illustration. His studio has won numerous awards and appeared in major publications, such as Communication Art, Print, and HOW Design. Von himself teaches illustration and design, and gives one-day workshops based on his book, Vector Basic Training, which is a systematic process for creating vector art that marries precision with creativity. Von is also currently developing design content that will be published soon on lynda.com. Find him on the web at www.vonglitschka.com.
Cristen Gillespie is a contributing writer for The Adobe Illustrator WOW! Books, and has coauthored The Photoshop WOW! Book. She has also coauthored articles for Photoshop User magazine. With a decades-long enthusiasm for the digital world of art and multimedia, and an equal interest in digitally preserving and presenting family histories, she enjoys the challenge of teaching others to love the software she loves, broadening her own digital horizons, as well as getting the opportunity to work with files from some of the very best digital artists out there.

Sharon Steuer has been creating, writing about, and teaching workshops on digital art since the early 1980s. The current edition of her Illustrator WOW! book, The Adobe Illustrator CS6 WOW! Book, is the twelfth book in the series. Sharon is also the author of Creative Thinking in Photoshop: A New Approach to Digital Art, and is a regular contributor to CreativePro.com and Untapped Cities. Her digital paintings and illustrations have appeared in numerous books and magazines and have been exhibited nationally.
This article was last modified on December 17, 2025
This article was first published on August 30, 2012
Commenting is easier and faster when you're logged in!

Recommended for you

The Digital Art Studio: Illustrator’s New Crop Image Button
The 2017 release of Adobe Illustrator added a new feature you can use to permane...

How to Prepare Raster Images for Use with Illustrator Brushes
In the process of testing Illustrator features released last June in the Creativ...

The Digital Art Studio: Patching Text without the Fonts
How do you fix a typo when you don’t have the correct font? After my beloved stu...