


Excerpted from “Photoshop Color Correction” (Peachpit Press).
The power of Photoshop’s Curves features (Image > Adjustments > Curves) comes from its ability to directly remap the tonal values in an image or any channel of an image.
Unlike the Levels command, which has control points only for the highlights, shadows, and midtones, the Curves tool provides up to 14 control points (although it’s rare to use more than 5 or so).
The horizontal axis in the Curves dialog box represents the current values of the pixels in an image or selected part of an image. The vertical axis represents the tonal values after the curve is applied. The default curve is a straight line with an angle of 45 degrees — for each pixel, the input value is the same as the output value. As you add points to the curve and drag them to reshape the curve, all tonal values are affected, especially those closest to the point.
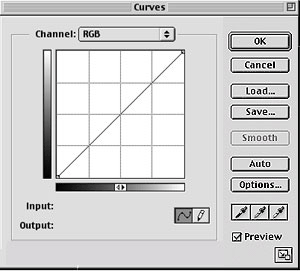
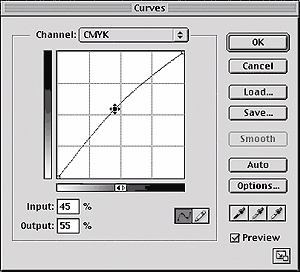
Figure 1: The Curves dialog box starts with a straight diagonal line, which for an RGB image goes from the shadows at bottom left to highlights at top right (top). Dragging an RGB curve upward adds light, which makes the image brighter. By default, all channels in an image are affected, as shown by the Channel pull-down menu (here it reads “RGB”) but in practice most corrections are applied to one channel at a time.
For a CMYK image (bottom), the Curves dialog box starts with a diagonal line going from the highlights at left to shadows at right, so dragging the curve upward will add ink, making an image darker.
Curves work the same way in RGB and CMYK, but Photoshop displays them in a way that may seem counterintuitive at first. The RGB curve (see figure 1) has shadows on the left side and highlights on the right, whereas the CMYK curve is the other way around.
Some people find this approach sensible, because of the difference between the radiant light of an RGB monitor and the reflected light of a printed page. In RGB, dragging the curve upward means increasing the amount of light emitted, so the colors are brighter. In CMYK, dragging the curve upward means increasing the amount of ink on the page, so the colors are darker.
Other people prefer to reverse the default orientation of the RGB curves (by clicking in the gradient below the curve grid), which offers one major advantage: Any curve you would apply to the red channel in an RGB image can be applied, –with little or no change, to the cyan channel of an equivalent CMYK image. Likewise for curves applied to the green/magenta or blue/yellow channels.
It’s rare in RGB corrections and unheard of in CMYK to apply a curve to all the channels in an image. It’s best to apply curves on a channel-by-channel basis, for precise control over three key properties of an image: its tonal aimpoints, contrast, and color balance.
- The tonal aimpoints that define an image’s color range are the highlights and shadows, and the Curves tool is indispensable for adjusting the existing highlights and shadows in an image so they take full advantage of the tonal range of the output device.
- The overall contrast of an image is defined by the difference between its highlight and shadow points. But extra contrast can be coaxed from almost any image by making adjustments to Curves, because where a curve is steeper, an image will have greater contrast.
- Color balance is an essential aspect of image quality, and a subtle adjustment in Curves is often the easiest way to remove a color cast. This enables you to compensate for scanning errors, unusual lighting conditions, or problems with the original film or its processing.

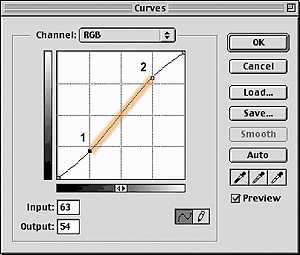

Figure 2: An original RGB image (top) has been modified with a gentle S-shaped curve (middle) in which points have been added to pull down the three-quarter tone value (1) and drag up the quartertone value (2). The result (bottom) is increased contrast in the shaded midtone area between 1 and 2 (where the curve is steeper), but reduced contrast in the highlight and shadow areas (where the curve is flatter).
The competent use of Photoshop’s Curves tool is an essential skill in color correction, as curves provide the most powerful way of precisely remapping tonal values.
The key skill in correcting images using Photoshop’s Curves dialog box is understanding on a channel-by-channel basis how the input values (along the horizontal axis) are remapped to the output values (along the vertical axis). It sounds simple enough, but properly applied, it lets you fix blown-out highlights, plugged-up shadows, strange color casts, and many other defects. We’ll be using curves to set the optimal aimpoints for highlights and shadows, for correcting midtone neutrals, and for correcting contrast.
Return to the main story “Essentials of Photoshop Color Correction: Applying RGB Curves.”
Excerpted from “Photoshop Color Correction” (Peachpit Press).
Peachpit Press is offering this book at a discount to creativepro.com readers. Follow this link.
This article was last modified on January 3, 2023
This article was first published on November 6, 2002
Commenting is easier and faster when you're logged in!

Recommended for you
Make a Grungy Logo in Photoshop
If you’re a seasoned Photoshop user, this little tutorial might not be for...

How to Apply Textures to Uneven Surfaces with Photoshop
This tutorial is intended for intermediate Photoshop users, or really patient, f...

Lightroom CC for Designers
If you’re a designer, you’d be forgiven if you responded to Adobe’s announcement...