


They say that limiting your options can lead to creative solutions. This is certainly true for Web designers and typography. Since the beginning of the Web, our typographic choices have been limited by the fonts available on other people’s computers. The so-called “Web safe” fonts — Arial, Helvetica, Times New Roman, Courier, Verdana, Georgia, and a few others — have dominated Web site typography because we can’t always be sure that the person on the other end of the Web browser has any other fonts installed.
This has lead to such workarounds as images full of type in the place of HTML text, and Flash and JavaScript solutions like SIFR and Cufon. While creative, these workarounds are flawed. But now we can break away from all that and use a much wider set of fonts, thanks to the CSS @font-face rule.
The @font-face rule lets you specify fonts that visitors can download from the Web and use while viewing your site. Visitors won’t need to own the fonts or have them installed; when they visit your site, the Web browser temporarily downloads the fonts and uses them while displaying text (Figure 1). @font-face is supported by all current Web browsers.
Figure 1. This example from niceWebtype.com may look like one big graphic (OK, there is one big graphic: the background image of the motorcyle), but the big red word “Filthy” is normal HTML text, spiced up with @font-face and the font Bello Pro. Click on the image to see a larger version.

However, it’s not all wine and roses. There are a few things you’ll need to keep in mind if you want start using @font-face, and several ways to use it effectively.
In part one of this two-part series, I’ll discuss how to most effectively and easily use the CSS @font-face rule. In part two, you’ll learn how to create Web fonts and host them on your own Web site. Part two will also cover the downsides to using Web fonts.
The Challenges
The @font-face rule has been around for a while, but only recently have enough browsers supported it for it to be a reliable Web-design option. Still, there are a few things to keep in mind before you jump on the @font-face bandwagon.
• Browser support isn’t 100%. Remarkably, Internet Explorer has supported @font-face since IE 4. However, versions of Safari earlier than 3.1, Opera earlier than 10, Google Chrome before version 4, and Firefox earlier than 3.5 do not support @font-face. Fortunately, the communities that use these browsers tend to upgrade relatively frequently, but it’s still possible that some people won’t see what you intend. In part two of this series, I’ll show you how to give these users a viable alternative.
• Different formats for different browsers. Unfortunately, you can’t just slap a copy of your favorite font on your Web server and expect visitors to be able to see your finely crafted Web page.
First, Internet Explorer has its own proprietary format:Embedded OpenType format (EOT). You need special software to convert a font to EOT, but don’t even bother — it’s really complicated. Fortunately, an online service can help (as you’ll see in part 2 of this series).
Forget Postcript fonts. Browsers other than IE require TrueType or OpenType fonts. Firefox 3.6 has introduced yet another font format called Web Open Font Format (WOFF).
While these limitations are good to keep in mind, in part two I’ll show you techniques that take care of all of these font-format differences.
• Licensing requirements. While it’s possible to put any TrueType or OpenType font on your Web server and add the CSS code so that Safari, Firefox, and Opera can use those fonts, that doesn’t mean it’s legal to do so. Font foundries like Adobe, Emigre, Hoefler & Frere-Jones, and House Industries are justifiably worried that putting a font on a Web server means anyone could download and use the font without paying for it. If you buy a font, odds are it does not include a license for Web use. Check the licensing agreement. However, there are free fonts that don’t restrict Web use, and, as you’ll see, there are ways to legally use high-quality, commercial fonts on the Web.
Hosted Services
There are two ways to implement Web fonts: Use a Web hosting service or host the fonts on your own server (which is trickier than it sounds).
First, let’s look at hosting services, such as Typekit (Figure 2), Kernest, and Typotheque. The fonts are downloaded from their servers, not yours, and you access them by adding either a little JavaScript code (Typekit’s method) or CSS (Kernest and Typotheque) to your Web page.
Figure 2: Typekit is one of the few commercial font-hosting services that make using fonts on the Web easy.Click on the image to see a larger version.

While the three services do the same thing — let you use uncommon fonts on a Web page — the cost and font offerings for each services varies. Here’s a quick breakdown:
• Typekit offers both free and paid account types. The free account gives you access to more than 90 fonts, though you’re restricted to only two fonts per site. The Personal account ($24.99/year introductory price) lets you choose from more than 280 fonts and use a maximum of five fonts on a site. The Portfolio ($49.99/year) and the Commercial ($249.99/year) accounts give you full access to 370+ fonts. You can use an unlimited number of fonts on five sites (Portfolio account) or 40 sites (Commercial account). The list of fonts Typekit offers is also continually growing.
• Kernest offers lots of free fonts — 600+ — and a collection of commercial fonts that you “rent” on a yearly basis at prices starting at $9 per font. Among the free fonts, Kernest includes what it calls “Web Native” fonts designed specifically for viewing in a Web browser, with typographic features such as larger x-heights, open counters, and less contrast between thin and thick areas of each letter. These fonts are more readable on screen than fonts created originally for the high resolution of print design.
Kernest also lets you download fonts to use on your own Web server. I’ll cover that in part 2 of this series.
• Typotheque is a type foundry that produces high-quality OpenType fonts. They also offer their fonts for use on the Web. You pay a flat fee for each font, not a yearly subscription cost. There’s a Web font-only price (20% of regular cost), which lets you use the font on your Web pages. If you pay for a full license you also get the OpenType, which you can install on your computer and use for print design. In both cases, Typotheque hosts the Web fonts — you simply add CSS to your pages to access the fonts for your site. You can use the fonts on an unlimited number of Web sites. One downside to Typotheque is that there are only 28 font families to choose from.
[Editor’s note, August 2010: Web fonts are in constant flux. Since Dave wrote this article series, more companies have begun offering hosting services. Click the links below for details on each company:
• Extensis Makes Web Fonts Easier with WebINK
• Font Shop Introduces Web FontFonts
• FontsLive.com Enables Web Fonts Without JavaScript
• Google Enters the World of Web Fonts
We’ll continue to keep you posted on Web font developments.]
Using Typekit
I’ll demonstrate how these services work using Typekit. Because there’s a free version of Typekit, you can even follow along every step of the way without making a big commitment.
1. Get an account. Visit https://typekit.com and click the “Try it for Free” button. Then click the Sign Up button under the “Trial Plan.” You’ll need to provide your name and e-mail and make up a password.
2. Create a kit. The collection of fonts you use for your Web site is called a “kit” (Figure 3). First, enter a name for your kit — “My Site,” “My Site Fonts,” whatever. Enter your Web server’s host name; for example, www.mysite.com. Specifying the domain you wish to use the kit on is a requirement because it prevents other sites from using the Typekit fonts you’ve paid for. You can list up to 10 domains per kit, which lets you use the same set of fonts on a local testing server, a main site, and subdomains (such as internal.mysite.com). At the very least, specify both www.mysite.com and mysite.com.
Figure 3. The first step in creating a kit is giving it a name and listing which domains can access the fonts in the kit. You can edit both of these pieces of information at any time from the Kit Editor. Click on the image to see a larger version.

3. Copy the JavaScript. You need to put two lines of JavaScript code on each page that will use Typekit fonts (Figure 4). The JavaScript contacts Typekit, authorizes your site, and downloads the files for whoever is visiting the page.
Figure 4. Typekit relies on JavaScript to load the fonts you use on your site. You’ll need to include these two lines on each page of your site. If you ever forget the JavaScript code, login to Typekit.com, launch the Kit Editor, and click the “Embed Code” link in the top right of the Kit Editor window (see Figure 6). Click on the image to see a larger version.

4. Edit your kit. When you’re logged into the Typekit site, you’ll see a “Launch Kit Editor” button in the upper right of each page (circled in Figure 4 above). Click this button to open a new window. The Kit Editor lets you do things like manage your fonts, domains, and settings, but when you first launch it, you’ll click a button that takes you to the site’s listing of fonts (Figure 5). You can view fonts by style (serif, sans-serif, script, exotic) or by tag (clear, headline, fun, etc.). When you find a font you like, click the “Add” button to put it in your kit.
Figure 5. Adding fonts to a Kit is as simple as browsing the site’s long list of fonts and clicking the “Add” button. Click on the image to see a larger version.

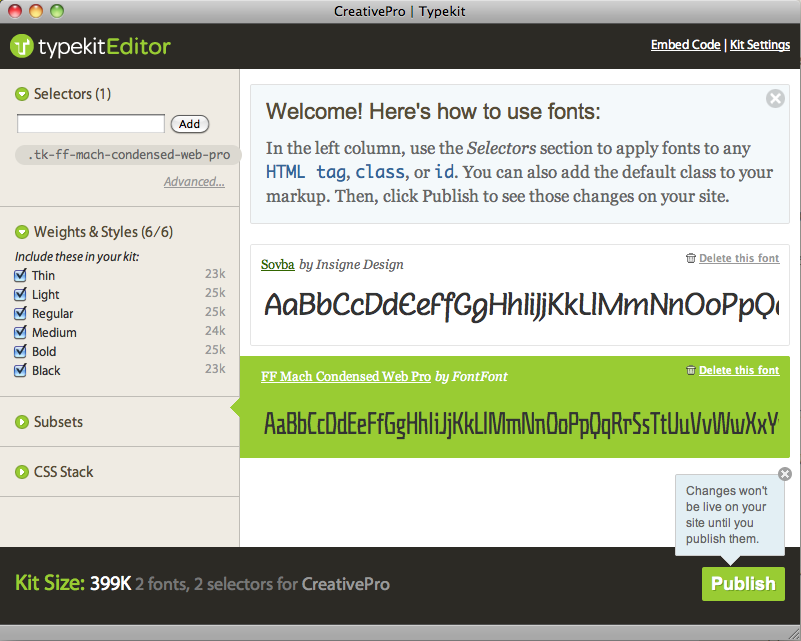
5. Manage your kit. Whenever you add a font, the Kit Editor window opens (Figure 6). Here you can remove fonts and disable particular weights in multiple-weight fonts.
Figure 6. The Kit Editor lets you manage your fonts and select the domains where the fonts can be used. Click on the image to see a larger version.
Keep a close eye on the Kit Size in the lower left of the Kit Editor Window. It lists the total download size of the fonts you’ve selected. It’s easy to pick a bunch of fonts and find that your visitor will have to download 1MB worth of data just to view your pages. I’d recommend using at most two fonts: a single headline font in bold, and a body font with bold, italic, and regular weights.
6. Publish your kit. After you’ve collected the fonts you want to use, click the Publish button in the lower right corner of the Kit Editor. This updates the Typekit service with your fonts and settings. This step is very important — if you forget to publish your kit, you won’t have access to the fonts in it.
7. Copy the CSS code. In the top left of the Kit Editor you’ll see a “Selectors” field, which is where you’re supposed to enter the CSS selectors you want to use your fonts with; for example, h1 for the <h1> tag or .coolFont to create a class. Doing it this way is a pain and totally unnecessary. Instead, click the “Advanced” link under the Selectors field, which opens a window showing you the code you need for your CSS (Figure 7).
Figure 7. Clicking the “Advanced” link in the top left of the Kit Editor window opens this window, which describes how to use the CSS Font-Family property with the selected font. In this example, you need to add font-family: “sovba-1”, “sovba-2”; to any style that you wish to use this font with. You must use both names supplied. (To prevent piracy of the fonts, TypeKit splits them into two different fonts.) Click on the image to see a larger version.

Basically, you’ll use the normal CSS font-family property in your stylesheets like this:
h1 {
font-family: “sovba-1″,”sovba-2”;
}
Just copy the names that are listed in the window. If you have more than one font, select the font in the Kit Editor (click it and a green bar will appear behind the font) and click the “Advanced” button a second time to copy the font-family CSS code for that font. Note that you don’t have to do this for each weight (bold, italic, thin, etc.), just for each font.
8. Add the JavaScript code to your Web pages. As mentioned in step 3, you’ll need to add some JavaScript code in the <head> of your Web pages. One good place for this code is just before the closing </head> tag and after any other JavaScript and any CSS code. (Did you forget to copy the JavaScript code in step 3? You can always access it from the Kit Editor as described in the Figure 4 caption.) For example, the bolded text below shows the JavaScript code in place in the <head> of an example Web page. Note that the JavaScript will be different for each account, so copying the code below won’t work for you. You’ll need to set up your own Typekit account and copy the specific JavaScript code they give you.
<title>My Site</title>
<link href=”site.cs.css” rel=”stylesheet” type=”text/css” />
<script type=”text/javascript” src=”https://use.typekit.com/uod3ejs.js”></script>
<script type=”text/javascript”>try{Typekit.load();}catch(e){}</script>
</head>
9. Set up the CSS code. Now you’re ready to use the font in your style sheet. At this point, treat the font like any font you’d normally use with the CSS font-family property. For example, to use a common Web font like Arial with all your heading 1 tags, you could add this CSS to a page:
h1 {
font-family: Arial;
}
To access a TypeKit font, you need its names (step 7). There will be two names for each font. So to use the Sovba font for all h1 tags, you’d write this:
h1 {
font-family: “sovba-1”, “sovba-2”;
}
It’s a good idea to add a few backup fonts to this list, in case a visitor’s browser doesn’t support Web fonts or he or she can’t download the font from TypeKit.com. To make Arial and a generic sans-serif font your backup fonts, you could change the code immediately above to this:
h1 {
font-family: “sovba-1”, “sovba-2”, Arial, sans-serif;
}
If you plan on using <strong> or <b> tags to make text bold, or the <em> or <i> tags to italicize text, be sure that the font you selected in Typekit has both bold and italic versions, and that you add those versions to your kit. Once you’ve added bold and italic versions to your kit, you can use regular HTML like <strong> or <em> to format text that uses your Web font. Continuing with the h1 example above, if you had the HTML code <h1>Hello <strong>World</strong></h1>, the word “World” would be display using the bold version of Sovba.
Some fonts include multiple weights, such as Light, Medium, Black. If that’s the case, and you’ve added those weights to your kit, you can use numeric values for the font weight. Valid values are 100, 200, 300, 400, 500, 600, 700, 800, 900. So to display the H1 tags using the Thin version of Sovba, you’d need to add the Thin version to your kit and then use CSS code like this:
h1 {
font-family: “sovba-1”, “sovba-2”, Arial, sans-serif;
font-weight: 100;
}
You’ll have to experiment with the font-weight settings (Figure 8). There’s no exact mapping of which value (100, 200, and so on) matches which weight (Thin, Medium, and so on).
Figure 8: Using numeric values for the font-weight property lets you access multiple weights within a single family. Click on the image to see a larger version.

Go to Page 2 for the crucial last step!
This article was last modified on December 17, 2022
This article was first published on February 8, 2010
Commenting is easier and faster when you're logged in!

Recommended for you

TypeTalk: Converting QuarkXPress Files in InDesign
TypeTalk is a regular blog on typography. Post your questions and comments by cl...

Five Healthy Habits in InDesign
Everyone knows the healthy habits we should practice regularly, like flossing ou...
dot-font Book Free to Download
Back in 2007, longtime CreativePro.com author John D. Berry gathered a selection...