
Fix a Broken Wing in Photoshop
This article courtesy of the Adorama Imaging Resource Center, part of the Adorama Camera retailer.
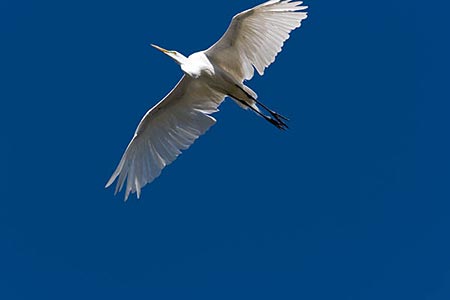
I’ve been having fun shooting photos at an egret rookery, but it’s frustrating, too. The birds are so beautiful flying to their nests, and they often carry slender eucalyptus branches with a cluster of leaves on the end, which flow behind them gracefully in flight. (There are some examples on my Web site.) But I need my 70-200mm image-stabilized lens zoomed out to 200 to bring them close enough to fill the frame. It’s difficult to follow them at this magnification and I sometimes cut off a wing.
I decided to take such an image and see if I could repair it. Figure 1 is one that needs some work!

Figure 1.
I’m using Adobe Photoshop CS2, but you may be able to use other programs. Of course, menus will be different in different programs and versions. And I’m speaking Windows here. If you use a Mac substitute Cmd for Ctrl and Option for Alt.
Techniques We’ll Learn
In fixing this image I’ll show you how to extend the canvas size and patch in more sky, and how to add a wingtip from another shot and make it match.
The hardest part is finding a complete, matching wing. I could use the bottom wing, flipped and rotated, but it’s in shade and brightening the feathers to match the top wing without changing the surrounding sky would be quite a job. I looked at the other shots I made that day and found one with a wingtip at a similar angle.
Adding More Sky
The first thing I need to do is manufacture more sky on the top edge. I’ll go to the menu bar and click on Image > Canvas Size. The dialog box is shown in Figure 2. I’ll increase the vertical size by about 10 percent and click in the box with nine squares to tell it to add the space on the top. The canvas color isn’t important; it will be covered up.

Figure 2.
Now I need to fill in sky in this added canvas by cutting out a section of existing sky and pasting it into the new area. In an image where the tones in the sky are very even (no noticeable gradients from lighter to darker), this method is easier than cloning.
To copy the sky I’ll use the Rectangular Marquee tool and make a selection of the top portion of the existing sky big enough to cover the added canvas. In this image I could take a piece from below the bird. It may be a slightly different shade than the top part of the sky, which could be fixed. But in most images you need to use the edge adjacent to your added canvas, so I’ll do that here. That lets me show you a trick I like to use to match the two pieces at the join line.
A Marquee Trick
Before I select the area with the Marquee tool, I’ll grab the lower right corner of the image window and pull it down and to the right. This gives me some working room around the image. This lets me start the Marquee Tool outside the image edge on the upper left corner. Then I’ll drag it diagonally to beyond the image edge on the lower right corner.
The selection now automatically extends to the exact edges of the image on the left and right, so I only have to control the top and bottom edges. The numbers 1 and 2 on Figure 3 show my starting and ending points with the tool.
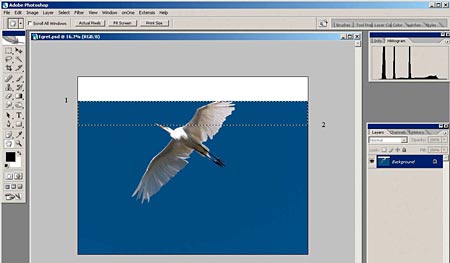
Figure 3.
If I make the marquee selection bigger than I need vertically, no problem. When I move the new piece of sky up to fill the blank canvas, the extra will wind up outside the image area on the top. But I have to be very careful where I place the top edge of my marquee. I don’t want to catch any of the color of the added canvas area, but I want to get very close to the edge.
Now I click Edit > Copy (or Ctrl-C) and then Edit > Paste (Ctrl-V.) That puts the selected piece of sky on a new layer above the Background layer, but you don’t see anything different because it is an exact copy of the Background.
Now I want to move this new piece up to fill the added canvas area. Even though the sky looks even in tone, there may be a slight difference in the darkness of the top and bottom edges of my cutout piece, so I’ll utilize a quick trick to make any small difference invisible. I’ll flip the piece vertically. (This won’t yield a good-looking result if there is a noticeable tonal gradient at the top edge of the original sky. You will have a double gradient extending both directions from your seam line.)
A Quick Flip Trick
To flip the new piece, from the menu bar I’ll click on Edit > Transform > Flip Vertical. Then I’ll click on the Move Tool and slide the new sky piece up until its bottom edge just barely overlaps the top edge of the original sky. As I move it I’ll hold down the Shift key, and as long as I move the cursor close to vertical, this will constrain the movement of my new piece of sky to vertical, so the right and left edges stay in alignment with the background image.
Then I’ll zoom in to 100 percent over the area where the two layers overlap and use the up and down arrows on the keyboard to nudge the overlap to just a few pixels (Figure 4). I’ll also slide over and check the edges to be sure they stayed in alignment. If not, I’ll nudge the layer with the right and left arrow keys.
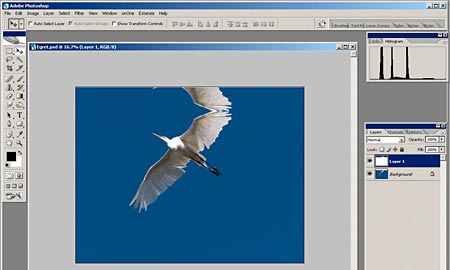
Figure 4.
When I zoom back out and view the image at less than 100 percent, Photoshop may show a thin line that makes it look like I don’t quite have the two layers meeting. But I saw I had a good overlap at a 100 percent view, so I know this is an artifact of Photoshop scaling the two layers at an odd magnification, and I will ignore it.
Now I need to get rid of the piece of the wing on the added sky, which I’ll do by cloning. It’s easier to see what I’m doing if I turn off the visibility of the Background layer and zoom in to 100 percent. I want to be careful not to paint too much sky below the original bottom edge of this layer. That would cover up the original wing, and I want to keep as much of it as I can. If I get too sloppy I can make a rectangular selection around the unwanted area and hit the Delete key to get rid of the extra sky and leave a smooth bottom edge.
Hard and Soft Choices
Because I am cloning in such an even-toned area I can use a fairly large brush, but the larger it is the harder I want it to be. With a large, completely soft brush I would have a large area of softness at its edges where it is at partial opacity, and that would average out any grain or noise texture and the cloned area would look artificially smooth.
You can get an idea of the relationship between brush size and hardness by making a new layer on which to draw some experimental brush “dots.” Don’t make an adjustment layer, but a pixel layer: Layer > New Layer. Take a regular brush — not the clone tool — and set it to 100 percent opaque (this is the opacity in the middle of the brush.) Set it to zero hardness and make dots at several different brush sizes. Then make it 50 percent hard and do the same.
You can see the amount of feathering at the edges, where the brush is not 100 percent opaque. The Clone brush will have exactly the same profile. When you are through experimenting just delete the layer you were drawing on.
When I’m through cloning I should have an even sky color on my added layer. Since the color of the new layer matches the Background sky, I can simplify things if I flatten it to the Background. I’ll turn the Background visibility back on and click Layer > Flatten Image. Normally I like to keep all my working steps in my master file, but this is an exception I would make for simplicity. It also makes it easier to clone out any imperfections where the added sky meets the original.
Adding a New Wingtip, Keeping Color Consistent
Now I’m ready to use the image with the new wingtip. Both were shot at about the same angle to the sun, making the sky color and exposure match fairly well. Since I shoot in Camera Raw, I’ll need to be sure I convert it using the same color temperature I used for the first image, so the sky color will be as close as possible. If you’re shooting in JPEG you don’t have this choice (the camera made the color temperature decision for you), but if the two shots were under similar circumstances they will probably be close.
I’ll corral the new wingtip with the lasso tool, leaving a generous amount of sky around it, as shown in Figure 5.

Figure 5.
Then I’ll choose the Move tool, click with it inside the selected area, and drag it into the image I’m repairing. It will now be a new layer, above the Background.
Now I need to rotate and re-size the new piece to match the existing wing. I prefer to do this in two steps rather than use Free Transform because that gives me more control. To help me get it aligned I’ll reduce its opacity to 50 percent (using the slider at the top of the Layers palette) then I’ll do Edit > Transform > Rotate.
Rulers Rule!
I need to know where the original wing ends, so I’ll turn on the Rulers on the image borders (Ctrl-R) and move the cursor into the top ruler border and drag a guideline into the image. I’ll turn off the visibility of the wingtip layer and position the guide on the top edge of my original image. Then I’ll turn the wingtip layer visibility back on.
After the new piece is rotated I’ll use Edit > Transform > Scale to size it. In Figure 6, you can see the new wingtip is smaller than the underlying one, but I only want to match the tips of the two feathers above the guideline. I’ll line up the two layers at the leading edge of the wing and hope I can size it so the widths of both feathers and the central shaft of the leading edge feather match the underlying one. I lucked out here and got a perfect fit. If I had chosen a different wingtip to try to match, I might have been better off to size the new piece larger and make the match farther down. It’s a matter of finding what works.

Figure 6.
Now I need to mask off (hide part of) the new wingtip to see if my match is really as good as it looks. I’ll make sure the new wingtip is the active layer (blue) by clicking on it, restore the layer opacity to 100 percent and go to the menu bar and click on Layer > Layer Mask > Reveal All. Or I can click on the mask icon at the bottom of the Layers palette, circled in red in the figure above.
I’ll choose a brush, set the foreground color to black and the opacity to 100 percent. Since I just made the mask on the wingtip layer, it will be active by default. If I had made it earlier and done other things in the meantime, I would make sure the mask was active by clicking on its icon, to the right of the pixel icon on the wingtip layer.
By drawing on the mask of the wingtip layer with a black brush I can erase parts of it. This is much better than using the Eraser tool because with a mask I can change the brush color to white and un-erase. I may need to go back and forth several times to get the best match. I’ll save this masked layer in my master file, rather than flattening it to the background, so if I spot a small area of mismatch later (I speak from experience here) I can touch it up by painting on the mask again, anytime in the future, or tweaking its position if needed.
I’ll start with a fairly large brush that is 70 percent hard, and go to a smaller, softer brush as I get into detailed areas. As the brush gets smaller the softness of the edge covers a smaller distance, making it less feathered. I want the edges to be properly feathered for the same reasons I mentioned in the section on cloning the sky. You will learn to judge this. When I’m done I’ll turn the Background off (Figure 7) to see if I left stray bits (easy to do in an area where the two layers match well) and I’ll clean them up with the brush.

Figure 7.
The cutout wingtip is on its own pixel layer, which is transparent where there are no pieces of the wingtip. When you turn off the visibility of the underlying pixel layer (the Background) the transparency is indicated by a grid pattern. But it makes it very difficult to see small or partially opaque areas you missed.
You can get rid of this pattern by going to Edit > Preferences > Transparency and Gamut and setting the Grid Size to None. This gives you the white background I have in Figure 7 above. Now you can see what you’re doing.
Next, I’ll turn the Background visibility back on and do any final tweaking to the mask. Then I’ll link the two layers so I don’t inadvertently move the wingtip (Figure 8). In CS2 you do this by clicking on the Background layer and holding the Control key while clicking on the wingtip layer, then letting go of the Control key and clicking the link icon at the bottom left of the Layers palette. In earlier Photoshop versions there is a link thumbnail to the right of the visibility thumbnail. In this case you simply highlight a layer and click the link for any layer you want to link to it.
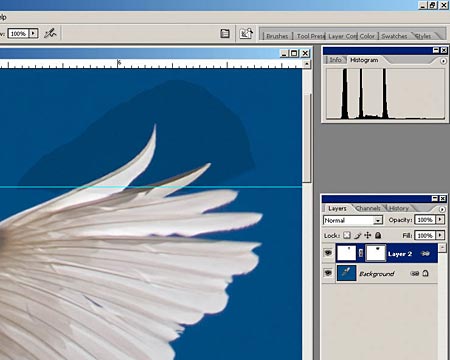
Figure 8.
Making the New Wingtip Match
I need to do some tonal correction on the wingtip layer. It is slightly underexposed compared to the Background image, making the sky too dark and the feathers too gray. I’ll do this correction with a Levels adjustment layer that will go above the wingtip pixel layer, but I need to make it affect only the wingtip layer. Normally it would affect all the layers below it: both the wingtip layer and the Background layer. I can make it affect only the wingtip layer by “grouping” the adjustment layer to it with a “clipping group.” (There is some confusing terminology here, as the terms clipping and grouping have more than one use, and there have been some changes in menu terminology in recent versions of Photoshop.) While the semantics are confusing, it is easy to do.
First, I’ll make the adjustment layer, making sure the wingtip layer is the active layer, so the adjustment layer will go above it (Layer > New Adjustment Layer > Levels). The dialog box will pop up to let me make the adjustment, but I can’t make it yet. If I did, the adjustment would affect both the wingtip and the Background. So I’ll click OK without making any changes.
Next, I’ll make the clipping group by going to the Layers palette, holding down Alt and putting my cursor on the border between the new adjustment layer and the wingtip layer below it. When I’m on the border, the cursor will change to something that looks a little like a padlock. Then I’ll click the mouse and the adjustment layer will be indented, indicating it is in a clipping group with the wingtip layer.
Finally, I’ll go back and double-click the adjustment thumbnail of the Levels layer (the leftmost thumbnail in the layer) to bring the adjustment dialog box back up. Now I can make the changes I need and they will affect only the wingtip layer.
Note: If you can’t do this kind of grouping or clipping in your image editor, you can make a duplicate of the wingtip layer and make the Levels adjustment directly on it instead of using an adjustment layer. Turn off the visibility of the original layer and save it in case you need to start over.
Lightening the Feathers
In the Levels dialog box, I’ll lighten the feathers by moving the right-hand (highlight) slider in Levels to the left just a bit, using the RGB histogram that comes up by default. If this leaves a color cast in the highlights, I’ll click on the Channel window near the top of the dialog box and go to the individual color channels and experiment with moving those highlight sliders instead. Moving one (or sometimes two) of them will let me keep the highlights neutral.
Using the individual color channels in Levels gives you control over color balance in the shadows, mid-tones and highlights. The Color Balance dialog box is just a different interface, but behind the scenes Photoshop is doing the same thing as it is when you are adjusting the color channels in Levels. I prefer to color balance in Levels because I can see the histogram. (If you aren’t sure of the advantage of keeping an eye on the histogram, see my tutorial, “What is a Histogram and What You Should Never Do To One.”)
Matching the Friendly Skies
This will make the sky lighter, but if it’s still too dark I can lighten it (that is, lighten the mid-tones) by going back to the RGB channel and moving the middle slider a bit to the left. If this lightens the highlights in the feathers noticeably, I’ll go back to the highlight sliders and tweak them back a touch darker.
If I can’t get a good match trying to adjust both the highlights and mid-tones of the wingtip layer, I could adjust only the sky (mid-tones) separately from the feathers (highlights) using a Magic Wand selection for the sky tones. I could then inverse it (Select > Inverse) to get a selection for the feathers. With one of the selections in place I can make an adjustment layer and it will automatically be masked to incorporate that selection. If I did that I would soften the selection a little so its edges aren’t obvious.
It might seem easier just to get rid of the sky around the wingtip by selecting it with the Magic Wand, feathering the selection enough to match the softness of the feathers, and deleting it to isolate the feathers, but this can look artificial. In this photo, with such an even-toned sky, I can get a very good match of the two skies.
Undo the Lasso
When I’m done with my adjustments, the two skies appear to match very well, but I don’t like the hard edge where they meet, which came from my original lasso selection. That hard edge was very useful to let me see how good my sky color match was, but any slight mismatch I may have left will show much less if I soften the edges. So will any mismatch in noise or texture. To see what I’m doing I’ll turn off the Background layer. Then I’ll click on the mask thumbnail on the wingtip layer to tell Photoshop I want to draw on the mask and not on the image.
I’ll use a small soft brush (with black foreground color) to soften the edges of the sky. If the brush is black I’m hiding the sky; if it’s white I can reveal areas I previously hid. Again, I don’t want too soft or too hard an edge on the brush. For the same reason as with cloning, the partially transparent area at the edges of a soft brush will soften any noise or grain by averaging it, and make it look artificial. But too hard an edge will also look artificial if there is any place where the color or texture match is not perfect.
Free as a Bird!
Figure 9 is the finished image — quite a change from Figure 1! I used the same technique to go back and add even more sky to the top of the image so I had room for my favorite finishing touch, a ragged edge I created using OnOne Software’s PhotoFrame.

Figure 9.
Diane Miller is a widely exhibited freelance photographer who lives north of San Francisco, in the Wine Country, and specializes in fine-art nature photography. Her work, which can be found on her Web site, www.DianeDMiller.com, has been published and exhibited throughout the Pacific Northwest. Many of her images are represented for stock by www.MonsoonImages.com.
© 2006 Adorama
This article was last modified on January 4, 2023
This article was first published on October 15, 2007
Commenting is easier and faster when you're logged in!

Recommended for you
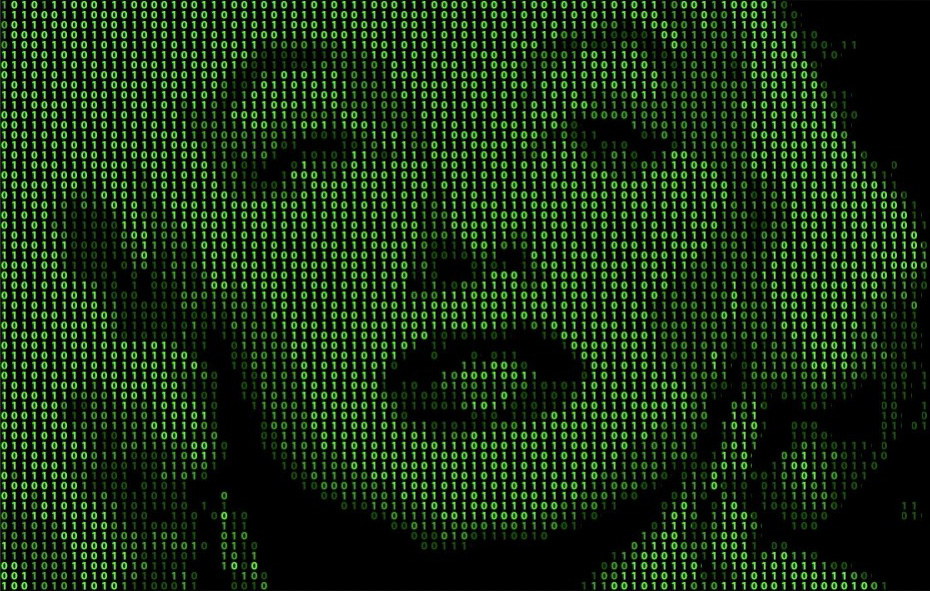
How to Apply a Matrix Number Grid Effect to Images in Photoshop
We’ve all seen those sci-fi movies like The Matrix, in which images are bu...
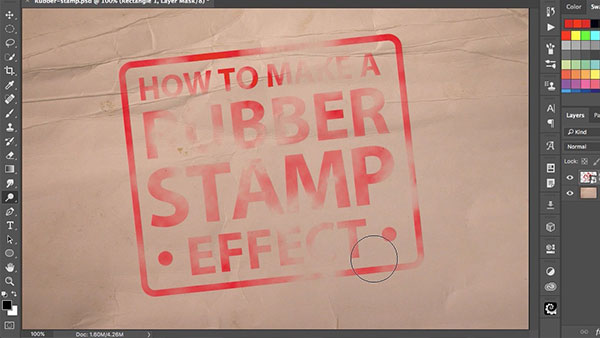
How to Make a Rubber Stamp Effect in Photoshop
You can turn just about any artwork, logo, or text into a rubber stamp by follow...

An Ultrawide Monitor Could Transform Your Workflow
Pick your way past the gamer-oriented ads, and you find LG, HP, and Dell are all...