


In the last thrill-packed installment of this column, we embarked on a discussion of the process of buying a digital camera. Our goal was not to evaluate any specific cameras, but to give you a codified set of questions that you can ask to try to winnow the field to a few models that are right for the way you shoot.
If you followed along with the last column, then you should have made some decisions about budget, as well as some broad categorical decisions about what type of camera you need — SLR, small size, long lens, etc. After making those two cuts, you should have addressed the question of how much resolution you need for the type of output you hope to create.
With these three questions out of the way, you should be zeroed in on a very specific class of camera, and might have already identified some prospective models. Now it’s time to start evaluating specific features to further refine your search.
Basic Controls
As you’ve probably already discovered, digital cameras pack lots of features that aren’t available on film cameras, from automatic panorama modes to bracketable color parameters. There are times when special features like these can mean the difference between getting or missing the shot. But for your bread-and-butter shots, what really counts are the basic photographic controls that the camera offers — the everyday controls that you’ll need for the bulk of the shots you’ll take. So, you’ll want to evaluate particular models to ensure that they provide the types of controls that you want, and an interface that makes these controls easy to use while shooting.
Exposure control marks your next big decision. Are you looking for a fully automatic snapshot camera, or a more advanced camera with more control? Or, perhaps you’d like something in between to facilitate some photographic “growth.” (Obviously, your options here are going to be somewhat limited by your previous decisions. If you’ve decided you need a 14-megapixel camera to get the type of output you want, then you’re probably not shopping for a simple point-and-shoot.)
Oddly enough, it used to be that every camera offered manual controls and you had to pay a lot of money to get a fully automated model. Nowadays, every camera offers automatic mode, and you have to pay a lot of money to get any manual controls. As you’ll learn in future columns, manual controls let you handle difficult lighting situations — such as harsh backlighting — as well as ensure that elements in your image are rendered with the proper tone and color. Even if you don’t consider yourself an avid photographer, you’ll want to look for a bare minimum of exposure control so that you’ll be equipped to handle certain situations.
There are three different exposure parameters: shutter speed, aperture, and ISO. More sophisticated cameras will give you several options for manipulating any or all of these. As with modern film cameras, most digital cameras offer several different shooting modes that provide different levels of control over your camera’s exposure.
Exposure Control
Program Mode is a fully automatic mode that makes the camera perform all of your exposure decisions. Depending on the quality of your camera, this mode might be everything you need for 80 percent of your shooting. However, these mechanisms don’t always yield the best results for a particular situation. In a more complicated situation, they may yield a poor or average result. It is in these situations that you’ll want some additional shooting control.
Even fully automated cameras usually include a selection of Preset Exposure Modes. These are special modes that force the camera into certain exposure parameters that are tailored to specific situations. For example, a Landscape exposure mode will lock focus on infinity, and use a smaller aperture for maximum depth of field. A Portrait exposure mode, on the other hand, will try to use as wide an aperture as possible, to blur the background and bring more focus to your subject. These modes don’t allow any fine-tuning, but for many tricky situations, the ability to bias the camera’s automatic modes might be all you need to get a good shot.
For true power, though, you’ll want to select a camera that offers more than simple preset exposure modes. Priority modes let you wrest some exposure control back from your camera’s automatic mechanism:
- Aperture Priority mode lets you select an aperture, leaving the camera to decide on a shutter speed that’s appropriate. To evaluate an aperture priority mode, pay particular attention to the range of f-stops available. Not all digital cameras allow you to pick any of the camera’s possible apertures.
- ShutterPriority works just like aperture priority, but allows you to select the shutter speed of your choice.In most cases, priority modes will be all of the manual control that you need. However, if you want to ensure maximum control, then you might want to opt for a camera that also provides a full manual control mode, which allows you to manually select any combination of shutter speed and aperture.
Though you’ll probably be able to spend the bulk of your time in Program mode, you’ll still want speedy access to whatever manual controls your camera provides. Ideally, you should be able to change shooting modes through an external control on the camera’s body. Some smaller cameras, though, provide mode access through an internal menu (see Figure 1). Obviously, lack of external controls is just something you have to put up with when you choose a small camera (otherwise, it probably wouldn’t be a small camera). If you tend to shoot in situations where you have to make quick decisions and changes, then you’ll want to assess the accessibility of your camera’s mode controls.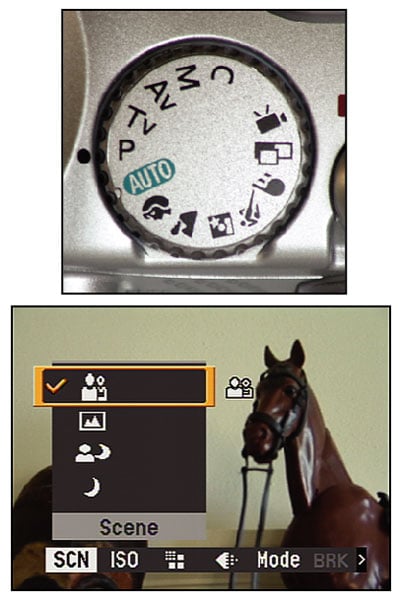 Figure 1: For changing modes, most cameras offer either a dial or switch on the outside of the camera, or a selection screen within the camera’s menuing system.
 Compensating and Reciprocating
By opening or closing your camera’s aperture, and changing the speed of its shutter, you can control how much light strikes the image sensor. Obviously, your primary goal in selecting a shutter speed/aperture combination is to produce a final image that is neither too bright nor too dark, and that reveals good detail from the shadows through the highlights.
However, by electing to change one parameter or the other, you can make some “artistic” decisions about the content of your image. Altering shutter speed can give you some control over the motion in your image — allowing you to blur or stop a fast moving image, for example — while aperture selection gives you control of which areas of your image are in focus.
Shutter speed and aperture have a reciprocal relationship. In other words, if you change one parameter in one direction — increasing your shutter speed to freeze a fast moving object, say — then you need to change the other parameter in the opposite direction — opening the aperture to allow more light. In other words, there are many different combinations of shutter speeds and apertures that all yield the same exposure — that is, the same amount of light ends up striking the focal plane.
Many digital cameras offer an automatic reciprocity control. This mechanism lets you automatically cycle through all equivalent (reciprocal) settings for a given exposure. So, if your camera meters a scene at 1/100th of a second at f16 and you want shallower depth of field, you can simply use your automatic reciprocity control to select a combination that has a wider aperture. In many situations, automatic reciprocity is all of the manual control you need, and so can be a reasonable substitute for priority modes or full manual override. Even if you’ve decided you need manual modes, keep an eye out for a reciprocity control also, simply for the flexibility it provides when shooting.
Your camera’s light meter calculates a shutter speed and aperture combination that will yield an evenly exposed, well-lit image. However, there will be times when evenly exposed is not the best choice for an image. Often, an image needs to be over- or under-exposed to properly render certain elements.
If you have manual controls, then you can use your base metering as a starting point, and calculate an over-exposure by hand, adjusting your shutter speed or aperture appropriately.
A much easier choice, though, is to use your camera’s Exposure Compensation controls to tell the camera to over- or under-expose. Almost all digital cameras — even the tiniest point-and-shoots now feature exposure compensation controls. These simple mechanisms let you elect to change the exposure by up to two stops, usually in half, or one-third stop increments.
The advantage of exposure compensation controls is that you don’t have to think in terms of specific shutter speeds and apertures. Instead, you can simply think about relative exposure changes — overexposing by a stop, for example.
Because it’s such a powerful exposure tool, you’ll want to ensure that you have easy access to exposure compensation controls. Ideally, you want an exposure compensation control that’s located on the camera’s body, with a readout on the LCD screen or camera’s viewfinder. If a camera provides exposure compensation through a menu, then ensure that it’s only one or two button presses away.
Some cameras have external exposure compensation controls that are accessed by pressing a combination of buttons. If this is the case, then make sure you can hit the combination comfortably, without losing your grip on the camera.
Exposure compensation and automatic reciprocity can actually be all of the exposure control you need. With them, you can specify over or under exposure, or configure a particular exposure parameter to your liking. Ideally, you want these controls to be accessible while looking through (or at) your camera’s viewfinder.
White Balance and ISO
In a film camera, there are certain decisions you have to make when selecting a type of film. First, you need to decide how sensitive, or “fast” your film should be. Faster film is more sensitive to light and therefore doesn’t need to be exposed for as long as a less-sensitive film. Faster films let you shoot in lower light, and afford some different exposure options when shooting in brighter light. The downside to faster films is that as film speed increases, so does graininess.
Film speed is measured using the ISO scale — higher numbers means faster film, which translates into greater sensitivity, and usually more grain. One of the downsides to shooting with film is that once you select a particular speed, you’re stuck with that speed for the entire roll.
Digital cameras also have a sensitivity to light that’s rated using the ISO scale. Most cameras default to an ISO rating around 100, but unlike a film camera, you can change the ISO of a digital camera on a shot-by-shot basis, allowing you to easily crank up the ISO if you suddenly find yourself in a darker environment. Because of this ability to adjust ISO on the fly, it effectively works as a third exposure parameter. As such, when evaluating digital cameras, you’ll want to pay attention to how accessible the ISO control is. Though not as oft used as shutter speed or aperture, you still want to ensure that it’s easy enough to get to when you need it. You’ll also want to assess how well the camera performs as you increase its ISO. We’ll cover this topic more when we get to our discussion on evaluating image quality in a future column.
One of the amazing traits of the human eye is that it correctly renders color no matter what type of light you’re in. Unfortunately, neither film nor digital cameras can pull off the same feat. When shooting film, you have to be certain to select a film formulation that’s appropriate for the type of light that you’ll be shooting in.
Similarly, when shooting with a digital camera, you have to calibrate the camera for your current lighting situation, a process called white balancing.
These days, most cameras provide very good automatic white balancing features, so that you usually don’t even have to think about a white balance step. However, these mechanisms can still be fooled by mixed lighting, unusual subjects or lighting situations. As such, it’s a good idea to opt for a camera that includes some manual white balance controls as well.
Most cameras include some preset white balance options such as Sun, Tungsten (indoor), Cloudy, or Flourescent. These will often provide good solutions for situations that are too tricky for your camera’s automatic white balance. For the ultimate in control, you’ll want to look for a camera with manual white balance, which allows you to create a white balance setting that’s custom tailored for your particular situation.
Many digital cameras also offer white balance fine-tuning which allows you to make minor adjustments to the camera’s preset white balance modes.
Though you’ll most often use automatic white balance, you’ll still want to ensure that a camera provides fairly easy access to its white balance settings. Because white balance is based on your current lighting situation — something that is usually somewhat stable throughout a shoot — you don’t need to have the same type of quick, fingertip access to white balance that you need for exposure compensation or other exposure parameters.
As with ISO, you’ll want to evaluate how a camera’s white balance affects your final image, something we’ll be discussing later.
At this point, having made decisions about price, type of camera, resolution, and exposure controls, you’ve actually made it past the most critical camera buying decisions. You’re now ready to begin making decisions and evaluations of the camera’s “secondary” features, a process we’ll cover next time.
This article was last modified on December 14, 2022
This article was first published on August 3, 2004
Commenting is easier and faster when you're logged in!

Recommended for you

Pentax Announces Optio S7 with Advanced Feature
PENTAX Imaging Company has announced the PENTAX Optio S7 compact digital ca...

Make a Realistic Wood Texture in Photoshop
Step 1 Create a new document. The dimensions don’t really matter, but I st...

CreativePro Tip of the Week: Using the Navigator panel in Photoshop
This CreativePro Tip of the Week for Using the Navigator panel in Photoshop was...