


“Buying a Digital Camera, Part FOUR?!” Okay, so this may not exactly be your handy pocket guide to buying a digital camera, but the fact is that there are a lot of decisions involved in choosing a camera. This stems partly from the fact that, unlike with a film camera, you have to consider the quality of the images that a digital camera produces (with a film camera, a lot of that concern comes later, with film choice). But digital-camera choice is also complicated by the fact that digital cameras afford a much greater diversity of features and designs than do their film counterparts. So far, we’ve covered the primary issues of camera size, image-sensor characteristics, lens quality, exposure control, and the other factors that directly affect final image quality and camera usability.
Over the next two columns, we’re gonna take a look at the extra, utilitarian features that you’ll want to consider when making your choice. After that, we’ll have one final column on assessing image quality, which will mark your final camera-buying decisions. (Yes, for those of you keeping tabs, that’s a total of SIX columns about buying a digital camera. You’ll have to trust me on this.)
If you’ve been shooting with a manual, or semi-automatic film camera, then a lot of the features we’re going to look at here might seem like silly luxuries. But in almost every case, once you’ve spent a little time with them (gotten a little exposure, so to speak), you’ll begin to realize that these features really do make you a more productive photographer.
ISO and Histogram
We’ve already discussed the need to evaluate a camera’s exposure controls, so you should have given some thought to how much manual override you think you need for the type of shooting you do. You should also have considered your candidate camera’s specific controls, with an eye toward evaluating priority modes, manual modes, and access to shutter speed and aperture settings. Digital cameras, though, offer an extra exposure control that film cameras don’t have.
When the raw information is read off of a digital image sensor, it’s passed through an amplifier before heading on to be analyzed and processed. Data can be amplified to varying degrees and, obviously, if you amplify the signal more, you won’t need as much light to make a legible image. To gauge and measure the image sensor’s sensitivity to light, digital camera manufacturers have adopted the same ISO scale that film manufacturers use. (If you’re new to photography, higher ISO numbers mean more light sensitivity, which means you can shoot with a shorter exposure. This affords different creative options, as well as the ability to shoot in lower light.)
Most cameras these days default to a sensitivity that’s somewhere between 80 and 120 ISO. What’s more, most cameras also offer adjustable ISOs. That is, they can use more amplification to make their image sensors more sensitive. This means that many cameras these days offer a choice of ISOs, usually 100, 200, and 400.
With a film camera, when you pick a particular film speed, you’re stuck with it for the entire roll. When shooting digitally, you can change the ISO for every frame, making it a third exposure parameter, in addition to shutter speed and aperture.
There is a price to pay for this flexibility, of course. As with any signal, when you amplify the data coming off of an image sensor, you also amplify any resident noise. This noise can be caused by the electronics in the camera or even just the stray cosmic ray. As such, higher ISOs produce noisier images than lower ISOs. Oftentimes, this noise looks just like the grain in a piece of film. However, some cameras produce noise that isn’t so attractive.
Evaluating the ISO features of a camera is pretty simple. First, make sure it has adjustable ISOs (this is such a handy feature that there’s really no reason not to consider it a must-have item) and take note of the range. For example, some cameras can go slower than 100, offering a super noise-free ISO 50, while others can go much higher than 400, pushing their ISOs up to 3200. As with other features, make sure the ISO control is easy to get to while shooting. Just as you want quick access to shutter speed and aperture settings, ISO control should be a fingertip feature.
Most importantly, though, you’ll want to judge the quality of the camera’s faster ISO’s. We’ll be discussing image detail at length in our next installment, and will cover the specifics of evaluating high ISO quality.
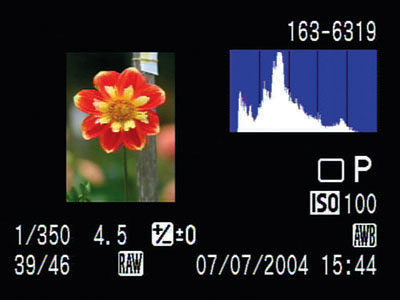
A histogram is a bar graph of the distribution of tones in an image. As you’ll learn in future columns, a histogram is an indispensable tool both for shooting and editing. When shooting, a histogram makes it possible to see if you’ve over- or under-exposed an image — something you usually can’t tell from an LCD screen — and makes it possible to gauge whether you’re capturing the maximum dynamic range (see Figure 1).
 Figure 1: An in-camera histogram lets you easily see if an image is over- or under-exposed, as well as assess whether you’ve captured the maximum dynamic range.
Many cameras these days offer a histogram feature that allows you to view a histogram of any image you’ve shot. If you plan on doing any shooting more complex than simple snapshots, then a histogram feature is a must-have. If you’ve opted for a camera with any type of manual control, it’s stilly not to look for a camera with a histogram.
When evaluating histogram features, look for a clear, easy-to-read histogram that highlights over- or under-exposed areas.
Some cameras now offer a Live Histogram feature that displays a histogram on the camera’s LCD in real-time. A Live Histogram lets you immediately see the effects of exposure adjustments while you’re shooting. Though it doesn’t provide any extra functionality, it does save you the trouble of having to shoot and then review to evaluate an image’s histogram.
Exposure Locks and Panorama Controls
Every time you press the shutter button on an automatic camera, the camera’s light meter analyzes the scene and calculates an appropriate exposure. While this is a great convenience and a tremendous time-saver, there will be times you won’t want the camera to meter off of the scene that it’s looking at.
For example, when shooting a multi-shot panorama — a series of images that will later be digitally stitched together to create a single, large image — you usually don’t want the camera to re-meter for each shot, as this will create an uneven exposure across your final composite.
With an exposure-lock feature, you can lock the camera at its last metering, allowing you to re-frame and shoot additional images. In addition to facilitating panoramic shooting, an exposure lock effectively allows you to separate the camera’s auto-focus mechanism from its auto-metering, meaning you can meter and focus on different areas.
Some cameras include special panoramic shooting features that, in addition to locking exposure, provide guidelines on the camera’s LCD that help ensure your images overlap properly in preparation for a good panoramic-stitching operation later.
If you plan on shooting panoramas, these are important features to have. An exposure lock is handy for more everyday shooting features as well, but if your camera offers multiple focus spots and several metering modes, an exposure lock won’t be as critical.
Today, many cameras offer a choice of color spaces. Though most cameras default to sRGB, many offer the option of the Adobe RGB color space as well. If you’ve got an existing color-management workflow built around a particular color space, having a choice of spaces on your camera will make things easier.
To further refine your color controls, you might want to look for a camera that offers white-balance fine-tuning. (We discussed white-balance controls in part two of this feature.) A fine-tuning option lets you tweak the camera’s pre-set white-balance options to achieve more realistic color.
Finally, if image and color quality are your ultimate concern, you’ll want to get a camera that provides support for Raw files. When shooting in Raw mode, the camera stores the raw, unprocessed data that comes off of the camera’s image sensor. Raw files offer the greatest image quality and image processing flexibility, and we’ll be discussing them in more detail in future columns.
Once you’ve selected amongst these features, you’re ready to take a more thorough look at the camera’s design, performance, viewfinder, and some extra, possibly sillier features. We’ll be taking a closer look at all of those options in our next installment.
This article was last modified on December 14, 2022
This article was first published on August 31, 2004
Commenting is easier and faster when you're logged in!

Recommended for you

Photoshop Fun: A Hole in the Hand
Creating surreal images is all about the idea. So what does this image mean? As...

Free Photoshop Filters Webcast
It can be a lot of fun to experiment with Photoshop’s many filters to crea...

Photoshop How-To: Adding Bleeds and Crop Marks
One question that I receive on a fairly regular basis, is how to add bleed to an...