


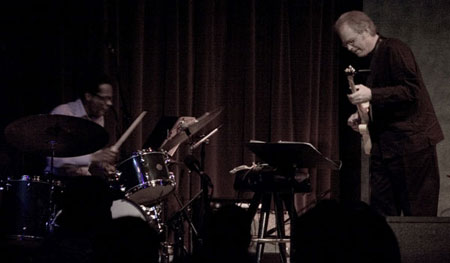
A couple of weeks ago, I photographed a concert given by the great jazz guitarist Bill Frisell. The concert venue — Yoshi’s in Oakland’s Jack London Square — is a good place to hear music and a good place to have sushi, but on this particular night it was a lousy place to take pictures. The band was a trio, with the bulk of the lighting focused on Frisell on one side of the stage and organist Sam Yahel on the other. Drummer Brian Blade was left largely in the dark.
Dark stages aren’t unusual for a jazz performance, but this one was particularly gloomy. Concert shoots are also usually complicated by the fact that stage lights are almost always colored with gels, resulting in very different color temperatures and an overall picture that often lacks any true whites.
Fortunately, a good digital SLR is capable of dealing with both of these issues. The Canon EOS 20D offers a capable 1600 ISO that makes for good low-light shooting, while the editing options of the Raw format balance the impossibility of getting good white balance at the time of the shoot. Even with these advantages, though, it wasn’t easy.
When I accepted this assignment, I wasn’t expecting the venue to be so luminance-challenged.
Nevertheless, I managed to get a few shots that, after a lot of processing, yielded some pleasing painterly images. Though grungy, the results have a texture that I like and that print well.
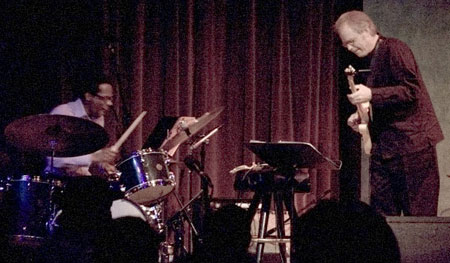
Rather than fight the noisy grunginess inherent in high-ISO, low-light images, I decided to embrace it and go for a beat-up look in my prints. I decided a film-like edge would be the final touch.
Because of their pastel-like, noisy, distressed texture, the final prints have something of a dye transfer look to them, and I thought a photographic edge could enhance this effect.
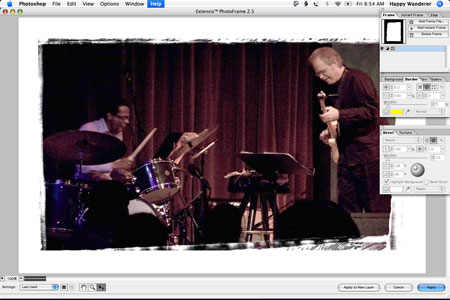
I created a few frames using simple layering and masking in Photoshop. (For do-it-yourself photographic edge tutorials, search the Web.) But knowing that there are also software programs that make edges, I tried out Extensis PhotoFrame, Graphic Authority Extreme Edges, and AutoFX Photo/Graphic Edges.
Extensis PhotoFrame 2.5
Extensis PhotoFrame 2.5 is a $200 plug-in for Mac or Windows Photoshop versions 4 through CS2. You can use its simple, powerful interface to build a frame from scratch or to customize any of the 2000+ frames and edges that ship with the package.
PhotoFrame’s full-screen editing mode shows a large preview of your image, and three floating palettes provide an extraordinary degree of cusomization. For simple geometric frames, you can use the program’s InstaFrame palette to add circular, elliptical, or square frames, as well as stars, hearts, and arrow-shaped frames. Corner-rounding controls and sizing sliders make it easy to create a precise shape.
Once you define an initial shape, you can turn to PhotoFrame’s other palettes to enhance a frame with drop shadows, glows, and border colors. Extensis did an excellent job of packing in all the parameters and controls you’d ever want for defining these features. Color selection, shadow direction, and more are all easy to understand and simple to implement.
PhotoFrame provides a good interface and a broad assortment of media for users of Photoshop.
To create something a little more organic than a geometric border, you load a frame file, which is a bitmapped image of a frame with alpha channel information for compositing. PhotoFrame’s vast frame file selection runs the gamut from realistic-looking photographic edges, to natural-media-like paint effects, to simulations of picture frames and more abstract borders and edges.
All of the customization parameters in the InstaFrame feature work with frame files, too. But you can also precisely control the color of the frame file and, most importantly, size. With simple slider controls, you can change a frame’s width and orientation so it better matches the composition of your image. (You might want to increase your image’s canvas size before trying to add a frame. It often helps to have some room to work with.) Unfortunately, you can’t change the width of the actual edge of a photo frame.
You can also change the transfer mode used to composite the frame onto your image. Extensis has implemented a great interface tweak here. As in Photoshop’s Layers palette, PhotoFrame’s blending modes are listed in a pop-up menu, but as you mouse over each item, the frame’s mode automatically changes, quickly previewing how each mode affects the composite.
PhotoFrame also lets you add as many frames and edges to your image as you like. The stacked effects and borders create more complex edges.
Finally, when you’ve built the edge to your liking, you can apply it to your image with the option of creating an entirely new layer for the frame. Unfortunately, PhotoFrame doesn’t support 16-bit images, so you’ll have to bump your file down to 8-bit before framing.
If you have a copy of Photoshop, PhotoFrame is an excellent package that provides extraordinary control and a great library of pre-built frames.
Graphic Authority Extreme Edges
If you’re more of a do-it-yourself type but don’t have time to build an edge from scratch, Graphic Authority’s Extreme Edges is a good framing tool at a good price: only $40. With approximately 200 edges that vary from simple textured edges to photorealistic film edges, you can probably find one that meets your need.
Rather than offering a plug-in interface for edge application, Extreme Edges ships with a short QuickTime movie that shows you how to apply the edge using a simple Photoshop technique. Essentially, you copy your chosen edge file into your document, stick it in a layer below your image, then define your image as a clipping mask.
Graphic Authority figures that Photoshop’s interface is good enough for photo editing, so the product is simply a frame library and a QuickTime instructional movie.
Because you work in Photoshop, you have access to all of the app’s tools for sizing, compositing, masking, coloring, and editing. Extreme Edges’ basic configuration is easy to record in a Photoshop Action for quick application. For the photographer who wants to extensively customize frames, the lack of a plug-in interface is actually something of an advantage.
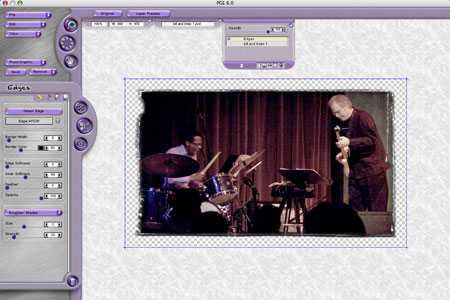
AutoFX Photo/Graphic Edges 6
The $179 Photo/Graphic Edges 6 from AutoFX is the most powerful of these three products. Shipping on three CDs, the package includes an astounding 10,000 edges, along with 175 frames, 1,000 textures, and other unique tools. You can install Photo/Graphic Edges as a Photoshop plug-in for versions 4 through CS, or as a stand-alone application. If you’re using CS2, you’ll have to install the stand-alone version, which means a few extra steps in your workflow. Photo/Graphic edges can read and write Photoshop, TIFF, BMP, JPEG, and PNG files, but it can’t handle 16-bit files or layered Photoshop documents.
Whether you run the plug-in or stand-alone version, the program’s interface is the same. Reminiscent of the Kai’s Power Tools interface, Photo/Graphic Edges takes over the entire screen and looks like something painted on the side of a van in 1978. Groovy textures and weird gelled buttons and palettes abound. Aside from the goofy look, the interface is well organized and easy to navigate. On the Mac, under OS X, full-screen use is a little frustrating. Even the OS X dock doesn’t work in the program, so you have to command-tab your way into other apps. If you want to frame one document while keeping an eye on something in another window, you’re out of luck.
Photo/Graphic Edges shares a lot of features with PhotoFrame. You can add edges and frames, both of which offer loads of parameters for customization. You can also stack edges and frames and control the compositing to create complex effects. You can save configurations as pre-sets and then easily apply them to other documents. The list of customizable parameters, from edge controls to lighting tools, is impressive.
With similar functionality to PhotoFrame, Auto/Graphic Edges adds unique brush effects and a huge assortment of frames and edges.
Photo/Graphic Edges goes beyond PhotoFrame with the addition of several unique brush tools that let you paint on edge or image effects. There are scores of custom brush shapes, and each is customizable. The brushes in Photo/Graphic Edges don’t do anything you couldn’t achieve with layer masks and brushes in Photoshop — the difference is that Photo/Graphic Edges brushes do it in a single stroke. Drag an Edge brush along the edge of your image and you can paint away the edge using beautifully rough, uneven strokes of varying opacity. Other brushes, such as the Ambient brush, add what appears to be water damage and other muck.
Some Photo/Graphic Edges effects use a combination of framing and brushing tools. For example, the Transfer effect automatically makes your image look as if it’s been printed or projected onto a wrinkly piece of paper. If you don’t like the automatic wrinkles, you can use the Push brush to add more wrinkles or the Iron brush to smooth things out.
Photo/Graphic Edges includes borders, bevels, photorealistic picture frames, and corner tabs. I’m less attracted to these features, but for someone looking to add variety to a page or who needs to create a photorealistic image of a picture in a frame, these options could come in handy.
As I mentioned before, you could achiveve many of these effects in Photoshop using compositing tricks, assuming you have the frame and edge shapes to work with. Photo/Graphic Edges provides you with those assets, as well as a much speedier way to apply them. Because you can stack multiple effects and delete or re-order any effect at any time, you can quickly try out effects without having to manage and organize gobs of layers.
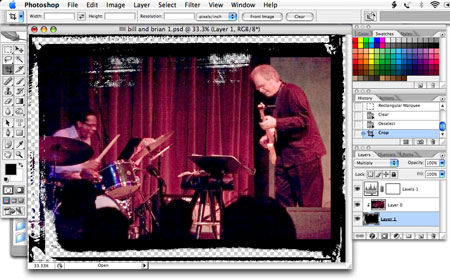
All three of these programs are good packages, and any one of them could give me the effect I was looking for. If I used frames more frequently, or for a wider range of assignments, I would stick with Photo/Graphic Edges. I was won over by its larger library of frames, lower price, and cool brush effects. In fact, I used Photo/Graphic Edges for the final versions of the Bill Frisell images.
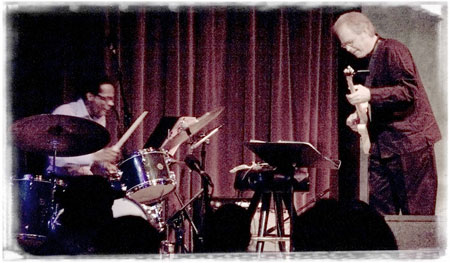
I embraced the noise of this low-light shoot by playing up the dye transfer look and adding a grungy photo frame using Photo/Graphic Edges.
This article was last modified on December 14, 2022
This article was first published on June 21, 2005
Commenting is easier and faster when you're logged in!

Recommended for you

Build a Tilt-Shift Camera Lens for Peanuts
Tutorial compliments of “Make:” magazine. One of the fancier lenses...

Image Editing in Lightroom 5: Raw or JPEG?
The following is an excerpt from The Adobe Photoshop Lightroom 5 Book: The Compl...

How to Create a Burnt Paper Effect in Photoshop
Creating a burnt paper effect in Photoshop is much easier than you might think....