

Other than new-lens lust, one of the most common hardware challenges that digital SLR users face is sensor dust. Because the lens on an SLR is removable, it’s possible for dust and debris to get inside the sensor chamber of the camera, resulting in visible spots and artifacts on your final images.
Yes, it’s easy enough to remove most sensor dust artifacts using your image editor, but if you’re dealing with lots of images, this can quickly complicate your post-production workflow, and it’s possible for dust to fall on a spot that’s difficult to correct. It’s much better to keep your sensor clean, and thus shoot clean images, than to fix it in post.
While camera manufacturers will clean your sensor for you, these services cost money and force you to send away the camera — hardly convenient, and not an option if you’re on-location when you develop a dust problem. That’s why it’s best to tackle this problem yourself.
Is the prospect of removing your camera’s lens and rubbing things on the sensor about as appealing as performing a DIY hip replacement? Fortunately, some new, very affordable sensor cleaning tools make sensor cleaning easier, more reliable, and potentially less harmful to the delicate inner workings of your camera.
But First, Lens Maintenance
Most of the debris that gets on your sensor is brought into the sensor chamber by the lens. Consequently, keeping your lenses clean will go a long way toward preventing sensor dust. Always use the end caps that came with your lenses, and don’t just throw those caps in your bag when you’re not using them! Put them onto another lens, or attach them to the camera’s body cap. The cap can transfer dust to the end of your lens, which will then transport said dust into the camera itself.
Some people say that you should power down the camera before changing lenses to prevent dust from accumulating. The idea is that the sensor has a static charge that can attract dust. There’s really no need to worry about this, though. When you change lenses your camera’s sensor is automatically powered off, so even if it did have an electrostatic charge that was powerful enough to suck material past the mirror (doubtful) it would be deactivated by the lens removal.
To clean your lens, use a blower bulb. Don’t ever use compressed air to clean your lenses, as the liquid propellant used by compressed air cans can leave visible stains on the lens itself. You’ll find blower bulbs at any camera store, or you can order something like the Giottos Rocket Blaster (Figure 1).

Figure 1. Blower bulbs are much better than compressed air cans for cleaning lenses.
Don’t Fear the Sensor
Before we go any further, let me allay some of your concerns. When cleaning a sensor, you don’t interact with the sensor directly. Situated in front of the sensor is a low-pass filter, a pane of glass that usually has an anti-static coating. The sensor is hermetically sealed beneath this filter. So, when you clean “the sensor,” you’re actually cleaning the pane of glass that sits in front of it — you’re not affecting the delicate sensor itself.
Of course, a scratch on the low-pass filter is still very bad news, but damaging the filter is much harder than damaging the sensor because the filter is made of fairly sturdy stuff. Use caution and care — and tools and materials designed for sensor cleaning — and you should be fine.
Anatomy of a Mote
Sensor debris comes in three forms: dry particulate matter; wet matter that can leave stains; and a combination of the two — dry particles that stick to wet stains and are practically welded to the sensor as the stain dries. You’ll use different techniques to remove the different types of debris.
It’s usually not too hard to figure out that you have a dust problem. If you see black specks, faint splotches or shadows (Figure 2), or weird dark areas with halos around them, that’s probably something on your sensor. Another clue is if these artifacts appear in the exact same place on a series of shots.

Figure 2. I don’t know if this guy was having the same troubles that I was, but these sand dunes put a LOT of debris on my sensor. Click image to see full-size.
When you first see such artifacts, your initial course of action should be to determine if the offending debris might actually be on your lens. If the grunge appears in the same place on shots that were taken with different lenses, then you know it’s sensor dust. If not, remove your lens, clean it, then take some more shots to see if it appears.
To determine if there’s dust on your sensor, aim the camera at a blank wall or empty sky, defocus, and take a picture. Then bring the image into your favorite image editor and increase the contrast. If there’s any dust present, it should appear. If the dust was on your lens, then cleaning the lens should make it go away.
If the dust is still there, it’s time to think about sensor cleaning.
Kit-less Cleaning
There’s a limited amount of cleaning you can do on your own, using nothing more than a blower brush.
Most SLRs have a cleaning mode of some kind. After removing the lens, activate the cleaning mode. The camera will flip up its mirror to expose the sensor (which is safely sealed behind the low pass filter). Turn your camera so that the lens opening faces down and use your blower brush to blow air into the chamber. A few strong blasts should be enough to dislodge any light particulate dust, which will hopefully fall down out of the camera. When you’re finished, power down the camera to take it out of cleaning mode.
Always have a fully charged battery in your camera when cleaning. You don’t want the power to shut off while you’re cleaning, because the mirror will come down. If you have the end of a blower inside the sensor chamber, the falling mirror could collide with it and be damaged. Nikon cameras won’t allow you to enter cleaning mode without being plugged in to an AC adapter.
Some newer cameras feature built-in sensor cleaning mechanisms that shake the camera sensor whenever the camera is powered on and off (or both — you can usually configure when the cleaning cycle should happen). These mechanisms are okay for some particular matter, but they won’t help at all with stains, or with particles that are stuck to the sensor by a stain. Similarly, a blower brush can’t remove stains or some particles on the sensor.
After you’ve tried the blower brush and built-in mechanism, take another sample shot to see if the dust problem persists. If it does, consider a more serious cleaning option.
Visible Dust Sensor-Cleaning Tools
The company Visible Dust sells excellent sensor-cleaning tools for particulate debris, stains, and other especially egregious dust problems.
For particulate matter, try Visible Dust’s Arctic Butterfly brush series (Figure 3). In addition to brush bristles designed to clean sensors without leaving residue, smearing, or other artifacts, Arctic Butterfly brushes are built around a battery-powered mechanism that spins the brush head at high speed.

Figure 3. The Visible Dust Arctic Butterfly brush, model SL 700.
You don’t use this spinning mechanism while brushing the sensor. Instead, you spin the brush for about a minute before brushing. This throws off any dust that might be on the brush, and gives it a static charge that makes it more likely to suck up dust. Traditional methods of “charging” a brush involved cans of compressed air. Because you’re not allowed to take compressed air cans on an airplane, the Arctic Butterfly is an ideal solution for travel.
Visible Dust sells three Arctic Butterfly models: the $65 SL 700, which has a fixed brush; the $95 724, which has removable brushes you can easily swap for cleaning different sensor sizes; and the $165 SD800 Pro Kit, which includes several brushes of different sizes and thickness.
The SL 700 and 724 models are small and easily packed into any size photo bag. Most importantly, they’re very effective. A single brush stroke will solve most problems.
If the brush doesn’t rid your sensor of debris, try a wet solution. Usually, “camera” and “wet” are not words you want to hear together. A wet sensor cleaner typically means a swab and a solution formulated specifically for sensor cleaning.
Visible Dust’s wet cleaners are special swabs designed to be used with Visible Dust cleaning liquids. The swabs come in several sizes, from 1.3x crop sensors to 1.6x crop to full frame. Visible Dust even makes special swabs for cleaning the corners of sensors, and for cleaning the focusing screen on your camera. All of the swabs are sturdy, durable, and easy to use.
The company makes several cleaning liquids, from the general-purpose Sensor Clean to liquids formulated for removing smears and gnarly dust problems.
A set of Visible Dust swabs costs around $35, while a bottle of cleaning fluid is another $35 or so. Seventy bucks seems steep when you can buy Q-tips and Windex for a fiver, but don’t fool yourself. While a Q-tip may feel soft, the individual photosites on your camera’s sensor are tiny. Tens of millions of them fit into a very, very small space. On this scale, a cotton fiber is suddenly enormous, and enormously coarse. Using any type of brush or material that’s not specifically designed for sensor cleaning can leave tiny scratches and smears on your camera’s low-pass filter, and these scratches can be visible in your final image.
Similarly, a cleaning liquid that isn’t designed for sensor cleaning can leave visible residues and harm the coatings on your camera’s low-pass filter. Some chemicals are even strong enough to etch the glass of the low-pass filter.
Where Is that Dust Spot?
Since rubbing things on your camera’s low-pass filter is a potentially dangerous thing, you don’t want to do it any more than you have to. To make it easier to determine where your sensor is dirty, and to help you decide if your sensor needs any cleaning in the first place, Visible Dust sells the $75 Sensor Loupe.
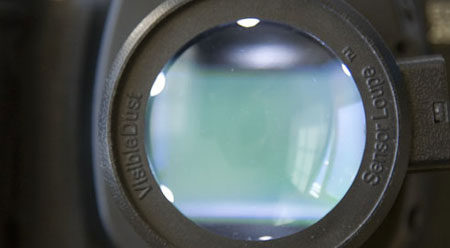
The Sensor Loupe looks like a loupe you would use on a light table, except it’s much larger and the inside is lined with bright white LEDs. To use it, you remove your camera’s lens, put the camera in cleaning mode, set the loupe on the lens opening, and then turn on the loupe. The high-quality glass lens inside the loupe magnifies the view of your sensor and lets you see exactly where any debris might be (Figure 4).
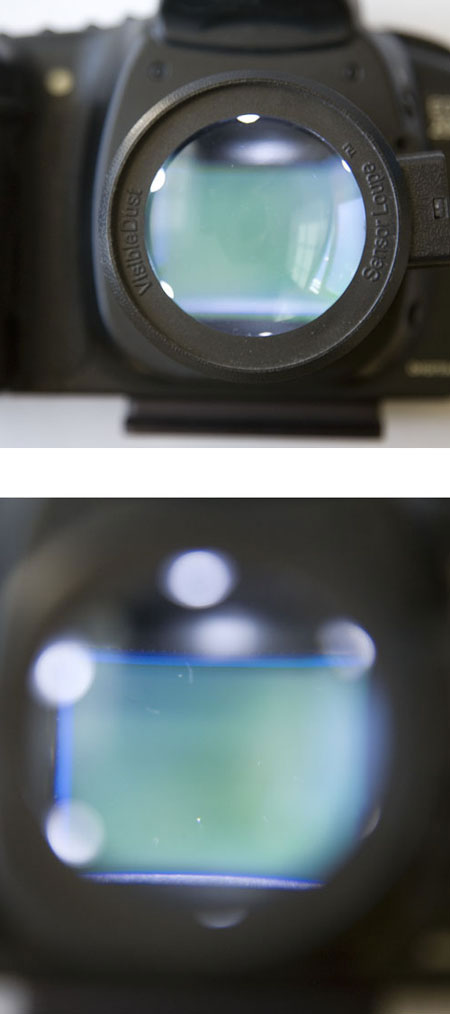
Figure 4. The Sensor Loupe fits on the front of the camera and lets you see just how dirty your sensor really is. This is actually kind of embarrassing.
It can take a while to learn how to focus your eyes to see the surface of the sensor — when illuminated, the sensor surface appears covered with confusing moiré patterns — but once you do, you can identify the exact locations of sensor dust and stains. For determining if your sensor is clean, this is much easier than hassling with the picture-shooting scheme described above.
What’s more, you can use the Sensor Loupe while brushing or using a swab, which makes it much easier to attack specific problems.
Small, lightweight, with an included zippered pouch, the Sensor Loupe is very intelligently designed, and easy to travel with. For sensor cleaning, it’s an excellent — nearly must-have — accessory. Visible Dust sells an assortment of combination packages of Sensor Loupes, Arctic Butterfly Brushes, cleaning swabs, and fluids. Check out the Web site for more details.
Delkin SensorScope
Delkin, a company best known for its high-speed memory and card readers, has also entered the sensor cleaning market with the Delkin SensorScope and some cleaning tools.
Like the Visible Dust Sensor Loupe, Delkin’s SensorScope ($90) is a loupe-like device that you use to examine your sensor. Because the SensorScope (Figure 5) is quite a bit larger than the Sensor Loupe and not as bright, the Sensor Loupe provides a slightly easier view of the sensor.
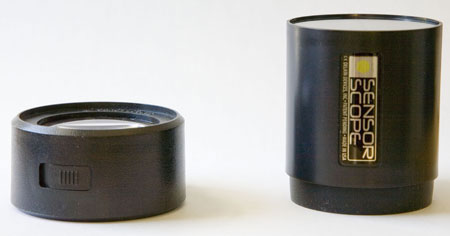
Figure 5. The SensorScope (right) is quite a bit larger than the Visible Dust Sensor Loupe (left).
Perhaps the most frustrating aspect of the SensorScope is that instead of a power switch, a button activates the SensorScope’s lights. To keep the lights on, you must hold the button down. That’s one extra finger to worry about while you’re also trying to manage a brush or blower. The Visible Dust Sensor Loupe is easier to use, provides a better view, costs less, and is smaller.
For cleaning, Delkin also sells both wet and dry cleaning tools. The SensorVac is Delkin’s alternative to the Visible Dust Arctic Butterfly brush. It’s basically a tiny vacuum cleaner. While the concept is interesting, the SensorVac rarely sucked up any of the dust that I could see through the Sensor Scope.
Delkin also sells SensorWands and SensorSolution for wet cleaning. I found these to be effective, though other reviewers have reported smearing and smudges.
You Can Do It
If you’re all thumbs and routinely have trouble with such everyday items as toothbrushes and pencils, sensor cleaning may be something you should avoid. But as long as you’re careful, there’s no reason to fear sensor cleaning, especially since the tools made by Visible Dust are now so refined and well-developed.
While brushes and swabs and solutions are expensive, they quickly pay for themselves with saved post-processing time. I also heartily recommend getting a sensor viewer like the Sensor Loupe.
This article was last modified on December 14, 2022
This article was first published on September 10, 2007
Commenting is easier and faster when you're logged in!

Recommended for you

Scanning Around with Gene: Seeing Pictures With Both Eyes
When I die and go to my Heaven, it’s going to look like a store in Berkeley, Cal...

Panasonic Introduces Three New FX Series LUMIX Digital Still Cameras
Panasonic today introduced the new LUMIX 7.2-megapixel DMC-FX50 and DMC-FX07 dig...

Heavy Metal Madness: I'm Looking Through You. Where Did You Go?
I’m a bit late in this eulogy to a couple of products from Eastman Kodak t...