


While the world may feel unpredictable and ever-changing, there have always been a few things you could count on to remain the same: the Cubs lose, your computer will be obsolete six months after you buy it, and camera makers write lousy software. Well, Cub fans, there’s hope! Because with the announcement of Nikon Capture NX, Nikon has proved that those seemingly unalterable certainties can, in fact, change.
Previous versions of Nikon Capture were aimed primarily at higher end users who used it as a Raw converter (before passing the results on to Photoshop). Nikon NX is targeted at photographers of all skill levels — from point-and-shooters to professional SLR users. No matter what brand of camera you shoot with, or whether you shoot Raw or JPEG (or even shoot film and scan into TIFF format), Nikon is hoping you’ll use Capture NX for your editing. Unlike previous versions, the new program provides a complete non-destructive editing environment and boasts a simple, powerful editing interface unlike anything found in any other image editor.
Earlier this year, Nikon purchased a large stake in Nik Software (formerly Nik Multimedia), a company best known for its sharpening and color adjustment plug-ins. Together, Nikon and Nik have created a very exciting new imaging tool. Capture NX will ship in the summer or fall of 2006 for Mac and Windows for an undisclosed price. I took a look at a beta copy and found much to like.
Basic Browser
Capture NX’s streamlined interface places pop-out tabs on the left and right of the screen (Figure 1).

Figure 1. Capture NX’s interface is very simple, with most controls accessible from the toolbar, or from simple palettes that pop out from the side of the screen. To see a larger version, click on this image.
On the left side of the screen, you can open the Capture NX Browser, as well as EXIF and IPTC viewers. The straightforward Capture NX browser lets you navigate the directory hierarchy of your drive. As you select a folder, Capture NX builds thumbnails of the contents. From the Browser, you can easily open any compatible image in Capture NX (Figure 2).

Figure 2. The Capture NX Browser provides easy file browsing, rating, and keywording. To see a larger version, click on this image.
Capture NX supports JPEG, TIFF, and Nikon Raw format documents. If you shoot in non-Nikon Raw formats, you’ll have to perform your Raw conversion elsewhere and move your images into the program as TIFF files. (Fortunately, Capture NX has a few automation tricks that streamline the process.) Images in non-compatible formats don’t appear in the Capture NX Browser.
The Capture NX Browser’s simple rating system lets you assign labels to images, and then sort and filter by those labels, making it easy to tag images as selects for sorting later. Similarly, the IPTC editor gives you access to the full set of IPTC metadata, while the Camera Settings tab lets you view EXIF headers.
Global Editing
Capture NX sports a toolbar at the top of the screen. On the right side of the screen you’ll find a “Bird’s Eye” palette with the same functionality as Photoshop’s Navigation palette. Below that is the Edit List (more on this later) and the Photo Info palette, which shows a three-color histogram with a variety of options, as well as a color sampler.
What you won’t find in the Capture NX’s tool selection are any of the mainstay tools you expect to see in an image editor. There are no selection tools or brush tools, and no layering facility. Capture NX lacks these features because, thanks to some innovative new approaches to editing, it doesn’t need them.
Like Apple’s Aperture, Capture NX is a non-destructive editing system. When you make adjustments and edits to an image in Capture NX, the pixels in your image aren’t actually altered. Instead, descriptions of the edits are stored in the Edit List palette. You can easily modify or delete any edit at any time. As you make changes, your edits are applied to your original data in real-time and displayed on the screen.
By default, the Edit List includes a Base Adjustment edit. Base Adjustment provides all of the basic color, tone, and contrast adjustments you’ll need to make to most of your images (Figure 3).

Figure 3. By default, all images include a Base Adjustment edit, which lets you apply most of the corrections that you need to make.
With the Base Adjustment edit, you can apply a slew of corrections, including the following:
- Color Balance correction, in the form of RGB and Brightness/Contrast sliders.
- A Color Booster correction, which intelligently adjusts saturation in your image.
- D-Lighting, which applies a perceptual brightening adjustment akin to the Shadows adjustment in Adobe Photoshop’s Shadows/Highlight tool.
- Levels and Curves adjustments, with a unique single-interface Levels and Curves tool that includes Levels sliders in the same dialog box as an editable curve (Figure 4).

Figure 4. Capture NX’s Levels and Curves dialog provides both controls in a single interface.
- Lightness, Chroma, and Hue adjustments, which use the same interface as the Levels and Curves edit.
- Several canned photo effects, such as Black and White, Sepia, and Color toning. Each of these effects provides detailed parametric control.
In addition, the Base Adjustment controls let you add noise reduction, sharpening, red-eye removal, straightening, cropping, and correction of lens distortion.
Taking full advantage of its non-destructive nature, Nikon has added a cool feature to Capture NX’s sharpening adjustment (which uses a standard Unsharp Mask algorithm). When you resize an image that’s been sharpened, Capture NX automatically scales the amount of sharpening you’ve defined to better fit your new image size.
All of these edits are global: They apply to your entire image, and you can easily go back and alter any parameter at any time by clicking on it in the Edit List. You can also uncheck an edit to remove it from the current image.
If you’re working with a Nikon Raw file, Base Adjustments also include Raw conversion controls: Exposure Compensation, Hue Adjustment, Color Moiré Reduction, and Dust Off, Nikon’s automatic spot removal feature. Dust Off takes a clean “reference” image and uses it to automatically remove dust troubles in any other images shot with that same lens. All of these features should feel familiar if you use Nikon Capture now.
Raw shooters should take note that, because of Capture NX’s real-time, non-destructive nature, there is no separate Raw conversion step when working with Raw files. You can adjust your Raw parameters alongside all of your other edits and adjustments. While Apple’s Aperture provides similar functionality, most Raw converters and image editors require you to first convert your Raw files before you can perform any other edits. Once you’ve worked with an editor that doesn’t require a separate Raw conversion step, it’s hard to go back.
Like its predecessors, Capture NX provides for highlight recovery when working with Raw files. Using the Exposure Compensation parameter, you can recover up to 2 stops of blown highlights, assuming your highlights were not completely clipped.
Selective Editing
Nikon’s real innovation is in Capture NX’s radical approach to making selective edits. In most editors, if you want to apply an edit to only part of an image, you must first select the area that you want to edit, then apply your adjustment. Over the years, software vendors have come up with many ways of making selections, from lassos to magic wands that select based on color to paintbrushes that let you paint selection masks in real-time.
In Capture NX, selection and adjustment are rolled into a single tool called a Control Point (Figure 5).

Figure 5. I’ll color-correct this shot using Control Points. To see a larger version, click on this image.
To make a correction to part of your image, you click with the Control Point tool on the part of the image you want to correct. Control Points have four editable parameters: brightness, contrast, saturation, and the size of the area you want to effect (Figure 6).
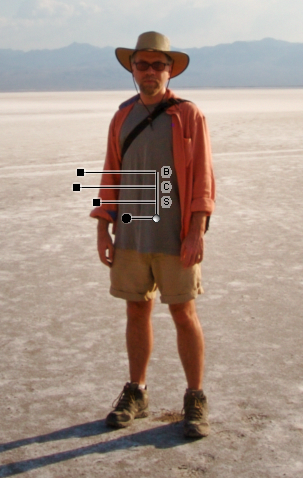
Figure 6. I began by placing a Control point on the figure, with the goal of brightening. Control Points have four editable parameters, which I adjusted by dragging the sliders that appear beneath the point when I clicked on it.
To adjust any parameter, drag the appropriate handle left or right. By dragging the topmost slider, you can change the size of the area affected by the Control Point (Figure 7).

Figure 7. I dragged the upper slider to adjust the circular area affected by a Control Point.
There’s a tremendous amount of intelligence behind the Control Point — it’s not simply applying your specified edit to every pixel within the circle. Rather, it’s attenuating the edit based on color and texture analysis, using the point you clicked on as a base.
Move the Control Point around an image and you’ll see the affect change based on whatever area you drag it to, as Capture NX analyzes the new area.
When you use a Control Point, Capture NX automatically analyzes the color and brightness information of your image to build a graduated mask within the circular area that you specify (Figure 8). The brightness, contrast, and saturation adjustments that you specify are then applied through that mask. You view the mask by selecting Show Selection from the View menu.

Figure 8. Capture NX built this complex mask in real time as I adjusted a Control Point. To see a larger version, click on this image.
When you’re ready to correct a different part of your image, just click to define a new control point and configure it accordingly.
To correct the sky in this image, I added a Control Point to the left side of the sky and stretched the circle to cover as much of the sky as possible (Figure 9). Then I increased the Saturation.

Figure 9. I began the sky correction by defining a Control Point in the left half of the sky. To see a larger version, click on this image.
Notice that Capture NX very wisely left the mountains and ground untouched. However, I couldn’t define a circle big enough to cover the whole sky. By right-clicking on any Control Point, you can access a pop-up menu that lets you delete or duplicate control points. I duplicated my original Control Point and dragged the copy to the other side of the screen to complete the sky correction.
Control Points are smart about how they overlap. My first Control Point overlaps the mountains on the left side of the screen. To correct them to add some contrast, I just added a Control Point and adjusted it properly.
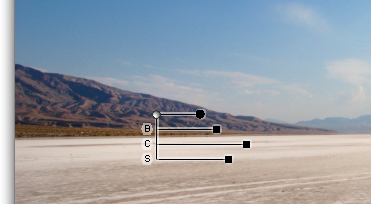
Figure 10. To correct the contrast in the mountains, I added another Control Point.
Even though the mountain’s Control Point overlaps with one of my sky Control Points, Capture NX figured out which adjustment to apply to each area.
To finish correcting this image, I added two more control points to correct the ground. In total, I added six simple points, two for the background, two for the foreground, one for the figure, and one for the mountains. At no time did I have to face a histogram, Levels or Curves dialog box, or any numbers of any kind. If you want to edit using these “traditional” tools, you could, as Capture NX provides them all. Likewise, if you prefer to work more precisely, you can configure your Control Points numerically using a pop-up palette (Figure 11) that appears any time you create a Control Point or click on an existing one.
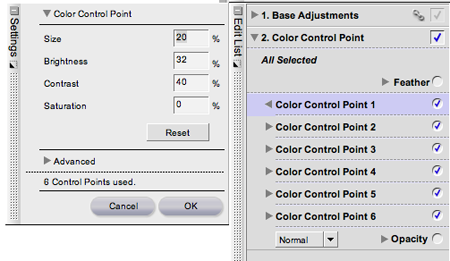
Figure 11. You can also configure Control Points numerically using the pop-up Control Point palette. Note too, the Control Point entries in the Edit List. These can be changed, removed, or temporarily deactivated at any time.
When I finished, my final mask looked like Figure 12 and my corrected image looked like Figure 13.

Figure 12. After setting all of my Control Points, my final image mask looked like this. To see a larger version, click on this image.

Figure 13. In this final image, the color is much more acceptable. Now if only the subject weren’t wearing such a goony hat. To see a larger version, click on this image.
More Control Points
Capture NX provides three other Control Points for defining the White, Black and Neutral tones in your image. Click with these points to remove color casts, even extreme casts, such as those encountered in low-light situations.
To brighten an image shot in low light, I applied a global D-Lighting adjustment and then added a single Control Point to the face for additional, localized brightening. However, it still suffered from a bad color cast (Figure 14).

Figure 14. This image needs more correction. To see a larger version, click on this image.
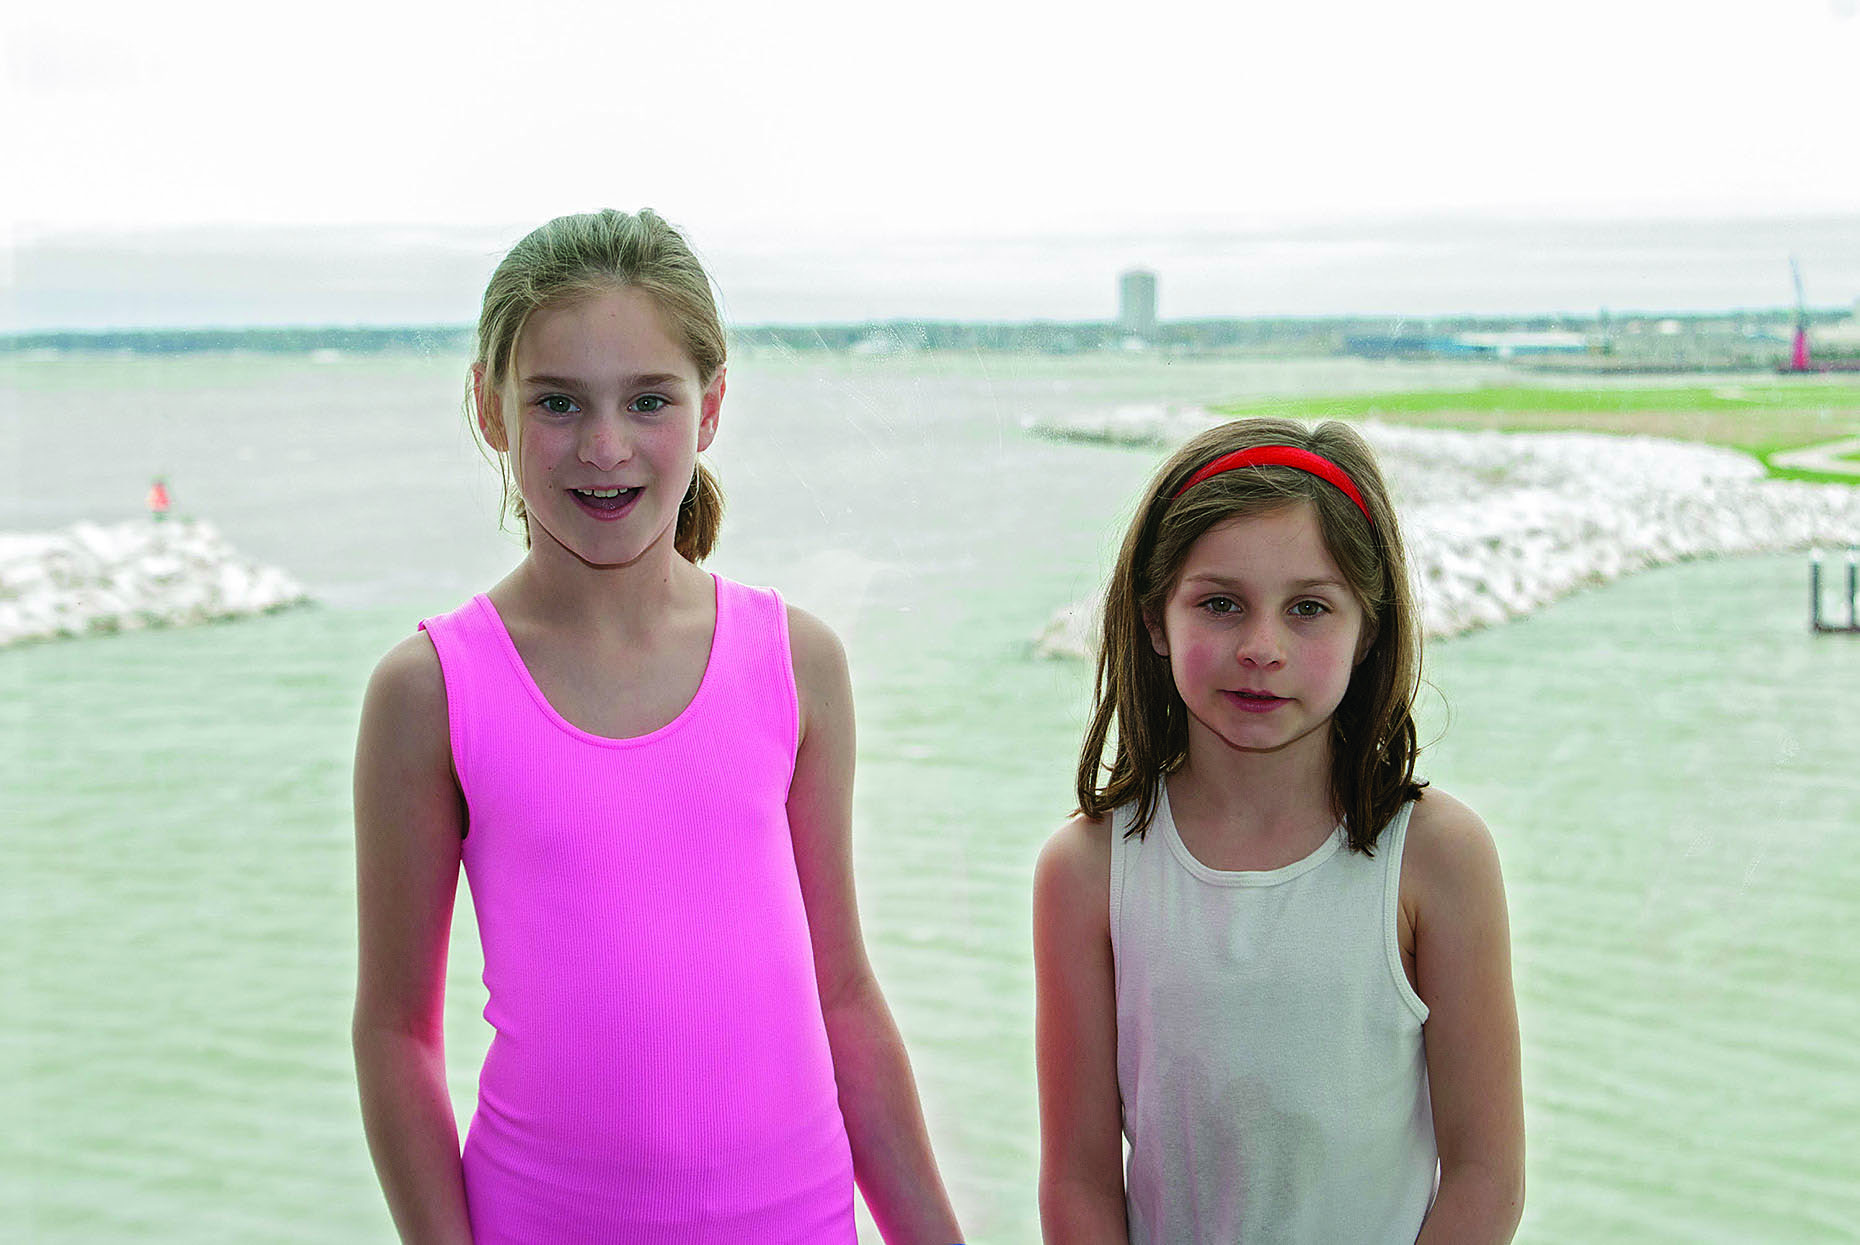
Once I clicked with the White and Neutral control point tools, the color casts were gone (Figure 15).

Figure 15. With only two clicks, I corrected the color casts in Figure 14 to produce this image. To see a larger version, click on this image.
To further refine selective edits, Capture NX includes a special Brush tool you use to brush on (or out) any edit you’ve applied to your image. Whether you apply a global edit or a Control Point-based edit, you can refine its application by painting it into the area you want, or painting it out of areas where you don’t want it. Capture NX’s brush provides full pressure-sensitivity for Wacom tablets. For larger areas, the program has a marquee tool, lasso tool, and gradient tool.
Batching and Saving
A batch-processing facility is built in to the program. With it, you can define a source image and a set of destination images, such as a folder. Capture NX automatically copies the edit list from the source image onto all of the destination images. This simple mechanism lets you easily apply uniform color adjustments to large batches of pictures.
You can also define a watch folder. Images placed in that folder automatically receive particular edits. This can be especially handy if you shoot in a non-Nikon Raw format. You can set up your Raw converter of choice to output converted files into Capture NX’s watch folder for immediate correction.
Capture NX also has a built-in soft proofing feature that’s fully compatible with ICC profiles. After selecting your profile, you can activate the Soft Proofing feature to generate on-screen proofs. Soft proofing doesn’t do you much good if you can’t print with your profiles, so Capture NX has a fully color-managed print architecture, as well.
The program’s Print feature lets you print single images or contact sheets (Figure 16).

Figure 16. The program’s Print feature makes short work of printing single image or contact sheets.
You can output your images as TIFF, JPEG, or NEF files. The TIFF and JPEG files will be fully rendered; that is, Capture NX will apply all of your edits. However, when you next open the image, you won’t be able to access any of your previous edits. To save your image with its edit list intact, you must save it as a NEF file.
If you’re like me, you probably thought that NEF was merely Nikon’s format for its Raw files, but the spec is actually much more versatile than that. NEF files can include Raw data or regular TIFF-like data. In addition, Nikon can put its edit list (a small XML file) directly into the NEF format.
Capture NX lets you define up to five different versions of an image — essentially, five different edit lists — within a NEF file, making for easy experimenting and version control. The Capture NX browser doesn’t let you view these different versions.
More to Come
Capture NX isn’t perfect, but I won’t ding it too hard. The software is still in beta, which is why this article is a first look, not a review. No matter what else Nikon might add in the next few months, it’s impossible not to be impressed with the program as it is.
When Nikon representatives called and said they had some software to show me, I left the house with something of an “Okay, I’ll humor them” attitude. Nikon Capture was never a bad program but, you know, “Camera vendors make lousy software.”
Though I’ve only played with the beta, I think it’s safe to change that to “camera vendors other than Nikon make lousy software.”
This article was last modified on December 14, 2022
This article was first published on May 26, 2006
Commenting is easier and faster when you're logged in!

Recommended for you
Using Photoshop’s Content Aware Scale and Content Aware Move
Speaking Photoshop This article is an excerpt from Speaking Photoshop CS6...

Design How-to: Endless Pattern Possibilities
This story is taken from “Before & After” Magazine. You can subs...

ShutterSnitch, the Wireless Photo Assistant for iOS
The iPad offers several advantages for photographers. Compared to a laptop, it t...