

Down at the bottom of the File menu in Photoshop, there are two little submenus: Scripts and Automate. Buried in these submenus are a few easy-to-overlook features that are surprisingly handy. Here’s how to take advantage of their powerful output capabilities and save a tremendous amount of time.
Banish the Mundane with Image Processor
While Photoshop has exceptional image-editing controls, it can also help you with more mundane work, such as resizing and converting images from one format to another.
For example, if you regularly produce copies of an image in multiple formats, you need Photoshop’s Image Processor. One of the most useful and least-known features in Photoshop, the Image Processor lets you automatically output multiple copies of an image in different formats, and perform resizings along the way (Figure 1).

Figure 1. Using Photoshop’s Image Processor, you can easily batch process images, applying a Photoshop Action and saving in multiple formats with the push of a single button.
To invoke the Image Processor, go to File > Scripts > Image Processor. In section 1 of the Image Processor dialog box, you can choose to process the currently open images or select a folder of existing images. Select a save location in section 2.
In section 3, File Type, you can check to save as JPEG, PSD, or TIFF, or any combination. That means you can output multiple files with one Image Processor action! In addition, you can use the Resize to Fit buttons to automatically resize the image to fit within the specified dimensions. Photoshop will automatically resize regardless of the image’s aspect ratio.
Finally, in section 4, you can specify an action for Photoshop to execute on each file.
The Image Processor makes it simple to perform complex batch operations that spit out multiple formats. Say you want to process a collection of images by adding a watermark to each and then producing both a Web-ready JPEG and a print-ready TIFF. Just create a watermarking Action in Photoshop and select it in the Run Action menu of section 4. Check Save as JPEG and Save as TIFF in the File Type section, and configure the Resize to Fit boxes accordingly. Select the images to process in section 1, indicate where to save them in section 2, and click the Run button.
Photoshop will open each document specified, run your chosen action over it, and then resize and save it in two different files, according to your specifications.
If this is a batch process you’ll run frequently, click the Save button and save this configuration. To use it later, click the Load button.
While Photoshop’s File > Automate > Batch command performs similar types of functions, the Image Processor’s interface is much simpler.
Save Paper or Create Diptychs and Triptychs with Contact Sheet II
Under the File >Automate menu, you’ll find a Contact Sheet II option, which lets you print multiple images on a single piece of paper. At the simplest level, this lets you print contact sheets full of thumbnails, for review or client approval. But Contact Sheet is also great for any time you want to gang-print images for other reasons, such as to create diptychs and triptychs, or to save paper.
For example, say you have the two images shown in Figure 2. They’re slightly different sizes, and different orientations. You want to make them both 4″ x 6″, and you have only letter-size paper (8.5″ x 11″). You could piece together a single letter-sized document in Photoshop with the two shots. Or you could save yourself some trouble and use Contact Sheet II.

Figure 2. You can easily print both of these images on a single sheet of paper using the Contact Sheet II feature of Photoshop CS2 and CS3.
Open the images in Photoshop, then choose File > Automate > Contact Sheet II.
In the Source Images section of the resulting dialog box (Figure 3), set the Use pop-up menu to Current Open Documents. (You could also tell Photoshop to use the contents of a folder or the current image selection in Bridge.)

Figure 3. You can use Contact Sheet for more than just outputting pages of thumbnails. It’s ideal for printing multiple large images on a big sheet of paper.
In the Document section, enter the size of your final print size. In this case, I’ve chosen 8″ x 10″ so the page will have a white border around the edge. To shrink the file size, I’ve instructed Photoshop to Flatten All Layers.
In the Thumbnails section, specify 1 column and 2 rows, and check Use Auto-Spacing to automatically create a margin between the two images. Check Rotate for Best Fit so the portrait and landscape images are properly rotated to make the best use of the page. Finally, uncheck Use Filename as Caption if you don’t want captions on the page.
When you execute the action, Photoshop will automatically re-size and re-arrange your images so that they both fit on the page and produce a new document. When it’s finished, you can print this document as you please.
This procedure is also great for printing diptychs and triptychs: 2-up and 3-up images that sit side-by-side on a page. If you don’t want the images the same size, uncheck Flatten All Layers. The resulting document will have a separate layer for each image. You can then use Photoshop’s Edit > Free Transform command to alter the size of each layer, allowing you to customize the size of each image on the page.
Produce One Page with Multiple Versions of an Image Using Picture Package
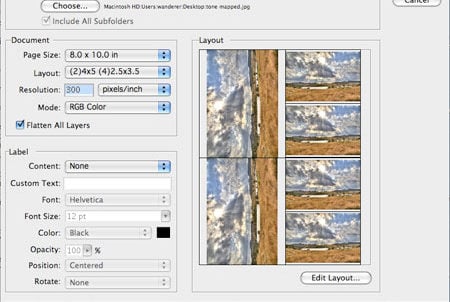
If you want to print multiple copies of the same image, use the Picture Package feature (File > Automate). Picture Package (Figure 4) lets you easily create a “package” of multiple sizes of the same images, like the collection of different-sized images kids bring home from school portraits.

Figure 4. Picture Package places multiple, variable-sized copies of the same image on a single page for printing. Click on the image to enlarge it.
As with Contact Sheet, Picture Package works with the currently open image, a specific file, a folder full of images, or the current Bridge selection. Choose your option from the Use menu, then configure your page size and layout in the Document section. Add custom captions in the Label section, and see a simple preview of your configuration in the Layout panel. You can also define your own layouts using the Edit Layout button.
Once you’ve configured the Picture Package to taste, press the OK button. Photoshop will construct a document that’s ready to print. The processing time will vary depending on the speed of your computer, the size of your source image, and the complexity of your chosen layout.
It doesn’t take long to learn any of these features — they’re self-explanatory and easy to experiment with — and spending just a little time learning their options will soon pay off with easier workflows and speedier output.
This article was last modified on December 14, 2022
This article was first published on October 31, 2007
Commenting is easier and faster when you're logged in!

Recommended for you

The 7 Skills Every Design Professional Needs Today
Today more designers are finding themselves having to be well rounded with diver...

Heavy Metal Madness: Put on a Happy Face!
When I met my wife Patty back in the very early ’80s, it made perfect sens...

Ten Tips for New Web Designers
For those of you who may be less familiar with the details of web design it can...