
Get Light Right for the Best Photos
Excerpted from The Digital Photographer’s Notebook: A Pro’s Guide to Adobe Photoshop CS3, Lightroom, and Bridge. Copyright © 2007. Used with permission of Pearson Education, Inc. and Peachpit Press.
Photography has undergone an earth-shattering sea change in its transition from film to digital. At the same time, the foundation of photography — light — remains the same. Photography literally means “light writing,” which means that photographers are light writers. The ability to bend light to our vision is what makes us photographers. After all, anyone can buy a high-quality digital camera. Very few can light a subject well. You might say light writers light right.
Eye versus Camera
It all starts with how our brain sees light — and how the camera records it. Adding to the complexity is that what your camera records may not be possible to reproduce on the printed page. Here’s how it breaks down.
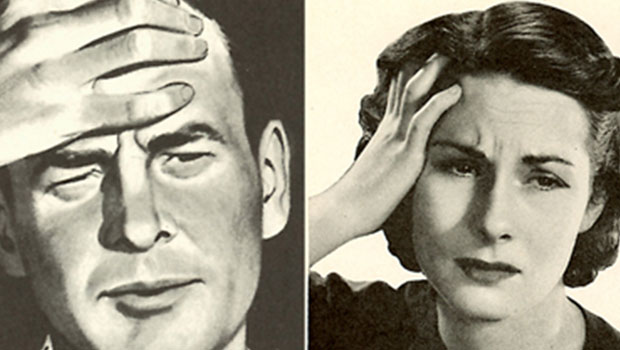
The range of light on a bright sunny day is too wide to capture detail in both the shadows and highlights with a camera, whether digital or film-based. This fact doesn’t seem to jibe with how the brain handles visual processing. When we look at a scene that has too wide a range, the brain looks first at the brightest areas. It remembers the details in the highlights and midtones, then it tells the pupils to widen to see what’s in the shadows. The brain combines the two images — the lightest and the darkest — in real time, allowing us to think we see a wider range of brightness than we really do. In other words, the brain is doing Photoshop on the fly. Who knew?
Digital cameras can record a wider range of brightness than film can. That’s good. The problem is that printers can’t begin to reproduce the brightness range of film, much less that of digital. There is a range of brightness of light that can be printed that will give detail in the highlights and shadows at the same time. A good inkjet printer can hold detail if the image has RGB numbers of around 25 to 40 in the shadows and a range of 242 to 249 or so in the highlights. Printing from Lightroom works the same, except the RGB values are presented as percentages. From 7% to 95% will provide a brightness range of reproducible shadow and highlight detail. Your printer, ink, and paper combination will also affect the results. Newer printers can extend that range on glossy or luster papers. Fine art papers, matte, watercolor, or canvas have smaller ranges between highlight and shadow detail. If the RGB number reads lower or higher when sampled, detail must be sacrificed in either the shadows or the highlights. Digital cameras today have sophisticated built-in software to help with setting exposures that return fairly consistent quality images. The algorithms tell the camera which end of the brightness range to favor and which to discard. The usual bias is to keep detail in the highlights and let the shadows go dark. It’s a good compromise for point-and-shoot situations.
Lightroom Numbers
Lightroom’s engineers (along with about half a million beta testers) took a fresh look at everything digital photographers do. Then they asked, “Does this really make sense?” One of the items that didn’t make sense was how Red, Green, and Blue values are displayed. Lightroom shows RGB data as percentages. So 0% is black and 100% is white. Photoshop and Bridge show 0 as black and 255 as white. Photographers used to the 0–255 system can be confused by Lightroom’s percentages. A workaround is to multiply the percentage reading in Lightroom by 2.56 to convert to the familiar 0-255 scale. So 97.3% in Lightroom is 249 RGB. And 25 in the RGB world is not quite 10% in Lightroom speak. Graphics in The Digital Photographer’s Notebook will show both numbers where appropriate.
In Figure 1, Photoshop and Camera Raw RGB numbers are shown across the top. The equivalent Lightroom values are at the bottom. There are twenty-one steps in this grayscale between complete black and paper white. How many can you count? For comparison, a continuous tone grayscale runs through the middle of the step wedges.

Figure 1
Specular highlights — catchlights in the eyes, or sun glinting off a chrome bumper — are reflections of the source of light. They have no detail and don’t count when considering the tones for printing. When printed they appear as paper white.
The photographer’s job is to use light to control (and often compress) the brightness range so both subtle shadows and highlights shine through. Lighting starts with exposure.
Exposure and Metering
Exposure, or the amount of light that hits your camera’s sensor, reveals the diffused value or true tone of the subject. That’s simple to say and a bit trickier to do, especially with a digital camera. There are two methods of reading light to determine exposure. One measures light after it has already lit the subject, bounced off, and is on its way to the camera. The other measures the light before it hits the subject. The first method is reflected metering. It interprets the amount of light that has already illuminated the subject. The second is called incident metering because it measures light before it reaches the subject. Let’s look at each in turn.
Reflected Metering
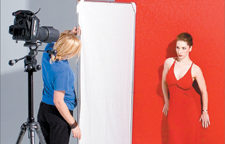
Reflected meters are the kind that are built into cameras. This type of meter sets a default exposure that returns a middle gray value, or RGB numbers of around 127 (Lightroom: 50.2%). If your camera’s meter reads a white value, the meter tells the camera to underexpose the scene by 2 2/3 stops so that it yields the desired middle gray. Pointing the meter at a black value results in a two-stop overexposure so that it once again results in middle gray (Figure 2). Reflected meters return an exposure value equal to 12.5% gray on any value they read.
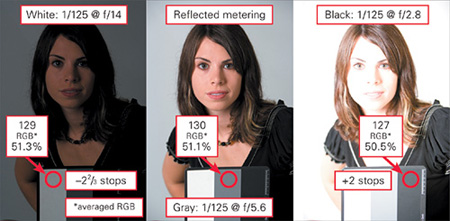
Figure 2
Look at the average RGB numbers for the three separate exposures shown in Figure 2. Each average is taken from white, gray, and black areas in the scene. The results of the separate exposures for the three swatches are: white: 129 (LR: 51.3%); gray: 130 (LR: 51.1%); and black: 127 (LR: 50.5%). The only exposure that can be called useful is that made by reading the gray patch. To make accurate reflected-meter readings, it’s common for photographers to carry a neutral gray card or the GretagMacbeth ColorChecker Gray Scale balance card, shown here. If a card is not available, worn asphalt and green grass can do the trick as both are close to 12.5% gray.
Incident Metering
Incident meters — separate handheld devices not built into the camera — are the most effective meters for setting proper exposure because they measure the light falling on a subject. Unlike reflected meters, they are not affected by the tonality of the subject. Incident meters are held at the subject’s position (Figure 3). The dome receiving the light is aimed at the source of light. The reading is then set on the camera. This exposure setting is the diffused value. Once the exposure readings are entered in the camera, everything else in lighting is subjective and done at the photographer’s whim for the desired effect.

Figure 3
Contrast
Contrast is the difference between highlights and shadows. When the contrast range is greater than four f/stops from darkest to lightest, the result will be out of the range most printers can handle. Usually the result is solid black shadows (Figure 4). The shadow area in the photograph of model Marie Friemann shows a reading well below the 25–40 minimum RGB range that’s required to show detail. This example is a high-contrast photograph. The difference between the lightest and darkest areas is well beyond a reproducible four stops. The shadows are blocked up so much as to be black.

Figure 4
Lowering Contrast
Adding light to the shadows lowers contrast. My assistant, Holly Jones, holds a reflector panel that bounces light from the source back into the shadows at Marie’s right (Figure 5).
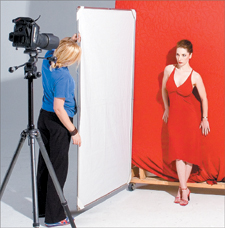
Figure 5
As a result, detail within the shadows is revealed (Figure 6). The Red channel now reads 69 (LR: 21.3%). Her hair, forehead, cheek, ear, and the texture in the shadow area of the background are revealed. The exposure remains the same, as no more light is coming from the source.

Figure 6
One of the reasons photographers love the light in the latest part of the afternoon, just before the sun dips below the horizon, is its directionality, warm color, and lower contrast. The shadows are filled in by the open sky.
Quantity or Quality?
Light is confusing. Consider this question: “As a subject gets closer to a light, does the light become harsher or softer?” Think about this for a minute. Imagine you are in a room at night with a single table lamp across the room providing illumination. Hold up your hand. Walk toward the light. Does the amount of light falling on your hand increase? Yep. Sure does. So the closer you move to the light, it gets brighter and harsher. Right? Well, half right, anyway. It does get brighter. It also becomes softer. And we humans, thanks to the way our brains work, universally confuse brightness with harshness. We mix up the quality of light with the quantity we see.
Shadow Edge Transition
Imagine you are walking away from the light. Hold one finger over the other palm of your hand. It casts a shadow. Look at the edge of the shadow. It sharply outlines the shape of your finger (Figure 7). The edge marks the transition from highlight to the shadow. If the shadow has a sharp edge, the light is harsh. Now think of shadows cast on a sunny day. They are very defined. The earlier photographs of Marie as seen in Figures 4.4 and 4.6 are made with harsh light. The edges of the shadows cast by her nose and chin are very sharp.

Figure 7
Now pretend you are walking toward the lamp. As you get closer, notice the edge of the shadow cast by your finger on your palm. The edges of the transition from highlight to shadow are blurred. By the time you get next to the lamp, the shadow and the highlight almost merge. What’s going on here? The light is really bright and the shadow edge is soft. Hmmm. Well, there are a couple of things happening.
First, the light has become much larger in relation to the size of the subject so the transition from highlight to shadow is spread out (Figure 8). The result is an almost shadowless image similar to what you see on an overcast day in which the whole sky is the (really big) source of light. Second, as the light gets brighter the exposure on the camera has to be lowered to compensate. The background becomes darker.

Figure 8
The larger a light source is in relation to the subject, the softer the quality of the light. Large light sources make soft light. The transition from highlight to shadow is spread over a large distance. Small light sources create harsh light and sharp shadow edges.
Instant Soft Light
Soft light is great for portraits of women and children. The long shadow edge transition minimizes texture in skin and enlarges the catchlights in the eye. It is very pretty. Best of all, it is easy to achieve. Either wait for an overcast day or slip a diffusion panel in front of the light source. Think of diffusion panels as on-demand clouds or port-a-clouds.
Sunny-day Soft Light
Outdoor sunlight streaming through tree leaves creates areas of very bright highlights and deep shadows, resulting in a high-contrast scene (Figure 9). The sun on Cara’s face and legs is so bright that the detail in her skin disappears completely due to overexposure. Closing down the aperture on the camera to compensate would make her outfit go completely black. Look at her black robe draped over the chair. You can see folds in it. The exposure is correct for the shadows because these details show. So how can the contrast be lowered?
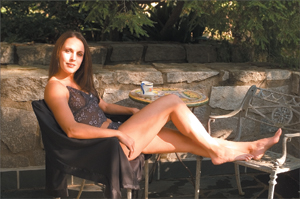
Figure 9
Remember that the only way to lower contrast is to add light to the shadows. The solution is to bring in a diffusion panel that is large enough to soften the light falling on Cara. In this case, it’s a 42 x 72-inch Chimera frame with a full translucent panel on it (Figure 10).

Figure 10
Now the patches of bright sunlight and the shadows cast by the leaves blend into soft light (Figure 11). The panel’s fabric reduces the amount of light reaching Cara by 11?2 f/stops. If we open up the camera’s aperture by that amount, the exposure adds light to the shadows, thereby lowering the contrast on Cara. At the same time, the increased exposure brightens the background not covered by the panel by 11?2 stops, as well. The light hitting the stone wall behind her is much brighter now, complete with blown-out highlights. Brightening the background in a photograph by reducing the light hitting the subject and then increasing the exposure to compensate is called subtractive contrast control.

Figure 11
Harsh then Soft Studio Light
Any light you find in nature can be duplicated in the studio — and it’s not hard to do. In this section, you’ll see how to place a single flash to replicate the effects of sunlight on both a clear and an overcast day.
Photographs do much more than tell the story of their subject. They also share exactly how it was lit. (Well, if someone has been playing around in Photoshop, it may not be exactly how the subject was lit.) Learning to read the lighting cues in a photograph goes a long way when you are creating the lighting yourself. Specular highlights reflect the source of light in the subject. Look for them on the hood of a car, on the glass of a window, in the water of a pond or lake, and in the eyes as they catch the light (Figure 12).

Figure 12
Specular highlights show you the size of the light shining on the person. A big catchlight reflects a large source and that means a gradual shadow edge transition, the indicator of soft light. A pinpoint of light in the eye would lead you to look for a quick, sharp shadow edge. Sometimes you can uncover retouching done on photographs by examining the catchlights. If the shadow edge transitions don’t jibe with the specular highlights, you can be almost certain that Photoshop has touched the photograph. Now that you know how light works, your photographs with long, smooth shadow edges won’t have teeny tiny catchlights in the eyes, will they? Of course not.
Harsh Light, High Contrast
This photograph of Marie is lit with harsh light (Figure 13). The tell-tale signs are the sharp transition from dark to light in the shadow cast on her cheek by her nose and on her shoulder by her chin. The tiny catchlight in her eye shows the size of the light source.

Figure 13
The high-contrast harsh-light image is made with a single flash set twenty feet from Marie and positioned forty-five degrees to her left and forty-five degrees above her (Figure 14). The flash is both the origin of light and the source of light because there isn’t a modifier (such as a diffusion panel) between it and the subject. At twenty feet, the 51?2-inch reflector is about the same relative size as the sun.

Figure 14
Here’s an easy way to see if your light will deliver sun-like quality. Hold your thumb at arm’s length from your eye. If your thumb blots out the light, it will be very close in quality to the sun. I guess this really is a “rule of thumb.”
Soft Light, Low Contrast
This photograph shows Marie in soft light with low contrast (Figure 15). The shadow edge transition is spread over a wide distance. The change from highlight to shadow is almost undetectable because of the low contrast. Again, the catchlights in Marie’s eyes show the size of the source of light.

Figure 15
Three changes have been made — two on the set and one in the camera. Two incident controls — a diffusion panel and a bounce panel — have been added. Incident controls modify light before it reaches the subject. Some other changes have happened by adding the incident controls. The diffusion panel becomes the source of light. The source of light always illuminates the subject. In this setup, the flash is the origin of light. It lights the source. The bounce panel, in this case another Chimera panel covered with silver lame, catches light from the source of light and the origin of light to fill in the shadows, seriously lowering the contrast (Figure 16).
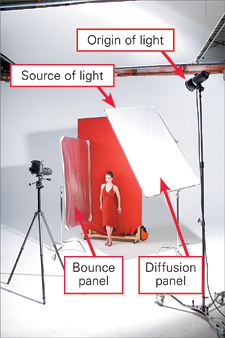
Figure 16
Take a closer look at Marie’s eyes (Figure 17). The silver bounce panel shows on her right, and there is another reflection on the lower part of her iris. The white floor adds even more fill light.
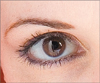
Figure 17
Finally, as in the earlier example diffusing the light outdoors on Cara in Figure 11, the exposure on the camera has been increased to compensate for the brightness reduction caused by adding the diffusion panel.
Soft Light, High Contrast
Removing the bounce panel from the set takes light away from the shadow side of Marie’s face and the contrast increases (Figure 18). Adding light to the shadows lowers contrast. Removing it from the shadows increases contrast. Contrast, and the quality of light, are all subjective decisions made by the photographer. Once you have set the diffused value (exposure on the camera), everything else is relative to it and under the rule of your every whim.

Figure 18
Creative Lighting
Learn to see your muse, as the camera will record it. One way to truly shortcut this process is to hook your camera up to your computer so you can see each image large on the screen. (See Chapter 3.)
Open a JPEG or RAW photograph in Photoshop. Zoom in to see the actual pixels at 100% and check your focus. Look at the catchlights in portraits. Be aware of the contrasts in the photograph. Is there a shadow that has lost detail? Are there any blown-out highlights (aside from the specular highlights)? Where would a little more light make a big difference? Those differences can be so subtle — you may only notice them by comparing them to other photographs.
Take a look at the photograph of Atlanta Falcons cheerleader Nikky Williams (Figure 19). Look at her left arm. It has a deep shadow. Her hair on that side falls into shadow and looks dull. The addition of a silver 42 x 72-inch bounce panel behind her adds a rim of light to her hair, along her arm, and along the edge of her gown (Figure 20).

Figure 19

Figure 20
Light Different
Break down your lights after each shoot. Or a least move them off set and, in the case of electronic flash, disconnect them from the power packs. That removes the temptation to treat each subject the same as the one before. Each subject, especially when that subject is a person, is different. Remember Apple’s “Think Different” ad campaign? Make your slogan “Light Different.” Consider this photograph of Lauren. When we met, I was completely taken with her strong angular face, high eyebrows, and blue eyes. The editorial shoot called for three quarter-length poses (Figure 21).

Figure 21
After we’d finished with the assignment, I moved in for close-ups. The lighting is two 2 x 3-foot Chimera Super PRO soft boxes. They are forty-five degrees from the lens to subject line and about two feet away. This is a soft, lower-contrast light that you won’t find outdoors in “natural” light. And it is very compelling. A close look at Lauren’s catchlights tells the setup’s tale. Notice the highlight around her upper lip and the specular highlight showing off the shape of the lower one (Figure 22). Break rules. Light differently.

Figure 22
Play
I can’t begin to describe how important play is in creative lighting. Try stuff. Shoot a photograph into your computer and study it. Change something. Shoot another and scrutinize that one. Keep going. Make notes or, even better, take photographs of the setup with a point-and-shoot camera. Never stop asking, “What would happen if…?”
I’ll close with a happy result of light play. I had a cucoloris (also called a cookie in the motion picture industry) made of metal screening that had been burned with a blowtorch. I wanted to see what it looked like when photographed (Figure 23). I put up a blue background paper then placed the cookie in front of a bare-bulb flash head. That makes it a very small origin of light. The result is a sky full of clouds (Figure 24). I had no idea that would happen. Now I have another technique in my lighting kit.

Figure 23

Figure 24
Play. The rewards are indescribably useful and, well, lots of just plain fun.
Thanks
The techniques in this chapter came from several years of being around the late Dean Collins. Many (if not most) of the photographers of my generation owe Dean for our knowledge of how light works and how to make it work for us and the camera. He gave us the definitions describing light.
Here’s a photograph of Dean grabbing a couple of beers out of the darkroom sink during a party at my studio in March of 2002 (Figure 25). I hadn’t used the darkroom since 1999 for processing and printing. It was great for parties, though. The darkroom has since been converted into a digital workroom, and I wrote this book sitting where the enlargers once stood. Things change. Photographs remind us of what is gone. For more on Dean, visit software-cinema.com.

Figure 25
This article was last modified on January 5, 2023
This article was first published on December 14, 2007
Commenting is easier and faster when you're logged in!

Recommended for you

Create Your Own Photoshop Filters With Filter Forge
Recently, Filter Forge, Inc released version 4.0 of their unique Photoshop plug-...
Heavy Metal Madness: The Agony of Defeat
[Editor’s note: Though this is the final installment of “Heavy Metal...

Create Patterns With Adobe Capture CC
How do you create beauty? There’s the old fashioned way: First, create the...