

Can you look over your clients’ shoulders as they review proofs from you? Doubtful. Most of us work with remote clients at least once in a while, if not regularly. These days even in-house designers more often distribute PDF proofs by e-mail than paper proofs by sneaker-net. While digital delivery is speedy and convenient, it does open the door to potential confusion.
For example, I was about to send an early proof to a new client when I realized he might not understand my use of for position only (FPO) photos and Lorem Ipsum placeholder text. It’s happened before — another client once screamed at me that his brochure “should be in English, not Latin — an [expletive] dead language.”
With this new client, a national retail chain that will send my proof to a dozen departments, managers, and executives, a similar misunderstanding might arise. Yet without the layout’s actual copy (still with the copywriter) and imagery (being shot), I’m stuck. While I can try to explain in the e-mail accompanying the PDF exactly how rough the proof is, my warning may not travel as far as the PDF proof. I’d like something inside the proof itself.
To solve this problem, I used Acrobat’s stamps (Figure 1).
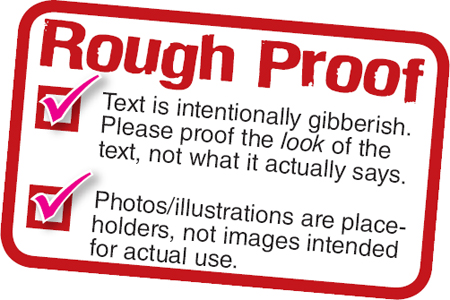
Figure 1. This easy-to-apply stamp will help my client understand the state of his PDF proofs.
Start In InDesign
Normally I’d create vector artwork like this in Illustrator, but some people aren’t comfortable with drawing applications. For those of you who’d rather stick with a page-layout app, I’ll quickly explain how to create the stamps in InDesign.
1. Create a new document in InDesign. If you already know the dimensions the stamp should be, set the page size to match in the New Document dialog. I’m not quite sure how big mine will wind up, so I’ll begin with a one-page, non-facing document of 3 inches wide by 2 inches deep. If the final size of the artwork is a little different, it won’t be difficult to fix; just try to err on the side of a stamp the same size or smaller than the page rather than one larger than the page.
2. Your stamp may be your logo, a copyright notice, your signature, or just about anything else. Whatever you choose, it’s unlikely you’ll want a stamp exactly like mine, so I’ll skip the creation step-by-step and leave you to design your own. If you do want a proof label like mine, feel free to steal it (Figure 2).

Figure 2. My stamp in InDesign.
3. Is your final design the same size as the InDesign page on which it sits? If not, copy the design and paste it into a new document with a page sized to fit exactly.
4. When you’re ready, export the stamp to PDF. Select File > Export, and in the Export dialog, set the Save As Type to Adobe PDF. Name the file and click Save. Set your options in the Export Adobe PDF dialog when it appears — I usually go with the default High Quality Print for stamps — and then click Export. The resulting PDF will be the same size as the InDesign page.
Finish in Acrobat
With the artwork done, let’s turn it into a stamp that can be applied to any PDF, any time.
5. Open Acrobat. It isn’t necessary to open the PDF you just created.
6. In Acrobat 6 Professional, choose Tools > Commenting > Stamp Tool > Create Custom Stamp. In Acrobat 7 Professional and Acrobat 8 Professional, choose Tools > Comment & Markup > Stamps > Create Custom Stamp.
When the Select Image for Custom Stamp dialog appears, click the Browse button and locate the PDF you exported from InDesign. Click OK and the Create Custom Stamp dialog appears (Figure 3).

Figure 3. The Create Custom Stamp dialog in Acrobat 8 Professional is where you name and categorize your new stamp.
7. In the Create Custom Stamp dialog, proof the image on the left. If it isn’t correct, click Select Image for Custom Stamp to return to the previous dialog box. Select the appropriate category from the dropdown list on the right or type in a new category name as I did. Finally, in the Name field, enter a title for your stamp.
8. After you click OK, the process of creating the custom stamp is finished.
Apply the Stamp Anywhere
Applying the stamp is very easy. Open the PDF file that needs the stamp. On the Commenting toolbar (Acrobat 6) or Comment & Markup toolbar (Acrobat 7 and 8), click the dropdown arrow beside the Stamp tool (Figure 4). Navigate to the correct folder, then the correct stamp. The stamp will immediately load up onto the cursor; click to drop it. To apply the same stamp again, just click the Stamp tool button (not the menu beside it), which will automatically reuse the last selected stamp.

Figure 4. Selecting the custom stamp in Acrobat 8 Professional. Click on image for larger version.
Once the stamp is on the page it can be moved, resized, even rotated for the perfect fit. To delete a stamp applied to the page, right-click (Control-click on a single-button Mac mouse) on the stamp with the Stamp, Hand, or Select tool and choose Delete from the context-sensitive popup menu.
More Fun with Stamps
After the first “Rough Proof” stamp, I was inspired to make more. I made two more versions of the first — one that mentioned only FPO text, another that mentioned only FPO images. Then I made stamps for other types and stages of PDF proofs I typically send to clients — copy proof, final proof, and so on. In fact, in the final proof stamps, I added instructions and line blanks for signatures, prompting my clients to sign off on a design directly on the proof page before faxing it back to me. (Note: I prefer that Acrobat-savvy clients digitally sign and e-mail back approved proofs; it’s the more efficient method for everyone.)
Did I have to use stamps in Acrobat? Couldn’t I have added such information in InDesign? Sure, I could have put the stamp artwork in an InDesign library or snippet — either would have made for extremely convenient reuse in just about any document — but Illustrator, Photoshop, QuarkXPress, Word, Excel, and InCopy can’t add objects from an InDesign library or snippet to a design. My layout, copy, and image proofs come out of various applications, but they nearly always go to the client as PDFs. Keeping the stamps in Acrobat is the easiest way to manage and apply them to proofs no matter where the artwork originates.
It’s important to recognize that Acrobat’s stamps are not required to be vector — they don’t even have to be PDFs! A stamp could be plain text, vector objects, raster images, or a combination of all three. When you choose the Create Custom Stamp command you can browse for, and Acrobat can create stamps directly from, several file formats: PDF, JPEG, BMP, Illustrator AI files, Photoshop PSD documents, and AutoCAD DWT and DWG files.
What else can you do with a stamp? Anything you can imagine, anything you’d want to add to a PDF now and then. Your (or your client’s) logo is an excellent candidate. “Property Of,” “Copyright,” “From the Desk of,” and “Contact” advisories are great candidates. I have a stamp of my scanned signature; it saves time with all those W9 forms we freelance writers have to fill out. An editor friend created standard proofreading marks as stamps, using them frequently in her copy of Acrobat. A realtor client of mine keeps her business card (and headshot) as a stamp in Acrobat. When she e-mails house and condominium listings to potential clients she stamps every page with her business card, ensuring that she and not another realtor in her office earns the buyer’s account. The possibilities for re-usable, resizable stamps in Acrobat are limited only by the extent of your needs.
Pariah S. Burke is a design and publishing workflow expert bringing creative efficiency into studios, agencies, and publications around the world as principal of Workflow:Creative. He is the author of Mastering InDesign CS3 for Print Design and Production (Sybex, 2007) and Illustrator CS2 @Work (Sams, 2005); the former trainer and technical lead for InDesign, InCopy, Illustrator, Photoshop, and Acrobat to Adobe’s own technical support team; a freelance graphic designer with 20 years experience; and the publisher of the Web sites Quark VS InDesign.com and Designorati. When not traveling, Pariah lives in Portland, Oregon, where he writes (a lot) and creates (many) projects and publications that empower creative professionals.
This article was last modified on December 13, 2022
This article was first published on October 17, 2007
Commenting is easier and faster when you're logged in!

Recommended for you

Stop Hyphenated (Compound) Words from Hyphenating
Cathy wrote: Is there an easy way to change preferences so that it will no...

Prepress Training Solution Announces Availability of Four New Adobe CS2 Courses
Prepress Training Solution announces the availability of four new online trainin...

InQuestion: Removing Unwanted Text Anchors
Jamie McKee identifies a strange hidden character, tells where it came from, and...