

In these modern times of environmental responsibility, plenty of companies are choosing to ‘go green.’ And while we all have different opinions on the best way to reduce, reuse, recycle – printing is one of those areas where businesses often choose to save costs and reduce their environmental footprint.
While there’s nothing I like more than a beautiful coated PANTONE ink on some quality textured heavy stock, I can totally understand businesses that want to send letters, invoices, and quotes via email, rather than expending energy and cash on paper, printing and postage.
Good luck to them, I say, until they ask me to convert the amazing letterhead I’ve just designed for them in InDesign into a Word template that can be used by their administrative staff and sent via email, rather than snail mail.
Still, I’m sure you want to save our planet as much as I do, so let’s discuss how we can make this happen. And while we’re discussing letterheads in this example, the same techniques can be applied for any custom Word template (like envelopes, reports, invoices etc)
Setting Expectations
Of course, your client has been thrilled with the work you’ve done on the original letterhead and you don’t want them to be disappointed with anything that you submit, so it’s important to have an upfront discussion about what you can and can’t control when it comes to converting your artwork into Word. Here are some important topics to cover.
Bleed
If your client wants a design that goes right to the edge of the paper – no problem! Until they want to print it out. Make sure they understand that anything that’s viewed onscreen in Word’s Page Layout View (or in Acrobat if the Word doc gets exported to PDF) will have artwork that goes to the very edge of the page. However, if they want to print it out (or have their customers print out the email copy they receive) there will always be a white non-printable area around all four sides of the document. This area is where the standard office printer grips onto the paper as it’s moving through the printer and therefore the space cannot be printed on. The only option would be to trim it off after printing, and most people aren’t prepared to take on that extra workload.
Fonts
With all the fabulous fonts now at your disposal, you’ll have chosen something amazing that suits your client’s image perfectly. And they may have even installed that font on their own computers. But their customers most likely will not have it. Any text in your design will be rasterized as part of the process which won’t give results as good as a commercially printed letterhead.
Color Fidelity
There’s no such thing as PANTONE or other spot color inks in Word. Your client will have to be satisfied to use the CMYK equivalent of their logo colors. And how close the output is to their intended color depends on a range of factors, including the thickness of the paper, the quality of the printer and whether it’s running out of ink.
So, if your client is still keen to proceed after understanding the limitations of bleed, font and color, let’s make it happen!
Recreating the Letterhead Template in Word
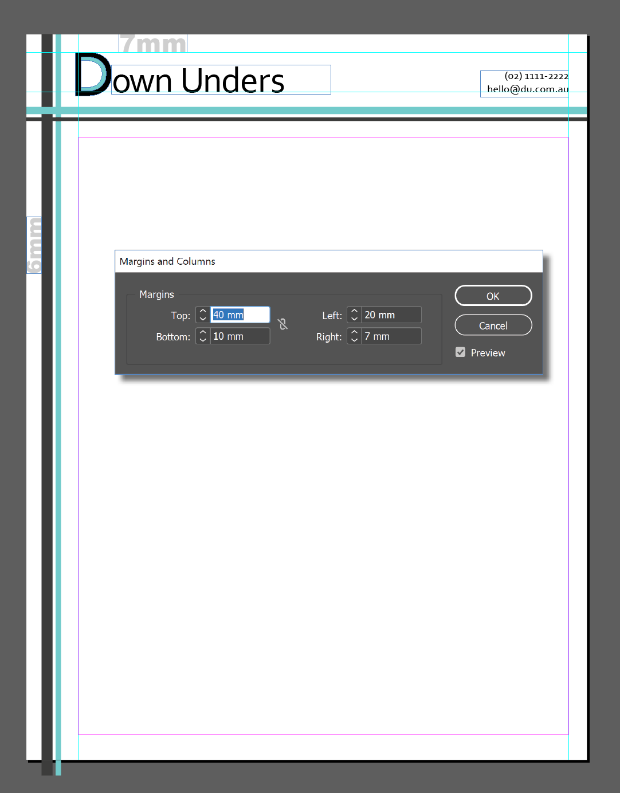
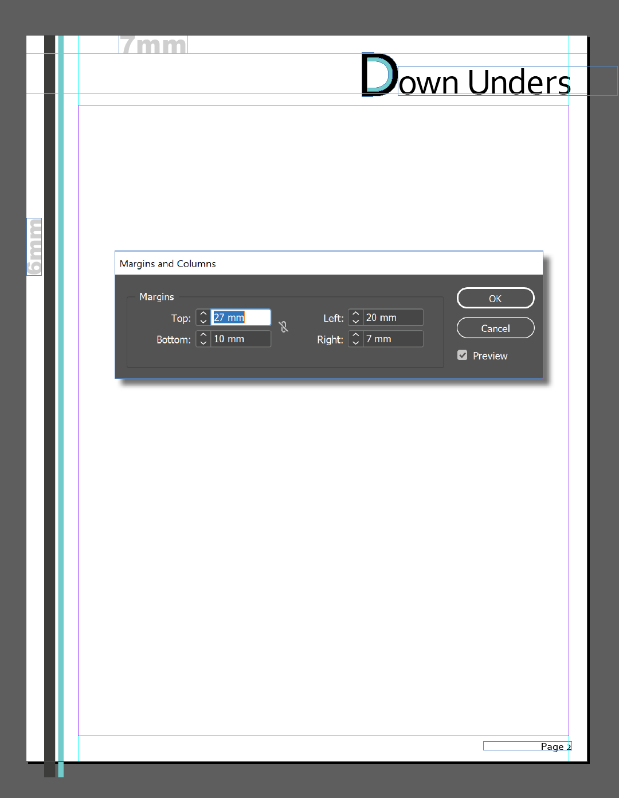
For this example, I’m using Creative Cloud 2019 (14.0.1) and Word 2016 for Windows (18.11) so my screenshots might look a little different to yours, but the concepts remain the same. I’ve created a letterhead in InDesign which has a different first page to the consecutive pages. Measurements are included in my images below.
Export Artwork
Unless it’s an incredibly simple design, don’t even think about re-creating it in Word. It’s much simpler to export elements of your design from InDesign into PNG (Portable Network Graphics) files which can be imported into Word in the appropriate positions.
If your design has elements on more than one side, (art across the top and down the left, as in my sample letterhead above), you’ll need to export each side separately.
For each side that you’ll be exporting:
- Select all the objects that make up that side
- Choose File > Export, give your file a name and from the Save As Type dropdown, select the PNG format.
- Click Save
- Use the PNG Options dialog box to specify that you want to export the selection and choose the resolution and other settings (see my recommendations below).

Because of the way I’ve created my letterhead, I’ve ended up with three files – one for the first page header, one for the header on consecutive pages and one for the stripes that go down the left side on all pages. (TopFirst.png, TopAll.png, Side.png). I don’t export the page number text (which appears at the bottom-right of the second and subsequent pages) because I want to build that in Word so page numbers can be calculated automatically in there for documents as they’re created.
Setup the Template in Microsoft Word
Now that you have the various elements exported, we can build the template within Microsoft Word by setting up our layouts and placing our elements into the header and/or footer areas. These areas are similar to Master Pages in InDesign in that elements in these areas will repeat on all pages, sitting on a layer underneath the copy text on each page.
Start a new letter-sized document by clicking File > New > Blank document. If you want to see the page as a whole, the zoom control is at the bottom right.
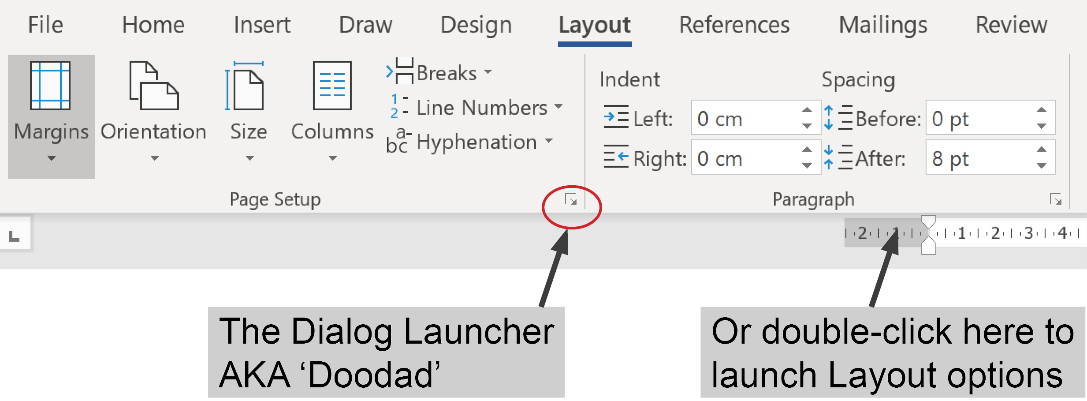
Click the Layout tab to display the Layout ribbon. While there are separate buttons for each function, the quickest way to make changes to Margins, Orientation and to let Word know if you want to use a different header on the first page is to click the little doodad at the bottom right of the Page Setup section on this Layout ribbon. Its official name is the ‘Dialog Launcher’ but I think it’s much easier to call it a doodad.
Quick tip: you can also double-click the grey area at the beginning of the horizontal ruler to access the layout options. If you’re rulers aren’t showing, click the View tab to display the View ribbon and check Ruler.
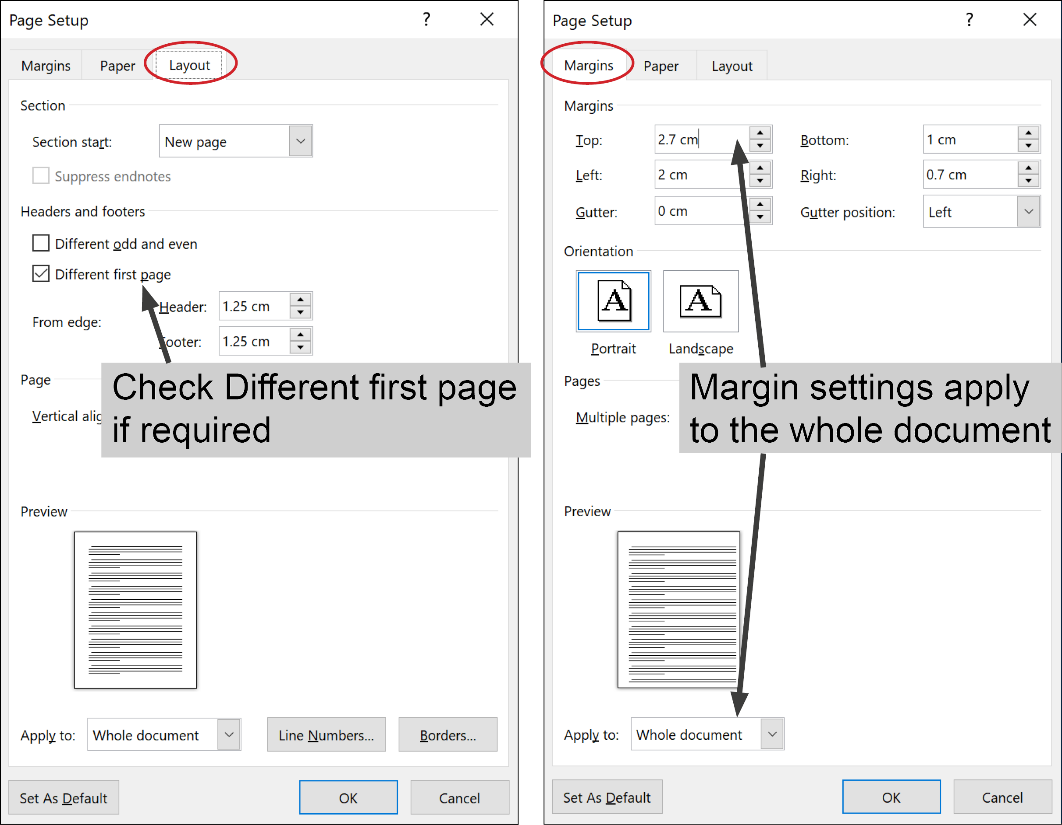
On the Layout tab, check Different odd and even if you want facing pages and/or Different first page if your first page design is different to consecutive pages (like mine). On the Margins tab, enter your margin settings and change your orientation if required. Note: despite checking Different first page on the Layout tab, the margin settings displayed on the Margins tab are for the Whole Document. If you’re looking to set a larger top margin on the first page (like I am), enter the smaller settings here (ie the settings you want for all consecutive pages) and we’ll need to adjust the first page later. Click OK when you’re done.
When you’re happy with your initial setup, save the file as a Word Template (.dotx extension). When saving as a template, Word will recommend you store the file in the default Template location – this is up to you, but if you store it here, you can test it regularly because it will appear as an option when you select File>New>Personal. I recommend saving regularly as you’re working (way more than you think is necessary) because things can get a little fiddly and you don’t want to lose anything after you’ve tweaked it into perfection.
Import Artwork into the Header
To access the header area in Word, click the Insert tab to display the Insert ribbon and then click Header > Edit Header (or Footer > Edit Footer).
Quick tip: you can also just double-click in the blank area at the top or bottom of the document to display the header or footer panes. Double-click outside the header area to return to the page working area.
Now we’re in the Header pane, a few things will look different …
- A dashed line will appear with a tag that says Header to indicate you are now in the header area. (If you’ve selected a different first page header, this pane will be labelled First Page Header)
- Your cursor will be positioned inside the header pane
- The Header & Footer Tools Design ribbon will be made available
- The vertical ruler changes to indicate you’re in the header pane (if you’ve got rulers displayed)
- If you’ve already got some text on the page, it will appear ghosted
… and we’re ready to import the PNG file that we want to appear at the top of our first page.
On the Insert ribbon, click Pictures and navigate to the image you need (TopFirst.png for me). Select it and click Insert. This will embed the art into the Word file like an inline object without creating a link back to the original in the way that File > Place does.
It’s likely the image needs to be scaled and repositioned. While it’s still selected, the Picture Tools Format ribbon will be available. This ribbon is where Word puts all the good stuff like cropping, adding borders and effects but since you worked all that out before exporting, you shouldn’t need to do any of that here. What you will need to do is click the Dialog Launcher doodad next to Size to edit the scaling and position of your placed picture.

In this dialog, use the Size tab to return the Scale setting to 100%, click the Text Wrapping tab and choose Behind Text which will sit the image behind the text, allowing you to add any extra text (like a page number or file name) in front of the image and will also allow you to specify an XY position from the Position tab. Most likely, you’ll set your Horizontal alignment to Left, relative to the page and Vertical alignment at an Absolute setting to match the distance your design sits below the top of the page. Unfortunately, there’s no preview checkbox so you’ll need to click OK to see your changes take effect. You can revisit this dialog a number of times to tweak the position measurements but if you’ve taken down the measurements from your InDesign layout, this process should be reasonably simple.

Import Artwork into the Footer
If there’s a footer image you want to include, you’ll need to activate the footer pane. If your header is still open, the Header & Footer Tools ribbon will include a Go to Footer button or you can just scroll down to the bottom of the page and click inside the footer pane. Once again, if you’ve selected Different first page, this footer pane will be labelled First Page Footer. However you get to the footer pane, once you’re there, repeat the whole process above of inserting, repositioning and resizing your image until you’re happy with the result.
If you’ve got elements that are meant to appear on the sides of your document, they can be included here in the footer pane. There’s no problem including a couple of elements in this pane (for left and right), just insert one element and then insert another and lay them out to match your original design as best as you can.
In my example, I’ve put the header items in the First Page Header pane and the left side stripes in the First Page Footer pane. The Horizontal position of my stripes element is set to 6mm to the right of Page and Vertical alignment is set to Top relative to Page to match my original layout.

Checking your document
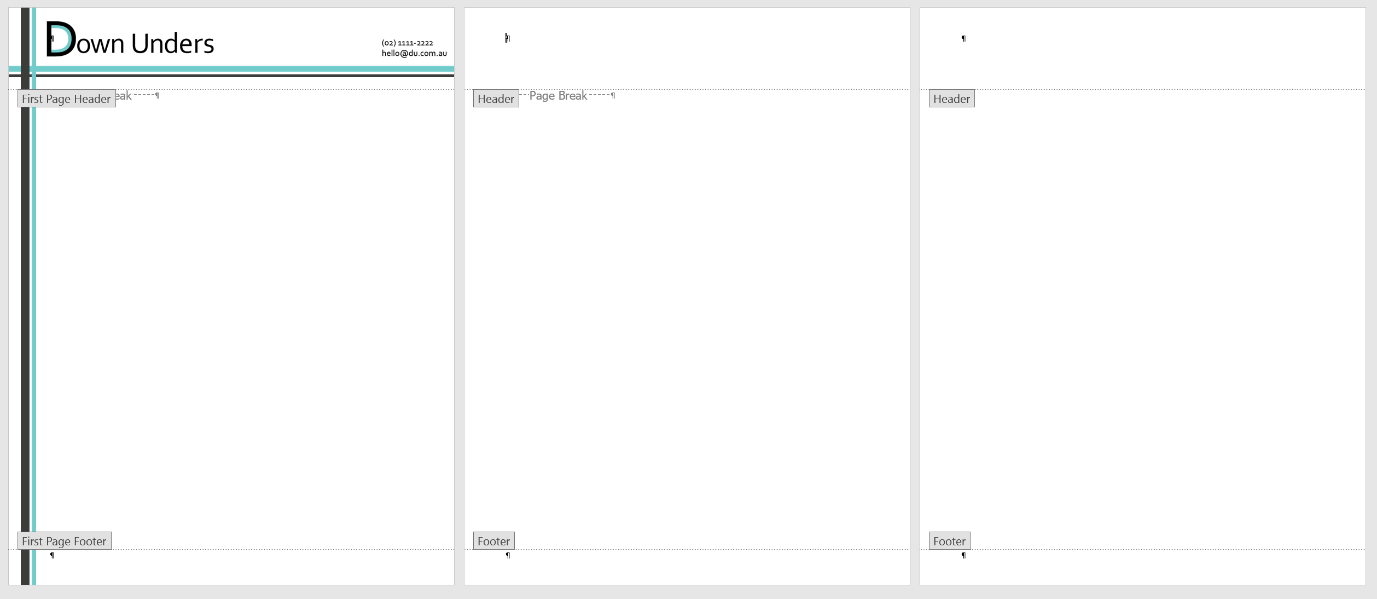
Close the header and footer panes and take a look at your document so far. There’s a Close Header and Footer button on the ribbon but you can just double-click on the page outside the header or footer pane to return to the main body of the document. The elements that you’ve just added will ghost out to indicate that those panes are no longer active and therefore can’t be easily selected and moved. Don’t worry, they’ll print out at 100%, they’re only ghosted on screen. To see pages 2, 3 and later, you can add a bunch of carriage returns to create a second and third page or just hit Ctrl+Enter a couple of times to force some page breaks. Use the zoom control at the bottom right of your screen to view the document as a whole. You’ll find it easiest from now on if you keep your document zoomed out to about 50% to allow yourself to see pages 1, 2 and 3 the whole time. I also recommend you show your hidden characters at this point to make sense of what you’re seeing. Do this by clicking the Show/Hide button on the Home Ribbon.
![]()
You might be surprised to find that the headers and footers you’ve set up aren’t appearing on all pages you’re displaying. Where they are displayed will depend on whether you’ve checked Different First Page or Different Odd & Even pages. I selected Different First Page, so the header and footer I setup was only for the first page. That means my second and third pages still appear blank.
If this is also how your document is looking, you’ll now need to repeat the whole insert/reposition/resize process repeatedly to add the visual elements into the other header and footer panes that you’ve created.
If you’ve selected Different First Page, you’ll just need to put something in the panes labelled ‘Header’ and ‘Footer’ on the second page. But if you’ve selected Different Odd and Even pages, the empty panes on Page 2 will be labelled Even Header and Even Footer, and on Page 3 will be labelled Odd Header and Odd Footer (and they’ll all be available for you to add graphic elements into if you wish).
If your header and footer panes haven’t worked out the way you wanted, you can use the Header & Footer Tools ribbon to access the Different First Page and Different Odd and Even checkboxes to clarify the settings you want.
Don’t forget, you should be saving regularly so as not to lose any tricky tweaks you’ve made along the way.

Final Tweaks
After you’ve completed all header and footer panes on pages 1, 2 and 3 as required, you’ll need to consider if you want to change the margin settings. We setup the margins for the whole document during the initial document setup in Word, but I want my first page to have a larger margin area at the top – I want to set mine to 40mm for the first page only.
Unfortunately, there’s no setting in Word that makes this possible. All you can do is add some whitespace into your first header to create some ‘breathing space’ between your artwork and the body text. Here’s a little tricky way I developed to make this happen easily and all it requires is a teensy bit of math.
Make sure you’re in the First Page header pane and take a look on the Page Setup dialog on the Layout tab to locate how far the header is set to start from the edge of the paper (remember, you can access this dialog quickly by double-clicking the grey part at the beginning of the horizontal ruler).
The default here is 1.25cm but you can change the header setting here a little bit without having too much impact if it makes the following math easier for you. I’ll leave mine set to 1.25mm. Remember from my initial InDesign image that I want my top margin to be set to 40mm. All I need to do here is subtract the difference between these two to work out how much extra whitespace I need to add in (40cm-1.25cm=2.75cm). So, I need to get 2.75cm of extra white space inside the First Page Header pane. And the easiest way to do that is by inserting that much space before the empty paragraph that’s sitting inside the First Page Header pane.
Now that we’ve worked this out, cancel out of the Page Setup dialog and click the Home tab and then click the Dialog Launcher doodad for the Paragraph section. Change the setting of your Spacing Before to match the amount of white space that you want to add. For me that’s 2.75cm. (Just like in InDesign, you can type the measurement plus the unit of measurement you’re using and Word will convert to the default unit of measurement, so I’ll type 2.75cm and it will convert to points). Click OK and your paragraph mark (only visible if you’ve got your hidden characters showing) will have moved down to allow this space and the First Page Header pane will have grown accordingly to allow the white space to fit.

Now, if you want page numbers added for page 2 onwards, we’ve still got some work to do. Make sure you are in the Footer Pane on page 2. Press Ctrl/Cmd+R if you want your page number right-aligned. Type any text required like “Page ” and then, from the Header & Footer Tools Ribbon, click Page Number > Current Position > Plain Number. This should insert a 2 since you are currently on page two. You can format this text to the font and/or size you like using the controls on the Home ribbon.

Testing it
When everything’s looking good on screen, it’s time to test it out. If you’ve saved the file in your default templates folder, you can select File > New > Personal and select the template from there. Create a new document based on your template and add some placeholder text (this isn’t possible automatically in Word, just type “The quick brown fox ..” or something similar and copy/paste repeatedly until you’ve got a couple of full pages). Your printout will show if the elements are placed correctly on the printed page, and if the quality is up to scratch. On mine, I discovered that the email address on the first page had been cut short by that non-printing white area around the page edge, so I had to move it back to the left a little.

If you find that Word takes too long to print, don’t be afraid to edit your original elements or change the resolution of your PNG files to improve the final output. Consider sending a copy to your client so they can print it out and check it as well. It’s best to spend the time to get this stuff right.
Finishing Up
You might want to edit the built-in paragraph styles for date, salutation, body text and signature to save your users time when they’re using your template. Make sure you select a font that you know your clients have!
When you’re done, remove any page breaks so that the document is only one page long. (The settings for page 2 and beyond will be saved in the template file even though you can’t see them. When the template is being used, it will start as a single page and when a second page is required, the header/footer and margins will automatically be applied.)
Save the file one final time as a Word template (.dotx). Take a look at the file size and ensure that it’s not too mammoth. If this file’s going to get rejected by the recipients’ mail servers your client’s not going to be too happy. Once you’ve completed the entire process, send the file to the client and have them copy it into the default templates folder for each user. To access it, they choose File>New>Personal and it will appear as a custom template.
Phew! Well I warned you that it was quite a process but you’ve done your part towards saving the planet and can give yourself a pat on the back for a job well done.
The original version of this article was written by Anne-Marie Concepción and published on Apr 2, 2008
This article was last modified on March 26, 2019
This article was first published on March 26, 2019
Commenting is easier and faster when you're logged in!

Recommended for you

All About Indents and Other Paragraph Separators
Learn how to choose the right method of paragraph separations to add both readab...

CreativePro Video: InDesign Tips for Beginners
In this week’s CreativePro video, David Blatner shares some of his favorite prod...

InDesign Magazine Issue 66: Workarounds
We’re happy to announce that InDesign Magazine Issue 66 (October, 2014) is...