

In the first part of this series, I introduced histograms: handy graphs generated by cameras and image-editing software that you can use to analyze a photo’s exposure. Part 2 of this series will concentrate on using histograms as a tool for shooting better photographs.
Knowing what’s wrong with your current exposure doesn’t do you much good if you don’t know how to fix your exposure. I’ll show you how to adjust exposure on almost any camera (and even some cell phones). But first, let’s make sure we have the same idea of what exposure is and how it affects your photography.
What Is Exposure?
To understand exposure, sneak out of work right now and see a matinee at a movie theater. (If you get caught, tell your boss that it’s professional development—part of your photography education.)
When the movie is over, leave the theater out of the back door. As you step from the dark movie theater into the bright afternoon light, you’ll be momentarily blinded as your eyes adjust to the change in brightness.
That’s exposure.
Your eyes can adjust how much light they gather. If they gather too much, the world washes out to bright white. If they can’t gather enough, you stumble around in the dark. To control how much light is gathered, the size of your pupil changes, opening wider to allow more light and closing down to reduce the amount of light.
Your camera works the same way. If there’s too much light striking the sensor, the image has parts that are blown out to complete white. Too little light, and some parts will be complete black. In addition to losing detail in highlights and shadows when an image is over- or underexposed, the overall brightness of the photo can affect how colors look and the overall atmosphere of a scene.
Exposure and Your Camera
Your camera has three mechanisms for controlling the brightness of an image:
1. An iris that can open or close to let in more or less light.
2. A shutter in front of the image sensor that opens and closes to start and stop the exposure process. The longer the shutter is open, more light will reach the sensor, and the brighter your image will be.
3. The ISO setting. A higher ISO setting makes the sensor more sensitive, so it doesn’t have to be exposed to as much light to capture an image.
Your camera has many different ways to affect these three mechanisms and control exposure, but the easiest is Exposure Compensation.
The Exposure Compensation Control
Somewhere on your camera is a control that’s probably labeled with a small +/- icon. That is Exposure Compensation. With it, you can dial in a specific amount of over- or under-exposure.
Figure 1. The Exposure Compensation controls on a Canon Rebel T2i (left) and a Nikon D50 (right).

Every time you double the amount of light that strikes the sensor, you increase the exposure by one stop. If you halve the amount of light that strikes the sensor, you decrease exposure by one stop. With Exposure Compensation, you can increase or decrease exposure in full or fractional stops.
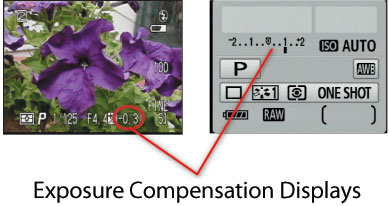
Figure 2 shows two different, but typical, Exposure Compensation displays. The example on the left shows an Exposure Compensation of -1/3 stop, which will cause a darkening of the image. The example on the right shows an Exposure Compensation of +1 stop, which will brighten the image.
Figure 2. An Exposure Compensation of -1/3 stop (left) will darken the image. An Exposure Compensation of +1 stop (right) will brighten the image.
The location of Exposure Compensation controls vary from camera to camera, but they’re almost always a prominent control you can get to quickly and easily.
So, going back to the examples from part 1 of this series, if you shoot a photograph, look at the camera’s histogram, and see that there’s a white spike on the right side of the histogram, dial in some negative Exposure Compensation and shoot again.
Conversely, if shadows are underexposing, the histogram will show spikes on the left side. To be sure that your shot captures details in those areas, dial in some overexposure with positive Exposure Compensation.
Or perhaps you’ve noticed that the scene lacks contrast. In these situations, a little overexposure—sometimes as little as a third of a stop—will usually boost contrast.
If you’re not sure how much Exposure Compensation to use, let the histogram be your guide. Shoot test photos with varying degrees of Exposure Compensation, then consult the histograms of each. Look for overexposure, underexposure, and low-contrast, as you learned in part one.
What Exposure Compensation Does
Using Exposure Compensation, you can make a shot brighter or darker without worrying about shutter speed or aperture settings. Because Exposure Compensation controls are fairly smart, they typically won’t adjust shutter speed to the point where you’ll get handheld shake due to a long exposure. In fact, they’ll very often achieve the compensation by making slight changes to shutter speed, aperture, and ISO.
However, if you want to ensure that Exposure Compensation only alters a specific parameter, simply set your camera to a priority mode. In Aperture priority mode, Exposure Compensation will alter shutter speed only. In Shutter priority mode, only aperture will be adjusted. (Note: Some cameras do adjust ISO in these modes, but this is often something you can disable.)
Also, you might choose specific exposure settings to achieve different creative effects. For example, as the camera’s iris closes down, the depth of field in an image increases. As shutter speed slows down, moving objects in an image will get blurry. Just experiment to get the effect you want. An alteration of a fraction of a stop rarely changes depth of field or motion blur noticeably.
The Controlling Type
Exposure Compensation is the only exposure control you’ll need for 90% of your shots, since most of the time you just want to control the brightness of an image. If you’re going after depth of field control—maybe you want deep depth of field for landscape shooting, for example—then use Aperture priority to specify the aperture you want. You can still use Exposure Compensation to control overall brightness without affecting your depth of field.
The histogram and Exposure Compensation controls on your camera are essential photography tools that can quickly help you get better exposures.
This article was last modified on December 14, 2022
This article was first published on May 16, 2011
Commenting is easier and faster when you're logged in!

Recommended for you

The Colorful Art Of Camera Tossing
This article is courtesy ColourLovers.com. Who exactly threw the first camera is...

DesignMentor Training Teaches Creatives to Shoot, Color Correct and Edit with Camera RAW through Digital Photography Portfolio-B
DesignMentor Training offers Creative Professionals the means to add advanced di...
100 Most Important Cameras in History
If you didn’t get exactly what you wanted for the holidays, here’s a treat you c...