How Photoshop Uses Bungee Cords to Define Color
The following excerpt is adapted from Speaking Photoshop CC by David Bate.
Reprinted, with permission of the publisher, from Speaking Photoshop CC © 2014 David Bate. All rights reserved.
For further information, visit speakingphotoshop.com.
***
Have you ever tried to unlock the meaning of those obscure RGB formulas that Photoshop uses to define color? For example, why do you get purple when R=50, G=10 and B=243? And how do you get orange from an RGB formula of 226/178/12? It’s not really as difficult as it seems when you realize that Photoshop uses bungee cords to make it all happen. To understand this concept, let’s first set the scene.
The Magic of Color Happens on the Color Wheel
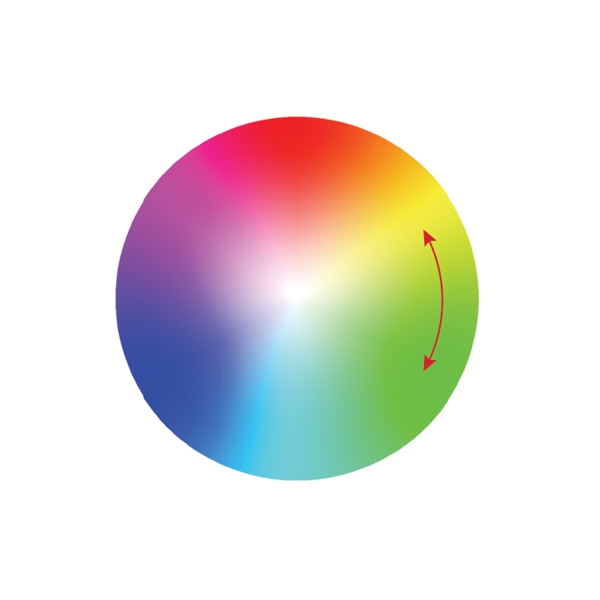
Color definition takes place on the venerable color wheel pictured below. If you take the time to truly understand its inner workings, then all color management issues in Photoshop will make perfect sense to you. Color professionals have the color wheel memorized, and you should too. To reconstruct the color wheel in your mind, do the following:
1. Place the primary colors of the Additive Color system (RGB) equally around the wheel. I like to think of it as a clock. Put red at 12 o’clock, green at 4 o’clock and blue at 8 o’clock.
2. Next distribute the primary colors of the Subtractive Color system (CMY). Since Subtractive is the exact opposite of Additive, it follows that we should place our first color, cyan, opposite red. Place cyan at 6 o’clock, magenta at 10 o’clock and yellow at 2 o’clock. These primary colors blend to create millions of other colors. The basic color wheel is now complete.
3. Add the Brightness Cylinder. Think of the color wheel that we just created as a cross section of the Brightness Cylinder. As the color wheel moves up the Brightness Cylinder, the colors become brighter until they all appear white. As it moves down the cylinder, colors become darker until they all appear black.
Key Aspects of the Color Wheel
There are three major ways to specify color on the Color Wheel.
• As you spin around the color wheel, you change the core color or hue. Hue is measured in degrees, from 0° to 360°.
• As you move from the center of the wheel to the outer edge, you increase saturation. Colors in the center are totally unsaturated. They can be white, black or a tint of gray, but they never have a color cast. Saturation is measured in percentages from 0% (no saturation) to 100% (totally saturated).
• As you move up and down the Brightness Cylinder, you change brightness. Brightness is also measured in percentages from 0% (no light, black) to 100% (maximum light, white).
The interaction of these three components is known as the Hue/Saturation/Brightness model (HSB). You can specify HSB values in the Color Picker or Color Panel if you want.
How Bungee Cords Define Color
All colors are “born” in the center of the Color Wheel. Immediately upon birth they are attached by three bungee cords to R, G and B, and a grand tug of war ensues. The ultimate color is determined by the intensity with which R, G and B pull.
For example, if R pulls at full strength (255) and G and B don’t pull at all (0), then the color will be pulled to pure red. Its RGB formula is R=255 / G=0 / B=0.
If R and G pull at full strength (255), and B doesn’t pull at all (0), then the color drifts to pure yellow. The formula for yellow is R=255 / G=255 / B=0. If R, G and B all pull with equal strength, then the color doesn’t move off dead center. A color is always neutral if R=G=B. It could by white (R, G and B equal 255), it could be black (R, G, and B equal 0), or it could be some gray in between, depending on where the color wheel sits inside the Brightness Cylinder.
Colors can be placed anywhere on the color wheel by changing the intensity of R, G and B.
The Color Wheel is Everywhere in Photoshop
Photoshop uses this color wheel with its bungee cord tugs of war throughout all color management tasks. You’ll find evidence of the color wheel in the Color Picker, in the Color panel, in the Hue/Saturation and Color Correction Adjustment layers, and more. If you have memorized this color wheel, and if you understand the tug of war concept, all color tasks in Photoshop will make perfect sense to you.
The Color Picker lets you specify the Color Wheel’s Hue/Saturation/Brightness model, or have a tug of war using the primary colors of RGB or CMY(K). The rainbow Color Ramp lets you spin around the Color Wheel to specify Hue. The large Color Swatch lets you control Saturation as you move from left to right, or Brightness as you move from top to bottom.
The Color Panel lets you play tug of war by specifying the relative strengths of R, G and B on a scale of 0–255.
The Color Balance Panel lets you shift color by sliding back and forth in the Color Wheel on the Cyan/Red, Magenta/Green or Yellow/Blue axes.
So understanding color in Photoshop and those obscure RGB formulas is really not so complicated, as long as you understand the Color Wheel and are aware that the Adobe software engineers incorporated bungee cords into its software code to drag color pixels to and fro.


