

In the process of testing Illustrator features released last June in the Creative Cloud, I really fell in love with Illustrator raster brushes. Rasters brushes in Illustrator? Yep. With raster brushes in Illustrator your objects can follow painterly gestures, join together to form complicated patterns, or even become moving puppets.

Illustrator CC can now turn raster images into Scatter, Art, and Pattern brushes. Once you define a raster object as a brush, you can draw and paint with it using your Paintbrush tool and your raster object will follow along. You can apply a brush to an existing object, or if you’re using a Wacom tablet, the brush can respond to the pressure or angle of your pen. And if you want to make a change or correction, no problem; at its heart every mark made with a raster brush still a vector path. If there is a kink in your brushed path, simply apply the Smooth tool, or adjust the direction handle of the anchor point, or even repaint the path altogether.

Although you can also create brushes from vector objects rasterized within Illustrator (e.g. to make brushes from otherwise “illegal objects” like mesh objects), here we’re going to focus on optimally preparing raster images to bring into Illustrator to use as brushes.
Choosing an Image Size
Raster brushes can slow down your redraw performance in Illustrator if they’re too big. So the first thing to be aware of is that you’ll have to limit the pixel resolution of raster images that you intend to make into brushes. Adobe sets a maximum limit for the size of Pattern and Art brushes to 1 Megapixel (roughly 1000×1000 pixels), but in most instances you’ll have a less frustrating time if you create brushes from images even smaller than that. Scatter brushes can actually be much larger, but you’ll likely find that you’ll want to keep sizes down for of all raster images intended for use as brushes. If you try to make a brush from an image that is extremely large, Illustrator will display an error message warning you that the image is too big. If your image is just a little bit too large, Illustrator will offer to downsample it for you. You can also manually downsample images in Illustrator (by choosing a lower resolution when applying Object > Rasterize to your raster), but generally it’s best to handle the preparation of raster images in Photoshop.
However, before you even address the resolution issues, there are even more important things for you to do in Photoshop if you intend to use your raster image as an Illustrator brush.
Cropping Issues
Artist and Illustrator Gary Ferster was the first of our Adobe Illustrator WOW! artists to identify the potential pitfall of trying to mask rasters in Illustrator for use as a brush. Being an Illustrator expert he assumed that he could just use Illustrator’s clipping masks to define which portion of his raster image to make into a brush—but this doesn’t work as expected. It turns out that images placed or rasterized in Illustrator will remain the size of the entire originally-placed bounding box, even if you applied an Illustrator clipping mask to “crop” the visible portion of the image. Although the brush will only show the clipped area, the bounding box remains the original size. This will prevent you from being able to properly control any brush, and in the case of pattern brushes, it will prevent your pattern from seaming together as closely as possible.

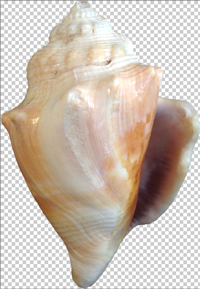
Original shell photo by Lisa Jackmore (note the space around the shell)
To have maximum control of your raster brushes, you must make certain to mask, crop, and then resample the image to its minimal desired size in Photoshop, before you place it in Illustrator.

Tighter spacing achieved by cropping the shell image before using it as a brush
In Photoshop, select the area that you want to be part of the brush. Click the Layer mask icon, which creates a mask for your image based on the selection. At this point you can make your image into a (masked) Smart Object, since the actual size of the Smart Object within won’t be seen by Illustrator. Then with desired area of your image still selected (Command-click/CTRL-click the layer mask, or the masked smart object to reselect it if it’s dropped), choose Image > Crop, and save this as version separate from your original.

Original image

The image masked, converted to a Smart Object, and cropped.
The final image, cropped and masked
Using Save for Web
With your image properly cropped and/or masked, you can now resize a version (if necessary) using Image > Image Size, and save it as a PSD (which automatically applies your mask). Alternatively, to resample your pixel resolution and save that version as a PNG (keeping your original file intact), use Save for Web. To do this choose Edit > Save for Web (Command-Shift-Option-S/CTRL-Shift-Alt-S), choose PNG-24 from the Preset at the top, and enable Transparency.
Then to reduce the Image Size, choose sizes less than 1000 px for the larger dimension and make sure that the Link icon indicates you’re maintaining the original proportion of the image (click to enable it if it’s not). Click Save when you’re ready to name and save the image.

Embedding Raster Objects
To make brushes from raster objects in Illustrator they must be embedded objects (not linked). Your options are to either open the raster directly in Illustrator (which embeds it), or place it as an embedded object (disabling the Link option). If you have a linked object in Illustrator, you can select it and click the Embed link in the Control panel (or in the Links panel).
Tip: to make it easier to update the raster image if necessary, make a copy of your linked file and embed the copy.
To now make your properly-prepped embedded object into a raster brush, drag it to the Brushes panel, and in the resulting dialog box, choose the type of brush you want (Art, Pattern, or Scatter). You’ll then be able to customize settings and parameters as desired, and click OK.
To paint or draw with the brush, pick up your pressure-sensitive Wacom tablet and pen, choose your Paintbrush tool and select your new raster brush (from the Control, Brushes, or Appearance panel), and paint!
Examples

Art brush

Pattern brush

Pattern brush
*****
Find more about working with raster brushes in Lisa Jackmore’s Creating a Pattern Brush from a Raster image, in the The Adobe Illustrator WOW! Booklet for June 2013 CC Release (PDF booklet from Peachpit Press), and in Sharon’s “Artistic Painting in Illustrator: Object-Creation Brushes” course on lynda.com (non-members can see a batch of the movies from this course free on lynda.com, and on YouTube).
(You can purchase the Adobe Illustrator WOW! Booklet and/or the Adobe Illustrator CS6 WOW! Book at 35% off retail with free U.S. shipping from Peachpit.com, using the coupon code WOWCC1B at checkout. Read more about Sharon’s courses and books at www.sharonsteuer.com/lynda and www.sharonsteuer.com/books.)
This article was last modified on October 1, 2022
This article was first published on November 20, 2013
Commenting is easier and faster when you're logged in!

Recommended for you

Adobe Introduces the Photoshop Photography Program
In a move that acknowledged the need for a cheaper, focused alternative to its e...
What’s New with Lightroom Classic CC 8.0
The venerable Lightroom application got a bit roughed up last year. For several...
Scanning Around With Gene: Five Years on a Flatbed
When I discovered that today marks my five-year anniversary writing a column her...