


Excerpted from Real World Print Production with Adobe Creative Cloud by Claudia McCue.
Copyright © 2014. Used with permission of Pearson Education, Inc. and Peachpit Press.
* * *
If you’re creating software documentation for print, or you want to show an image of a Web page in your project, you may need to include screen captures of software interface components such as menus or panels in your page layouts. Screen captures are easy to make using a system utility or dedicated screen-capture software, but they require some special handling to print clearly. When they’re part of software documentation or instructional materials, it’s important that the details are as sharply rendered as possible.
You should understand this about screen captures: Whether you take them by using your system’s built-in screen-capture functionality or a third-party screen-capture application, you are merely intercepting information that eventually becomes pixels on your monitor. Regardless of your current monitor resolution, there is a one-to-one relationship between the fixed number of pixels that an application (and your system) uses to render panels and menus and the number of pixels you see on your screen, even if you use a zoom utility. Of course, the size of the overall image you see is a function of your current monitor resolution, but the pixel dimensions of panels, menus, and tools will be identical, regardless of resolution. (Figure 1)
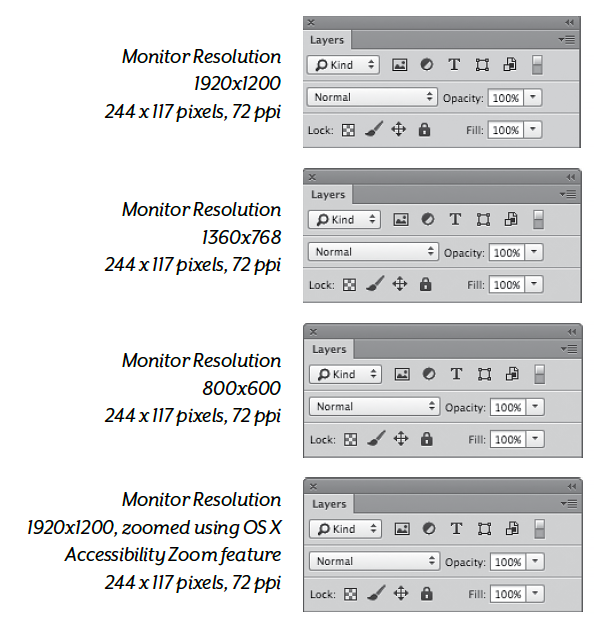
Figure 1: The resolution setting of your monitor has no effect on the number of pixels used by panels and menus. Although this panel was captured at three different monitor resolutions, the three captures are identical, each consisting of exactly the same number of pixels.
An application panel that measures 244 pixels by 117 pixels appears larger when your screen resolution is set to 800 by 600, and it’s almost unreadably small when your monitor is set to 1920 by 1200. However, the panel is made of exactly the same number of pixels in both instances. So it doesn’t matter what resolution your monitor is using, or how large the panels may appear onscreen, or whether you use a utility to zoom in. The captured image of a panel or menu will be the same in terms of pixel dimensions, regardless of the monitor resolution setting, and the resulting image will be 72 ppi.
TIP Do an experiment: In the software of your choice, open a panel and position it in the middle of the screen. Take screen shots at two different resolutions. Make a loose selection of the panel in one image, copy it, and place it into the other image. You’ll see that they’re identical in pixel count. The overall images will be different sizes because of the different monitor resolutions, but the number of pixels used by interface components such as panels, menus, and tools will be identical.
Since it’s been drilled into you that 300 ppi is the Holy Grail of image resolution, it’s tempting to try to improve screen captures by increasing the resolution. Unfortunately, this usually makes them look worse by softening small details during interpolation.
If you plan to use a screen capture at 100 percent enlargement, just leave it at 72 ppi (go ahead and freak out). Yes, the print service provider’s prepress department will raise a flag, but the examples below show why screen captures are not improved by increasing their resolution.
As you can see in Figure 2, the original 72 ppi screen capture seems a bit coarse, but it’s readable. Increasing the resolution to 300 ppi in Photoshop may sound like a good idea, but the interpolation will soften detail in the image.
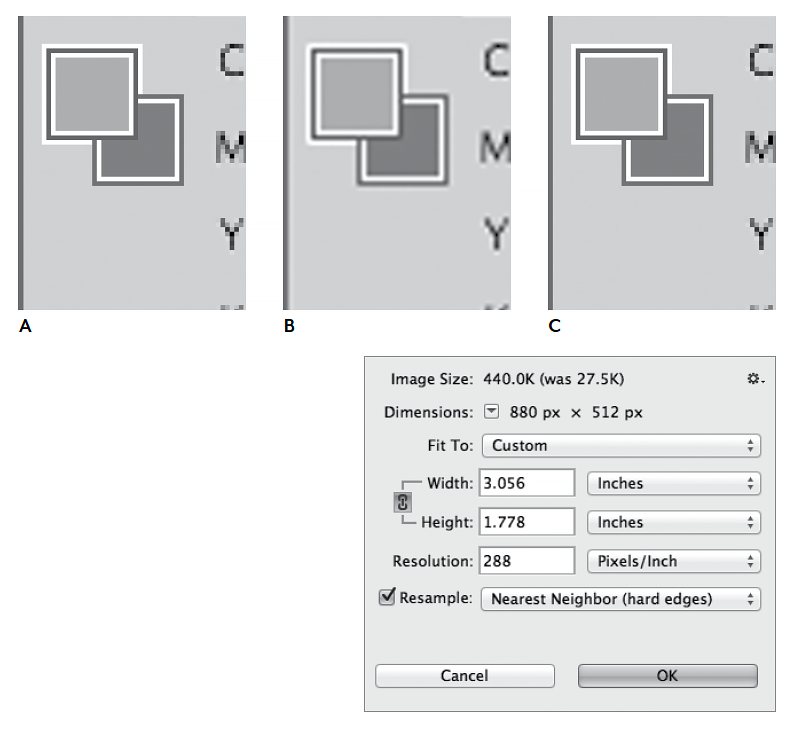
Figure 2: Image A is the original 72 ppi screen shot. Image B is the result of increasing the resolution to 300 ppi, using the default Bicubic method: Note blurry text and softened edges. Image C is the result of increasing the resolution to 288 ppi, using Nearest Neighbor.
If you do feel compelled to increase the resolution of a screen capture, choose Image > Image Size in Photoshop, and then set the resolution to an even multiple of the original resolution; for example, resample a 72 ppi screen shot to 288 ppi. In that same dialog box, set the Resample Image option to Nearest Neighbor. This avoids interpolation by simply repeating pixels rather than attempting to create pixels. It’s not an appropriate approach when scaling images of a photographic nature, but it’s a helpful solution for screen captures, because of their special nature.
Converting Screen Captures to CMYK
Because screen captures are generated as RGB images, they must usually be converted to CMYK for print. When performing that conversion, a special approach is recommended to maintain the best rendering of black type. The default conversion of RGB to CMYK in Photoshop will render black as a four-color mix (Figure 3), with the possibility that slight misregistration on press will turn tiny details to mush.
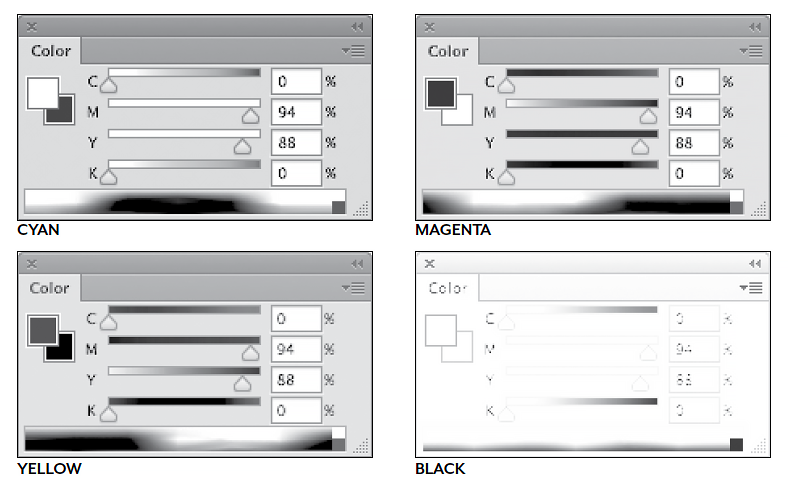
Figure 3: A conventional conversion from RGB to CMYK produces four-color equivalents of the gray and black parts of a screen capture. Press misregistration will turn text and other black or gray elements to an out-of-focus rainbow. Festive, but hard to read.
To simplify printing of screen captures, use a color-separation recipe that ensures that all neutral black or gray areas of the image will print only in black ink during the RGB-to-CMYK conversion. Neutral areas in an RGB image are those areas in which the RGB values are equal; for example, R128–G128–B128 would constitute a midtone gray.
To create this custom screen-capture conversion recipe in Photoshop, choose Edit > Color Settings to access the color-separation controls. Under Working Spaces, choose Custom for the CMYK setting (Figure 4).
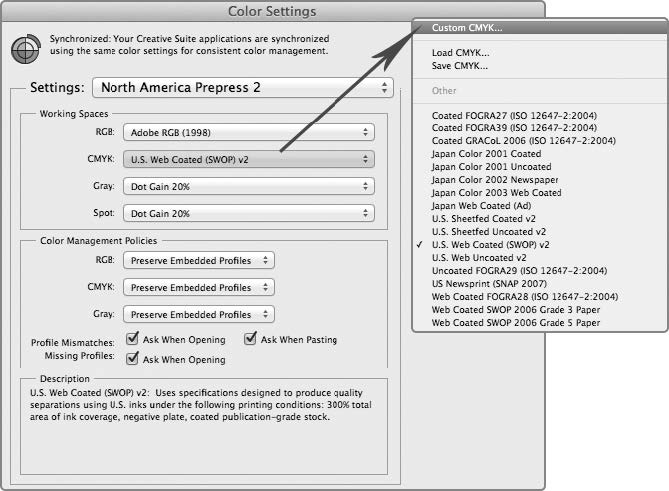
Figure 4: In the Color Settings dialog box, select Custom CMYK from the CMYK menu.
In the Custom CMYK dialog box, select Maximum Black Generation (Figure 5). The curve you see may seem odd, but it merely indicates that all equivalent RGB values are being replaced with black. The appearance of color elements won’t be compromised.
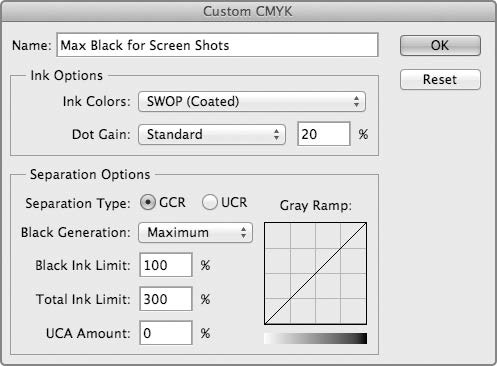
Figure 5: In the Custom CMYK dialog box, select the Maximum Black Generation setting. This consolidates all gray-equivalent values to the black channel, minimizing issues with registration.
Color elements will be composed of four colors in the final CMYK image. But black and gray elements will be rendered only in black (Figure 6). While this may look odd, it results in cleaner printing of the screen capture, because there aren’t four colors piling up in most of the image.
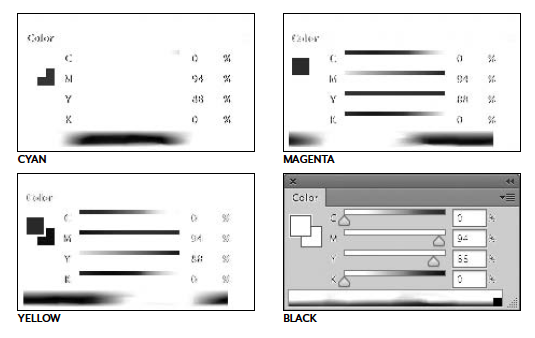
Figure 6: All the color components appear on the cyan, magenta,
and yellow plates. Black and gray areas appear only on the black plate. This special treatment ensures that screen shots print cleanly.
This article was last modified on July 27, 2021
This article was first published on March 26, 2014
Commenting is easier and faster when you're logged in!

Recommended for you

Photoshop Fun: A Hole in the Hand
Creating surreal images is all about the idea. So what does this image mean? As...

The 7 Skills Every Design Professional Needs Today
Today more designers are finding themselves having to be well rounded with diver...

Photoshop CS6 Quick Reference Guide
If you use Photoshop every day, chances are you’ve committed to memory the...