
Illustrator How-To: Breathe New Life into Stock Clip Art

Many designers find the idea of using clip art in their work to be somewhat gauche. While that may be true of using a lot of clip art in its raw state, you shouldn’t overlook it as a potential design resource. Clip art can be a great basis for speeding up the production of custom graphics. To create our illustration in Figure A, we used a clip art butterfly as the basis for creating a butterfly template that then served as the foundation for all three butterflies in the image.

Figure A: All three of these unique butterfly designs originated from the same base clip art.
Taking Clip Art to New Places
Using stock clip art as a template enabled us to create several custom graphics in far less time than it would have taken to draw them out separately. In this article, we’ll show you how we modified a clip art butterfly into a serviceable template and then modified the template to create unique graphics. First, we’ll explain how to evaluate your clip art and decide whether using it as a template is going to save or waste your time. Then, we’ll dissect our design into manageable chunks using layers. Next, we’ll modify our template by using the path tools and filters such as Outline Stroke. Finally, we’ll use the Free Transform tool to tweak our butterfly to the perfect shape and give you other tips for modifying your templates.
Taking Stock
Illustrator doesn’t come with a lot of stock clip art resources like CorelDRAW, but it does come with Brush Libraries that have a wide variety of different graphics in them. So, don’t forget to check your Illustrator CD if you’re looking for some additional clip art to manipulate.
To create our butterfly template, we started out with the butterfly symbol that comes in Illustrator’s Animal Sample Library. To load it, choose Window > Brush Libraries > Animal Sample to open the library. Then, click and drag the butterfly icon onto the document. With the butterfly selected, choose Object > Transform > Scale to open the Scale dialog box. In the Uniform text box, enter 400, and then click OK. This step makes it easier to work with the smaller details of our design.
Once you enlarge the butterfly, you can see from Figure B that it isn’t exactly the prettiest butterfly ever. It’s actually kind of strange looking. However, looks aren’t everything and what really matters is how it’s constructed. When you first look at any piece of clip art, you need to analyze how it’s put together and compare that to what you want to do with it. Some graphics may be put together in such a way that modifying them may actually take longer than drawing it from scratch yourself. Also, if your goal is to create a scientifically accurate representation of the Monarch butterfly, then modifying a clip art butterfly isn’t the way to go about it-starting from scratch would serve you far better.
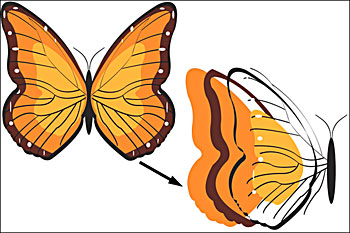
Figure B: Analyze the structure of the clip art to see if it will really help you. Since this design is broken up into distinct parts, it works well for customization.
Modifying the Butterfly
In Figure B, you can see the butterfly’s wing separated into its various pieces. Since we just want to create a basic butterfly template, we don’t need any of the decorative frills. You just need the basic wing shape, the veins and the body.
To get started, select the butterfly with the Selection tool and then choose Object > Ungroup. Repeat this three more times until the Ungroup option is disabled. Now, all components of the design are independent and you can separate them. Delete one wing entirely and just keep the basics of the other wing, as shown in Figure C. Since butterflies are symmetrical, you don’t need two wings in your template. You can just make one and then duplicate it once you’ve finished with it.
Now, separate the body, veins and wing onto their own layers, as this will make them easier to select and work with, also shown in Figure C. You can use any method you want to accomplish this, but the venerable copy and paste method works well.
Note: To make drawing easier, you can lock lay-ers you’re not using to keep everything in place. You can also select all the objects on a layer by option-clicking (Alt-clicking in Windows) on the layer.
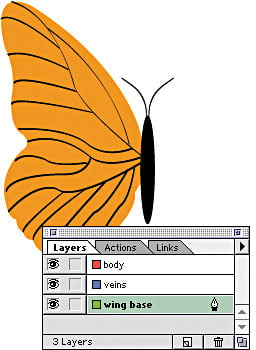
Figure C: To make your work easier, separate the basic elements onto their own layers.
Wing Modifications
The basic wing shape is okay but not excellent, so we modified it. You can make similar adjustments to your butterfly as you desire. First, we used the Pen tool to remove all the points we didn’t want, such as the bumps on the lower wing. We then used the Direct Selection tool to move things around a bit to make the wing larger in relation to the body, as shown in the comparison in Figure D.
Outlined Paths
The veins of the wing, though thin, aren’t strokes. They’re expanded paths. Because of this, you can go in and edit the points to vary the thickness of the line widths, which makes the graphic look more interesting. Outlining paths is also a good technique for technical reasons, as stroke widths can change when an EPS file is resized in a layout application such as InDesign or QuarkXPress. This is especially important to keep in mind if you’re expecting the lines to act as a trap.
We want to use this same technique to create a border around the wing. By varying its thickness you can change the butterfly’s appearance substantially.
To make the border, select the wing shape and apply a 1-pt. black stroke. Then choose Object > Path > Outline Stroke. Everything looks the same onscreen but the stroke is now a filled object. While it’s selected, create a new layer and copy and paste it to its own location. Now all you have to do is update the body a bit. Just add a few points to give it a more “bug-like” shape. With that, you’ve wrapped up the template. Now, we’ll show you how to modify it.
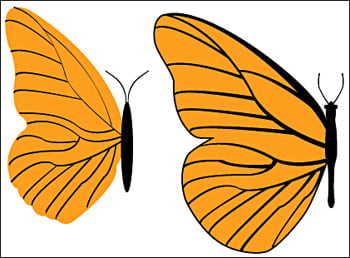
Figure D: Adjusting the wing’s shape and thickening the veins improves the butterfly’s overall appearance
Winging It Creatively
The template butterfly is finished. You only need to modify the basic shape and add decorative features to create numerous types of butterflies. Because the template is simple, it’s easy to modify. Next, we’ll take you through the process we used to generate our three butterflies.
To begin, duplicate the template butterfly. The first thing you want to do is establish the wing shape of your new butterfly. The easiest way to adjust the wing and veins simultaneously is with the Free Transform tool. This tool allows you to bend and skew the wing into different shapes for each type of butterfly.
To try it out, select the entire wing and then select the Free Transform tool. Click on the corner of the bounding box and you’ll see the Scale arrow. Begin dragging and then press the command key (Ctrl in Windows). The pointer changes and you’ll be able to distort just that corner of the wing, as shown in Figure E. Tweak the shape of the wing until you get something that looks good to you.
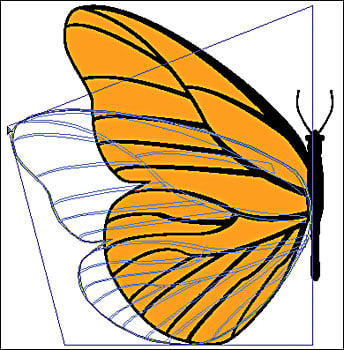
Figure E: The Free Transform tool can help you distort the wings into different shapes.
Getting Your Fill
Now that you’ve changed the wing shape, you only need to change the colors in order to have a whole new butterfly. You can also add or delete veins or just change how they connect together. The veins also give you a great way to add localized color and gradients quickly.
To do this, lock the veins layer to use it as a tracing aid. Then, create a new layer underneath the veins layer and name it gradient fills. Select the Pen tool and click points around a vein section, as shown in Figure F. Once you have a closed path, give it a gradient fill. After you do this once, the gradient fill becomes the default. So, you can quickly add other filled shapes around the wing and the veins cover up the gradient edges. You can also add spots and blends. Butterflies have vastly different appearances, so you can pretty much do anything you want to the wing. Once you’ve finished, copy and paste a copy of the wing onto a new layer, flip it horizontally and position it under the body layer. Then, you’ll have a complete butterfly like ours in Figure G.
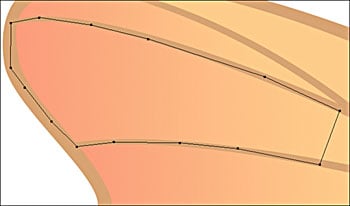
Figure F: By locking the veins layer, you can use it as a quick way to position gradients underneath it.

Figure G: A few color changes and details give us a very different butterfly.
In Clip
Whether you’re creating graphics for logos, illustrations or brushes, you may find that even ugly clip art can be useful. These techniques aren’t just for butterflies, but for any graphics where you need to create a variety of similar (yet different) objects without investing a lot of time.
This article was last modified on February 16, 2023
This article was first published on June 21, 2002
Commenting is easier and faster when you're logged in!

Recommended for you
How to Create Styles from Existing Text Quickly in InDesign
Learn how to add styles to InDesign text that has already been formatted locally...
An Easier Way to Apply Gradients to Table Cells
Filling a table cell with a gradient has always been tricky in InDesign.. until...

Replacing PDF Pages With Adobe Acrobat
In publishing as in life, little things can sometimes make a big difference. For...