

It isn’t often in life that you find yourself being encouraged to break the rules — to forget about limitations imposed on you in the past and do things your own way. That’s what’s so fun about Illustrator CS2’s new Live Paint function: It sets you free to color your artwork intuitively and impulsively. With Live Paint, you can instantly apply color, gradients, and other fills to any enclosed space in your artwork, without having to make sure it’s defined as a separate vector object first. That lets you paint shapes and spaces the way your eye sees them — just as you would if you were coloring a drawing or painting by hand. This article will introduce you to the ins and outs of working with Live Paint, and show you just how much fun you can have with that shiny new Live Paint Bucket. Painting the Intuitive Way Let’s look at an example of how Live Paint lets you break the rules. Suppose you draw three squares, arranged so that the space between them forms a triangle, as you see in Figure 1:
 Figure 1: Three squares arranged to form a triangle in the middle.
Under normal Illustrator rules, you wouldn’t be able to color that triangle because it doesn’t exist as a separate vector object. It’s just the empty space between the three squares. There’s no vector object that you can apply a fill to, so technically, there’s no triangle there to color. That’s where Live Paint comes in. Live Paint says, “Enough of these silly limitations. If you don’t like the rules, change them! And if you want to color that triangle, then let’s go ahead and color that triangle.” The results are in Figure 2.
 Figure 2: Live Paint allowed me to color the triangular space green — even though technically there’s no object there to color!
To change the rules, just designate the objects you want to paint as a Live Paint Group. Suddenly, you can paint any enclosed area you want, whether or not it’s a discrete vector object. I’ll show you exactly how to do that in a bit. Live Trace and Live Paint: A Perfect Pair One of the best things about Live Paint is that it’s designed to work hand in hand with another new tool in Illustrator CS2, Live Trace. Using Live Paint, you can easily color the artwork you’ve traced, without worrying about the fact that your tracing object isn’t composed of separate vector objects. For example, you can draw a sketch on paper, scan it, trace the scan using Live Trace, and then color the tracing object that results using the Live Paint Bucket. That’s what artist and illustrator Kevan Atteberry did. In Figure 3, you’ll Kevan’s original scanned drawing on the left; in the middle is the tracing Kevan made with Live Trace; and on the right is the final version after Kevan colored it with Live Paint.
 Figure 3: Left: Kevan’s original scanned drawing. Middle: the Live Trace version. Right: the final product after Live Paint.
Making a Splash Remember the three squares in Figures 1 and 2? Here’s how I colored the triangular space between. First, I selected the three squares. Then I chose the Live Paint Bucket tool (it lives just below the Eyedropper in the Toolbox) and clicked on the selected squares to turn them into a Live Paint Group (Figure 4). (You can also turn selected objects into a Live Paint Group by choosing Object > Live Paint Make.)
 Figure 4: Clicking a selected group with the Live Paint Bucket turns it into a Live Paint Group. Note the helpful tool tip that appears next to the cursor.
 Figure 5 shows my new Live Paint Group. Notice the special bounding box around the three squares, with the little star-shapes in its handles. The Live Paint bounding box distinguishes a Live Paint Group from an ordinary Group.
 Figure 5: The fancy bounding box lets me know that I’ve turned my squares into a Live Paint Group.
Finally, I chose a bright green color as a fill, then moved the Live Paint Bucket over the triangular space. The triangle became highlighted, showing me that the area was available for painting. I clicked on the triangle, and presto — the triangle filled with my chosen color (Figure 6).
 Figure 6: Left: When you position the Live Paint Bucket over an area that can be painted, a highlight appears around the area. Right: After clicking with the Bucket, the area fills with color.
By the way, you can change the way the Live Paint Bucket behaves by double-clicking on its icon in the Toolbox (Figure 7). This opens the Live Paint Bucket Options dialog, where you can set options such as whether the Bucket paints fills, strokes or both, and also set the color and size of the highlight you see when you position the Bucket over a paintable area.
 Figure 7: You can access the options for the Live Paint Bucket just by double-clicking on it in the Toolbox.
Different Strokes for Different … Live Paint Objects As I mentioned in the previous section, you can use the Live Paint Bucket to paint strokes as well as fills. Just make sure the Paint Strokes checkbox is checked in the Live Paint Objects dialog, and the Live Paint Bucket will apply whatever Stroke attributes you’ve defined before you click with the Bucket. In Figure 8, I used the Live Paint Bucket to give the green triangle a thick purple stroke on all three sides. When you paint the stroke, make sure to position the bucket so that the stroke is highlighted rather than the fill. The image on the left shows what it looks like when the fill is highlighted; the image in the middle shows the highlighted stroke. The image on the right shows the final product.
 Figure 8: Left: The Live Paint Bucket is positioned to paint the fill. Middle: When the cursor is positioned to paint the stroke, note that the cursor changes from a bucket to a little paintbrush, in addition to highlighting the stroke. Right: After painting the strokes on all three sides of the triangle.
 A Visit to Flatland: Working with Live Paint Groups Some of you may be familiar with the Victorian satire Flatland, Edwin Abbott’s fanciful story set in a totally flat world populated by intelligent squares, triangles, lines, and other two-dimensional shapes. When you’re working in a Live Paint Group, it might be helpful to imagine that you’ve taken a trip into Flatland. That’s because one of the rules that falls by the wayside when you’re working with a Live Paint Group is the idea of stacking order. Within a Live Paint Group, everything is treated as if it’s at the same level. Here’s an example. I created t
he simple butterfly shown in Figure 9 using compound shapes; now I’m ready to color it using Live Paint. On the left is the butterfly before painting. Notice in the middle image that when I move the Live Paint Bucket over the left wing, Illustrator highlights the area of the wing surrounding the two spots, allowing me to paint the main part of the wing without also coloring in the two spots. (I can color the two spots separately by moving the Bucket directly over them.) Under the normal rules of Illustrator, I’d have to make sure that the two spots were stacked above the wing shape so I didn’t paint over them when I colored the wing. But in the flat world of Live Paint, Illustrator understands that the spots are separate entities, and allows me to simply color around them. On the right in Figure 9, you can see the fully painted butterfly.
 Figure 9: Left: the original butterfly outline. Middle: Live Paint lets me select and paint the area of the wing around the two spots. Right: the fully painted butterfly.
 Choose Your Fill: Colors, Gradients, Patterns, or No Fill at All I’ve been talking about using Live Paint to apply color to enclosed spaces, but the Live Paint Bucket can paint all kinds of fills, not just solid colors. That means you can choose to paint with a gradient, a pattern, or even no fill at all. Figure 10 shows two overlapping circles. I made them into a Live Paint Group and colored the main portions of the circles with solid color fills. Then I filled the intersection between the two circles with gradient by choosing a gradient swatch in the swatches palette and then clicking on the intersection with the Live Paint Bucket.
 Figure 10: Left: positioning the Live Paint Bucket over the intersection of the circles. Right: after clicking on the intersection to fill it with a rainbow gradient.
 Now let’s see an instance of the kind of fun you can have by painting with no fill. For Figure 11, I placed the overlapping circles over a rectangle filled with the “Starry Sky” pattern. Then I selected the None swatch in the Swatches pallet and clicked on the intersection. The intersection immediately became transparent, allowing the pattern underneath to show through. By filling the intersection with no fill at all, I essentially punched a hole in the circles without having to deliberately create a compound path.
 Figure 11: I clicked the None swatch in the Swatches palette, and then clicked on the intersection of the circles with Live Paint Bucket. In doing so, I painted a hole that let the pattern underneath show through.
 Putting the “Live” in Live Paint The “Live” part of Live Paint means that your painting remains editable and changes with your objects when you resize them, transform them, or move them around. In Figure 12, I’ve used the Direct Selection tool to move and resize the two circles. Notice that the intersection maintains its gradient fill even as it changes size, shape, and position along with the two circles.
 Figure 12: Left: the original overlapping circles. Middle: I moved the red circle underneath the green one. Right: I changed the size and shape of both circles. The intersection maintains its gradient fill even as it moves around.
But also note that there are some limits even in Live Paint. In Figure 13, I took the two circles with the gradient-filled intersection (left), moved them far enough apart so that they no longer intersected, and the gradient area vanished (middle). On the right, you can see that when I moved the two circles together again, the gradient-filled intersection didn’t magically reappear — once it’s gone, it’s gone, so to get it back I’ll have to paint it again.
 Figure 13: Left: the original circles. Middle: I’ve moved the circles far enough apart that the gradient-filled intersection disappears. Right: I don’t automatically get my gradient fill back when I move the circles back together — I’ll have to paint the intersection again.
 Adding Paths to a Live Paint Group: No Cliques, Just Clicks After you’ve created a Live Paint Group and painted it, you may decide that you’d like to add some paths to it. Fortunately, Live Paint Groups aren’t snobbish — they’re always willing to admit new members. For Figure 14, I decided to add some stripes to the body of my Live Paint butterfly. I took the Line tool and drew six diagonal lines across the butterfly’s body. Then I selected the lines along with the butterfly Live Paint Group, and chose Object > Live Paint > Add Paths. The six lines were added to the Live Paint Group, where they served as three stripes that I could easily paint with the Live Paint Bucket.
 Figure 14: Left: I added three pairs of lines to the butterfly’s abdomen. Middle: Adding the new paths to the butterfly’s Live Paint Group. Right: After I added the six lines, I painted the spaces between them orange to create three stripes.
 Group Isolation Mode: Thinking Inside the Box Believe it or not, there’s an even easier way to add new paths to a Live Paint Group. It involves another new feature in Illustrator CS2 called Group Isolation Mode, which is very useful when working with Live Paint. There are times as you’re working in Illustrator that you may see a grey box appear around your artwork. It’ll look like Figure 15:
 Figure 15: Don’t panic! The grey box is your friend.
 The grey box tells you that you’ve just entered Group Isolation Mode. Here’s how this new mode works: Suppose you have some artwork that’s already grouped, and you want to add another element to it. Without Group Isolation Mode, you’d have to select your group, ungroup it, and then select it along with your new element and group them all together again. With Group Isolation Mode, it’s much easier. Just choose the Selection tool and then double-click on any of the objects in your existing group. You’ll see that grey box appear around the existing group, which tells you that you’ve entered Group Isolation Mode. And once your group has been isolated, anything you add inside that box will automatically be considered part of the group. Here’s an example. I created the snail in Figure 16 using compound shapes, then I colored the shell and the body of the snail using Live Paint.
 Figure 16: I used Live Paint to color the snail’s shell yellow and its body pink. But I forgot one detail …
Then I realize I’d forgotten to give the snail eyestalks. Since the snail was already a Live Paint Group, all I had to do was double-click on the snail to enter Group Isolation Mode (Figure 17).
 Figure 17: The snail enters Isolation Mode, as indicated by the grey box. Don’t worry, I won’t leave him there long.
 Once the grey box appeared around the snail, I added the eyestalks, which immediately became part of the snail’s Live Paint Group (Figure 18).
 Figure 18: The snail has been freed from Group Isolation Mode. And with his new eyestalks, he’ll be able to see where he’s going.
 When you’re ready to leave Group Isolation Mode, either double-click on the Artboard or click on any object outside the grey box. The grey box will disappear, and you’ll be operating under normal grouping rules again. One small flaw in the conception of Group Isolation Mode is that if you’re not aware of it, it can be easy to trigger it accidentally. That’s one very good reason to know what the grey box means and how to get out of it if you find yourself there unexpectedly. Live Paint’s Gap Options As you’ve seen, Live Paint lets you apply color to any enclosed area. But the key word there is enclosed. What happens when the area you’re trying to paint isn’t completely sealed off? What if there are one or more small openings between the paths surrounding the area, causing it to spring a leak? That’s where Illustrator’s handy Gap Options dialog box comes in. Figure 19 is an example creativepro.com contributor Sandee Cohen shared with me. On the left, there’s a pair of bananas Sandee created by tracing a raster image with Live Trace. Sandee then converted the tracing to a Live Paint group and attempted to paint the bananas a nice yellow color. But as you can see in the right-hand image, when she clicked on the bottom banana with the Live Paint Bucket, color flooded outside the banana because of a small gap toward the end of the banana. (It’s indicated with a red circle.)
 Figure 19: Left: the bananas before coloring. Right: the circle indicates the gap that’s keeping Sandee from painting the bottom banana.
 Fortunately, Sandee didn’t let the problem drive her, well, bananas. That’s because she knew Illustrator’s Gap Options could save the day. Sandee selected the bananas and then opened the Gap Options dialog box by choosing Object > Live Paint > Gap Options (Figure 20).
 Figure 20: The Gap Options dialog box lets you specify how large a gap has to be before it causes a leak.
 Using the dropdown menu labeled “Paint Stops at,” located at the top of the dialog box, Sandee changed the setting from Small Gaps to Large Gaps. This caused Live Paint to ignore the relatively small gap at the end of the banana, and let her paint the banana yellow, just as if the gap weren’t there (Figure 21).
 Figure 21: Once the gap was no longer a problem, it was easy to paint the bananas yellow.
 If Sandee had wanted to be even more precise, she could have specified an exact size for how large a gap would have to be before Live Paint would recognize it as an opening,. To do so, she’d check the “Custom” checkbox just below the dropdown menu and enter a number in the field. Note that if you don’t have any Live Paint Groups selected when you open the Gap Options dialog box, whatever settings you choose will become the default settings for any new Live Paint Groups you create before you change the settings again. You can also use the Gap Options dialog box to detect and highlight gaps in your artwork. Let’s look at the example of the three squares again. When I first placed the three squares together and tried to paint the triangle, I couldn’t get the triangle to highlight when I moved the Live Paint Bucket over them. I suspected that maybe the squares weren’t exactly flush, so I used the Gap Detection feature to see where the problem was. I selected the squares, opened the Gap Options dialog, checked the Preview checkbox and chose Green as the highlight color from the “Gap Preview Color” dropdown menu. Figure 22 is the preview I got, showing the troublemaking gaps highlighted in green. It was easy to move the squares a little closer together to eliminate those gaps.
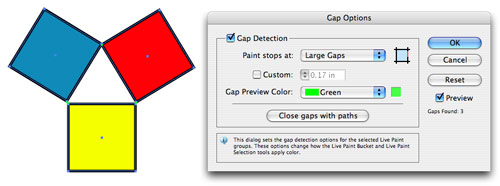 Figure 22: I checked the Gap Detection box and the Preview box in the Gap Options dialog, then chose green for my highlight color. The little green dots at the corners of the triangle show me where the gaps are.
 Illustrator will even close gaps for you automatically if you click the “Close gaps with paths” button at the bottom of the dialog. If you try this feature, be aware that Illustrator always uses straight paths to close gaps in the selected objects. Make sure that straight paths are really what you want in those locations, and check your results closely. How to Expand (or Release) Live Paint Groups Expanding and releasing might sound like a deep-breathing exercise, but they’re actually two important options you can take at the end of the Live Paint process. Once you’ve finished coloring a Live Paint Group, you may find that you’re ready to move on and do other things to the objects in the group — some of which will require taking them out of the realm of Live Paint. For example, you may want to be able to work with the objects in the group as separate elements once you’ve colored them. That’s where expanding comes in. When you select your Live Paint Group and choose Object > Live Paint > Expand (or click the Expand button in the Control palette), the selected objects will be converted to ordinary vector paths. Their appearance will stay the same as before, but their Live Paint characteristics will no longer be live, and they’ll be rendered into separate filled and stroked paths that behave according to the “normal” rules Live Paint allowed you to break. On the other hand, you may find that you’d like to revert the objects in your Live Paint Group back to their pre-Live Paint state. Maybe you’d like to rework them a little before you paint them, or you decide you’d like to color them the old-school way, without using Live Paint. No sweat! Just choose Object > Live Paint > Release (or click the Release button in the Control palette) and your objects will be converted back to ordinary paths. Editing Paths the Intuitive Way Now that you know how Live Paint lets you color spaces according to the way the eye sees them, you might be thinking, “Wouldn’t it be great if you could edit the paths themselves the same way? What if you could select and alter specific parts of paths based on the way they look?” Illustrator has that covered with the new Live Paint Selection tool, which lives next door to the Live Paint Bucket in the Toolbox. I created a grid of nine squares by drawing a large square along with four divider lines. I converted the grid into a Live Paint Group and painted the whole thing red. Then I chose the Live Paint Selection tool and found that by moving it over the divider lines, I could select the smaller segments of the lines that were formed as they crossed each other. I selected and deleted four of those small segments and the result was a cross shaped object in the center of the large square. I then used the Bucket to paint the four corner squares white, and presto — the
result was a red cross on a white background (Figure 23).
 Figure 23: Left: Using the Live Paint Selection tool to select one piece of a line. Middle: Selecting and deleting the four line segments around the middle square. Right: After deleting those four segments, I had a cross shape. I painted the four corner squares white to make the red cross stand out.
You can set the options for the Live Paint Selection tool by double-clicking, just as you do with the Live Paint Bucket. Before I started on Figure 23, I opened the Live Paint Selection Options dialog box to make sure I was able to select strokes as well as fills, and I changed the highlight color to Green so that I could see it against my grid’s red fill. Ready, Set, Paint Now you’ve got a good sense of Live Paint’s potential, and I’ll bet you’re itching to start playing with it. Don’t be shy — Live Paint is a tool that rewards experimentation. And because of the way Live Paint changes the rules, one of its best features is that once you start working with it, it might help you see your work with new eyes.
This article was last modified on January 3, 2023
This article was first published on December 21, 2005
Commenting is easier and faster when you're logged in!

Recommended for you
Setting Up Your Brand Kit in Adobe Express
Learn how to set up a brand kit in Adobe Express to provide your clients with a...

Creating Silhouettes in Photoshop with Remove.bg
I reviewed the revolutionary cutout tool remove.bg a couple of months back, and...

iStock.com Changing Pricing Structure
iStock is often credited as the birthplace of the microstock industry: widely-so...