

Would you like to add richer shading and highlighting effects to your vector artwork in Adobe Illustrator, and be able to quickly edit colors and have all these effects update instantly? I thought so.
The process starts with artwork that uses brushed strokes which have been converted to outlines. You then need to select all the art and fill in the enclosed area with flat color using the Shapebuilder tool (for a detailed Gallery explaining how I do this, see the Illustrator CS6 WOW! Book).
I color my artwork with flat colors using Global Swatches, and then use these Global Swatches along with Layer Effects to add shading and highlight effects. These two techniques combined allow me to quickly experiment with color changes, as well as adding a richer look to the shading and highlights in the artwork. Finally, I save myself even more time by saving the document as custom template.
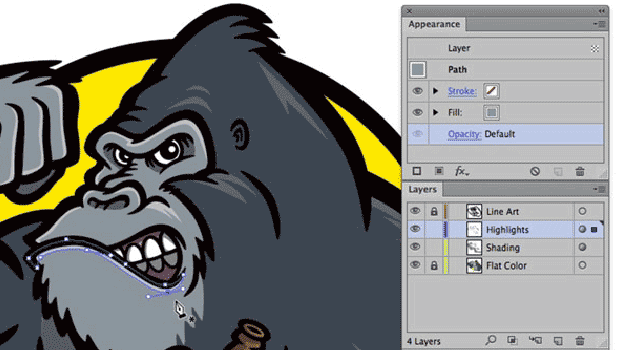
So to start, I am going to assume you have a file with some black-and-white line art, with the brushed strokes outlined, and the interior areas filled with flat color as in the screenshot below:

The first thing I do is double-click the layer name of the existing layer containing my artwork, rename it “Flat Color” and press Return.

I then press Cmd+L/Ctrl+L to create a new layer, then double-click that new layer name to make it editable and rename the layer to “Line Art”.

Next, I select one of the line art vector object shapes on the Flat Color layer, and choose Select > Same > Fill Color to select all the line art shapes on the artboard.

I then press Cmd+X/Ctrl+X to cut those shapes from the layer, and then click the “Line Art” layer in the Layers panel. I then press Cmd+F/Ctrl+F to paste the artwork on the clipboard into the “Line Art” layer in the exact same location on the artboard. As a result, I now have separate layers for the line art and the shapes for the the fill color, in perfect registration.
Next, I need to create two new layers in-between the “Line Art” layer and the “Flat Color” layers. I select the “Flat Color” layer in the Layers panel, then press Cmd+L/Ctrl+L twice to create two new layers above the selected layer. I then double-click on the layer name of each layer and name one “Shading” and the other “Highlights”.

I then add an Appearance effect to each of these layers. First, I target the Shading layer by clicking the circle to the right of the layer name in the Layers panel. Then I open the Appearance panel and click on the Opacity link to bring up the quick access panel for the Transparency panel. I click on the Blend Mode drop-down menu which should currently read “Normal”, and chose “Multiply”. I enter 65% in the Opacity box and press the Return key. I repeat this process for the Highlights layer, this time choosing Screen for the Blend Mode, and 80% for the opacity percentage.

Now I can start adding shading and highlighting effects to the artwork. Because I added these Appearance effects to targeted layers, this effect will be assigned to all objects on the layer. And the Blend Modes chosen for each of these effects layers have been set up so that I can use the same color as the flat fill color of the artwork for both the shading as well as the highlights layers.

And because I use Global Swatches for these colors, it makes it incredibly easy for me to edit colors and have the shading and highlight effects update instantly for the flat fill, the shading and the highlights. The shading and highlights also look much richer than when using a swatch of 100% K for all of the shading, and 100% white for all of the highlights.

One thing to note is that this process does not work for every single color out there, in particular reds. For these situations I set up separate Global Swatches for the shading and highlights for the red color fills and have to edit manually when they are changed.
And now that you’ve been following along and setting up a file like this on your end,
save yourself even more time and save this document as a custom template so all of these steps are completed, ready and waiting for you to drop in some new artwork and get going with the creative side of the artwork.
Just select all the artwork by pressing Cmd+A/Ctrl+A, then press the Delete key to delete all the objects on the artboard. Next, choose File > Save As Template… and save the file in a convenient location. Now all you need to do is open this template file instead of creating a new blank document for your next project. All your layers will be named properly, and the Shading and Highlights layers will already have the Appearance effects assigned to them.
***
Editor’s Note: You can see a related Gallery of George Coghill’s work in The Adobe Illustrator CS6 WOW! Book. And to save 35% off the retail price, go to peachpit.com and enter coupon code WOWCC1 during checkout!
George Coghill is a freelance illustrator specializing in monster, creature & cryptid creations. Visit his website, Monsterologist.com
This article was last modified on October 14, 2020
This article was first published on June 13, 2014
Commenting is easier and faster when you're logged in!

Recommended for you
Turning Grayscale to Color in Photoshop
When it comes to creating multitone images, it’s common to think of using the Du...

How To Create Sharp Digital Type Images
Images that contain type make frequent appearances on websites and blogs, ebooks...
Improve Your Talent for “Eyeballing It”
I’m kind of a stickler for neat and tidy layout; blame it on my printing b...