

Excerpted from The Adobe Photoshop Lightroom 4 Book: The Complete Guide for Photographers by Martin Evening. Copyright © 2012 Used with permission of Pearson Education, Inc. and Adobe Press. Martin Evening shows how the Adobe Photoshop Lightroom import procedure provides an adaptable import workflow, one that can be streamlined through the use of Import presets, as well as offering the ability to import files directly from the camera using a tethered shooting setup.
Part 1
(Click here to see Part 2.) Lightroom is essentially a catalog management program and raw image processor combined into one. It is important to appreciate how Lightroom differs from browser programs such as Adobe Bridge, where you simply point Bridge at a folder to inspect the contents. The browser method is really suited for those times where you need the freedom to search everything that’s on your computer. The downside of this approach is that you first have to know where to look in order to find what you are searching for. Plus, you’ll be shown all the files that are contained in each folder. If there are also lots of non-image files to sort through this can make image browsing quite tricky. Lightroom is different. With Lightroom you must import your photos first, and in doing so make a conscious decision as to which photos you want to have added to the catalog. As you will come to learn in this chapter, the Lightroom import procedure provides an adaptable import workflow, one that can be streamlined through the use of Import presets, as well as offering the ability to import files directly from the camera using a tethered shooting setup.
The main Import dialog
To import photos into Lightroom, you will need to click on the Import… button in the Library module. The first time you choose to import photos into Lightroom it will do so via the expanded Import dialog shown in Figure 1. As you can see, there are lots of options here, so let me take you through them one by one in the order you should use them. 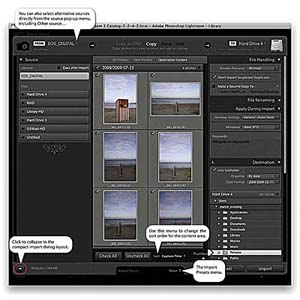 Figure 1: This shows the layout of the advanced import dialog showing all the main panels. At the top we have the import workflow bar. This displays a summary of the current configured import workflow, showing from left to right the import source, the import method, and the destination folder. You mainly use this to select the import method: Copy as DNG, Copy, Move, or Add. Below this you will see, on the left, a Source panel, which is used to select the source volume (or folder) to import from. In the center is the content area. This displays thumbnails of the images that are to be imported and offers options to segment the thumbnail display into different groupings. For example, you can choose to display photos by showing All Photos, show New Photos only, or segment by Destination Folders (how the photos will finally be imported, according to the Destination panel settings). You can use this central section to select all or select individual photos, as well as see Loupe view previews of the files you are about to import. Note In the expanded mode the Import dialog behaves more like a file browser. The browsing experience is slightly more refined though, as Lightroom knows to wait for a folder to be selected in the Source panel before populating the content area with the images that are available to import. Note There can only be one physical copy of each image in any particular folder location. It is possible to import more than one copy of a file to the catalog by disabling the “Don’t Import Suspected Duplicates” option, but it is not recommended that you do so. The panels on the right are used to manage the photos as they are imported. So we have the File Handling panel at the top to decide how to render the initial previews, whether to import suspected duplicates, and options for creating secondary backups. The File Renaming panel can be used to apply a file renaming scheme. The Apply During Import panel can be used to apply a Develop preset and/or a metadata template setting to the files as they are imported; plus, you can enter keywords to apply on import. Then we have the Destination panel, which lets you choose the folder the files should be imported to and how they should be organized within that destination folder. At the bottom you’ll notice an Import Presets menu. Here you can save Import dialog settings as custom presets. This can make it easy for you to select favorite import settings without having to reconfigure everything in the Import dialog each time you want to import files into Lightroom. If you click on the button circled at the bottom of Figure 1, you can go to the compact view shown in Figure 2 This provides an abbreviated summary of the import settings. This simpler interface is ideal if you have already saved a number of import presets. When working in this mode all you need to do is to select an appropriate import preset.
  Figure 2: This shows the layout of the compact import dialog mode.
Copy as DNG, Copy, Move, or Add?
Let’s look more carefully at the ways in which images can be imported starting with those that are relevant to camera card imports only: The “Copy as DNG” option copies the files from the card and at the same time converts them to the DNG file format. This option offers peace of mind, because the DNG file format is an Adobe-devised format for archiving raw capture files and widely regarded as a more versatile and therefore more appropriate file format for the long-term archival storage of raw camera files. The DNG conversion process also conveniently flags up any files that happen to be corrupted as they are imported. However, converting to DNG can easily double the time it takes to complete an import. The “Copy” option makes a straightforward copy of all the images that are on the memory card and stores them in the designated destination folder or subfolder. Note For the benefit of previous Lightroom 1 and Lightroom 2 users, “Copy Photos as Digital negative (DNG) and add to catalog” or “Convert to DNG” is now simply known as “Copy as DNG.” “Copy photos to a new location and add to catalog” is now known as “Copy.” “Move photos to a new location and add to catalog” is now called “Move” and the “Add photos to catalog without moving” option is now called “Add”. If you intend to import photos from an existing folder of images you can consider using any of the four import options. In these instances, “Copy as DNG” is only useful if the folder of images you are copying from contains unconverted raw images. You can convert non-raw images such as JPEGs to DNG (though this does not actually convert them into raw files). The “Copy” option can again be used to make copies of the files to the chosen destination folder location and add them to the catalog. But remember, you don’t always want to end up creating any more duplicate versions of master images than you need to, so “copying” files is mainly used whenever you need to copy files from a camera card or a DVD. If your intention is to import photographs from existing folders on your computer and add them to the Lightroom catalog, the two options you want to focus on are “Move” and “Add.” The “Move” option copies files from the selected source folder, copies them to the destination folder, and then deletes the folder and files from the original location. This is a neat solution for importing photos into Lightroom, placing them in the exact folder location you want them to end up in and not ending up with yet more duplicate images. The downside is that copying files still takes time. The “A
dd” option is the one I suggest you use mostly here. With an “Add” import you are telling Lightroom to “reference” the files where they are located on the computer. When you “Add” files at the import stage it takes a minimal amount of time to complete the import process. You also have to bear in mind that Lightroom does not place any real restrictions as to how or where the images are stored—they can be stored anywhere you like. To summarize, I mainly suggest you use “Copy” for all card imports (and convert your raw files to DNG later) and use “Add” or “Move” for folder imports. Note If you apply lossy compression when converting to DNG you can preserve the full pixel resolution but at a reduced file size. Lossy DNGs are almost like normal DNGs, except the raw data is permanently demosaiced, but kept in a linear form. Note The Metadata panel in the Library module now has a DNG view mode. This allows you to see specific DNG file information, such as whether lossy compression has been applied.
Converting to DNG after import
I always prefer to convert my raw photos to DNG at the end of a photo shoot rather than convert them at the import stage. When I am busy in the studio this can easily save an hour or more of computer processing time, which is important because time (as we all know) is money. You can do this by going to the Library menu and choosing “Convert Photos to DNG” (the Convert Photos to DNG dialog is shown in Figure 3). In the Source Files section you can choose to only convert raw files. Normally you only want to convert raw images to DNG, but with the new lossy compression options it is possible to convert JPEGs to lossy DNG without increasing the file size. You can also choose to delete the original raw files after successfully converting them to DNG, which can help you avoid ending up with duplicate raw versions of your images (see sidebar). The options in the DNG Creation section are the same as those in the Lightroom File Handling DNG Import preferences (except for the lossy compression), so I recommend you read the information on pages to for advice on which options to select here. You can also choose whether to embed the original raw file in the DNG image or not. This option does provide the flexibility of reverting to the original raw file format state, but the downside is that you will end up with DNG files that are at least twice the size of the original. Mostly I would say it is safe to leave this option unchecked: convert everything to DNG and delete the raw originals as you do so.  Figure 3: The Convert Photos to DNG dialog. Note that you also now have options to embed fast load data and apply lossy compression when converting photos to DNG. Note Should you keep the original raws? It all depends on whether you feel comfortable discarding the originals and keeping just the DNGs. Some proprietary software such as Canon DPP is able to recognize and process dust spots from the sensor using a method that relies on reading private XMP metadata information that is stored in the proprietary raw file. If you delete the original .CR2 files you won’t be able to process the DNG versions in DPP unless you chose to embed the original raw file data (since this will allow you to extract the raw originals). Personally I have no trouble converting everything I shoot to DNG and never bother to embed the original raw data. I do, however, sometimes keep backup copies of the original raw files as an extra insurance policy, but in practice I’ve never had cause to use these—at least not yet! When files are converted to DNG the conversion process aims to preserve all the proprietary MakerNote information that is contained in the raw original. If the data is there, external, DNG-compatible software should have no problem reading it. However, there are known instances where manufacturers have placed MakerNote data in odd places, such as alongside the embedded JPEG preview (which is discarded during the conversion process). Basically, the DNG format is designed to allow full compatibility between different products, but this in turn is dependent on proper implementation by third parties.
Updating DNG previews for third-party viewing
The DNG file format has been around for several years now and has been widely adopted as a preferred format for archiving raw camera files. One snag though is that the DNG created previews may not always be up-to-date. This is not necessarily a problem if you are using DNG in Bridge or Lightroom, since the previews can easily be rebuilt when transferring DNG files from one Lightroom/Bridge setup to another. However, it is less convenient when working with other DNG-aware programs such as Expression Media, where such programs are unable to rebuild a Camera Raw–generated preview. To get around this problem you can go to the Library module Metadata menu and choose “Update DNG Previews & Metadata.” This does two things: it updates the metadata the same way as the Save Metadata to Files command does, and it rebuilds the JPEG previews that are contained within the DNG files (see also the Appendix).
Importing files from a card
Over the next few pages I have shown how to import photos from a camera card using the Import dialog in the compact mode. Tip On a Macintosh, the Lightroom Preferences are located in the Lightroom menu (or you can use the , shortcut). On a PC, they are located in the Edit menu.
- Before you import any photos, go to the Lightroom menu (Mac) or Edit menu (PC) and choose Preferences… In the General section check the “Show Import dialog when a memory card is detected” option. When checked, Lightroom will automatically show the Import Photos dialog every time a memory card is detected.
 Importing image 1
- To start importing photos, insert a memory card into the computer so that it mounts on the Desktop. If the “Show Import dialog when a memory card is detected” option is unchecked, you will have to import the photos manually using one of the following manual methods: choose File ? Import Photos and Video…, click the Import… button in the Library module, or use the I (Mac) or I (PC) keyboard shortcut.
 Importing image 2
- If the Lightroom Preferences are configured as shown in Step 1, Lightroom will automatically open the Import Photos dialog. How the Import Photos dialog is displayed will depend on whether you last used the compact interface (shown above) or had checked the expand dialog button (circled) to reveal the full range of options in the expanded mode view (I used the compact interface here). In this example, the EOS_DIGITAL camera card appeared in the From section. In the workflow section you can choose to Copy as DNG, Copy, Move, or Add. For card imports the choice boils down to Copy as DNG or Copy. I nearly always select “Copy” here.
 Importing image 3
- The To section initially points to the computer user’s Pictures folder. This is a sensible default, but if you wish, you can select an alternative destination folder.
 Importing image 4
- For camera card imports you will want to import your images using folders segmented “By date” or “Into one folder.” There is a lot to be said for the “By date” option. All your files are imported and placed in dated folders a
nd this provides a neatly ordered way to manage your camera card imports. However, to make this work effectively you’ll need to tag the imported photos with at least one keyword; otherwise, you’ll experience difficulties later when tracking down specific photos. Importing photos into one folder (and naming the folder appropriately) will allow you to search for photos by the Folders panel name as well as by keywords.
 Importing image 5
- If you select the “Into one folder”option, then you will most likely want to check the “Into subfolder box” (as shown here) and type in a name for the subfolder you wish to create in the destination location. To keep things easy (and repeatable), I suggest that every time you import photos from a card you do so to a standard import folder. I usually name this “Imported photos.”
 Importing image 6
- If you already have a prepared IPTC metadata template, it is a good idea to select this now from the Metadata Preset menu list (circled).
 Importing image 7
- After you have configured all these settings it is a good idea to go to the Import Preset menu and save the import settings as a new preset for future use. When you are done just click on the Import button to commence the camera card import. Lightroom will import the files from the card to the Lightroom catalog. As the images are imported, the thumbnails will start to appear one by one in the Library module view. Meanwhile, the status indicator in the top-left corner will show the import progress. Often, there may be at least two processes taking place at once: the file import and the preview rendering. The progress bars give you a visual indication of how the import process is progressing. If more than one operation is taking place at a time, you will see the grouped status indicator (seen on the left). If you click the small arrow to the right, you can toggle the status indicator between each of the tasks in progress and the grouped indicator.
 Importing image 8Note
- When you choose Copy as DNG, the Lightroom DNG converter should report a problem if it is unable to convert a supported raw file. However, this does not guarantee that all file corruptions will be reported. Only those problems that the Lightroom/Adobe Camera Raw processor is able to detect will be highlighted.
- Normally, you should not encounter any problems when importing files from a camera card. But if you choose the Copy Photos as DNG option, you will be alerted to any corruptions in the files as they are imported. After you have successfully imported all the images to the computer, you can safely eject the camera card and prepare it for reuse. However, at this stage I usually prefer to completely delete all the files on the card before removing it from the computer. The reason I suggest doing this is because when you reinsert the card in the camera, you won’t be distracted by the fact that there are still images left on the card. For example, when I carry out studio shoots I find it helps to establish a routine in which the files are deleted immediately via the computer before ejecting. I find on a busy shoot it helps to avoid confusion if you clear the cards as soon as the files have been imported. Otherwise you may pick up a card, put it in the camera, and not be sure if this is one you have imported from already or not. This might cause you to wonder whether you have removed all the images. I would also advise you to always reformat the card using the camera formatting option before you start capturing further images. This is good housekeeping practice that can help reduce the risk of file corruption as new capture files are written to the card.
 Importing image 9
Source panel
You can use the Source panel to navigate and find the photos you wish to import. The Source panel view displays any found devices at the top under “Devices.” This includes camera cards, tethered cameras (where there are files on the camera card), and also things like smartphones. So, when you insert a camera card the card should automatically appear listed in the “Devices” section and selected as the source (see Figure 4). Normally, Lightroom will only let you import from one card device at a time. However, if your computer is able to see memory cards as separate drive volumes and they appear listed under “Files,” rather than “Devices,” then it can be possible to import files from several camera cards at once. You can check the “Eject after Import” option if you want the card to be ejected after all the photos have been imported—this saves you having to do so manually at the system level.  Figure 4: The Source panel in card import mode showing a card ready to import under found “Devices.” For all other types of imports where you wish to either Copy as DNG, Copy, Move, or Add a folder of images to the Lightroom catalog via an existing volume listed in the “Files” section, the volume headers in the Source panel can be expanded in order to locate the pictures you wish to import, just as you would in a regular file browser program (Figure 5). It is important to note here that Lightroom displays all connected and available directory volumes regardless of whether they may contain image files or not (the same is true for the Destination panel). When selecting files to import from the Source panel “Files” section you need to first click on a volume header to expand it to view the drive’s root level folders. From there you can click on the arrows to the left of each folder to expand the folder hierarchy and reveal the subfolder contents. Where you have folders nested several folders deep inside other folders you may find it helps if you double-click on a selected folder to reveal a more compact hierarchy, such as that shown in the Figure 6 view. If you compare this with Figure 5 you will notice how the same folder is selected in both views, but in the Figure 6 example only the folders belonging to that specific folder hierarchy are displayed and all other folders are hidden. If you double-click on a parent folder the Source panel folder hierarchy changes to reveal just those folders that belong to the parent folder’s parent directory and so on. This is known as a docked folder view. It is probably easier for you to go to the File menu, choose Import Photos and Video…, and navigate the Source panel to understand how docked navigation works. The docked method can at first appear confusing as the folders appear to dance around unexpectedly. Once you spend a little time familiarizing yourself with the double-click method of navigation, the shuffling about that you see happening won’t be so confusing.
  Figure 5: The Source panel with no card or other device found, showing the “Files” that can be selected for import.
  Figure 6: This shows the Source panel where double-clicking on the date folder listed in Figure 5 changes the folder list view to show a more compact hierarchy. Tip trong> When selecting folders to import from in the Source panel, they don’t all have to be on the same drive. It is possible to import from multiple folders that are on different drives. As you click on a folder listed in the Source panel, the photos that are contained in that folder will appear in the main content area and depending on whether the “Include Subfolders” option is checked or not, all subfolders will be included as well. It is possible to select multiple folders from the Source panel. You can do this by using the key to select a contiguous list of folders, or you can use the -click (Mac) or -click (PC) to make a discontiguous selection.
This article was last modified on July 20, 2021
This article was first published on May 14, 2012
Commenting is easier and faster when you're logged in!

Recommended for you

The Creative Commons and the Power of Open
If you’ve ever read Wikipedia or watched a TEDtalk video, you’ve benefited...

Organizing Illustrator Files With Layers
We’ve all done it. We’ve all been so involved in the creative process that we do...

Make an UnSplash in This Free Photo Community
Who says there’s no such thing as a free lunch anymore? Well, that’s...