Importing Photoshop Layers into GoLive


Many Web designers use Adobe Photoshop or ImageReady to compose their Web pages before committing them to HTML. This process can be time-consuming; each layer needs to be exported, named and cataloged individually into your Web directory before you even start piecing it back together. Doesn’t leave much time for you to goof off and surf the Web now does it? Fortunately, Adobe GoLive 5 has the ability to import your layered Photoshop files and ease the execution of your design (and gives you time to browse eBay’s site for that Betty Boop lunch box). In this article, we’ll look at how GoLive and Photoshop work together to turn your design ambitions into Web realities and still have time for life’s other diversions.
Floating Boxes
Before we get into the Photoshop file, we need to understand how GoLive keeps the layers separated and editable without resorting to image slicing or screen-sized files. The program uses what Adobe has named floating boxes to establish each imported layer of your Photoshop file as a unique element. Floating boxes are designated areas that allow you to position your image anywhere on your Web page while maintaining visual features such as transparency. GoLive also lets you animate your floating boxes, creating opportunities for interactivity within your site.
Behind the scenes, GoLive is using <div> tags to create the floating boxes. Within your HTML source code, <div> tags designate the physical size of the box, the visibility of the image, and the position on the page. Floating boxes use the x- and y-coordinates as well as a stacking order coordinate known as the z-index. This allows you to place images on top of each other while maintaining opacity and transparency. Sound like a layer in Photoshop?
Note: Floating boxes only work with 4.x browsers or better. If you view a page in an earlier browser, your floating boxes are ignored.
Importing Your Photoshop File
The first step is to create a Web design in Photoshop or ImageReady. This process works with any Photoshop-native PSD file that contains layers. For our example, we’ve created a simple, four-layer design that consists of a background image and three button images, as shown in Figure A. You can use as many layers as you want, but we’ll keep it simple for this example.
Figure A: Our layered Photoshop file is ready to be imported into GoLive.
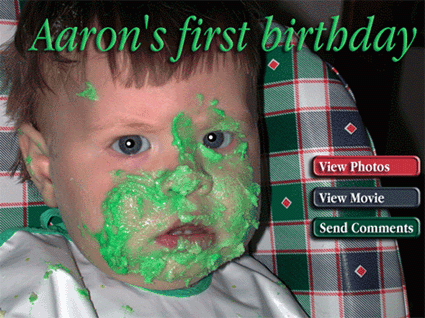
Once you’ve launched GoLive 5, you need to create a new page to import your layers. Our layers are imported on the page using the same coordinates that Photoshop used to place the images in the PSD file.
First, go to the File menu and select Import > Photoshop As HTML. GoLive prompts you to locate your PSD file, then asks you to select the folder where your images will be stored. It’s very important that you save your images to your Web directory where your Web server can find all of your images. If you’re creating a site to publish on the Web later, make sure you note where you’ve saved your imported images.
Once you’ve selected your image and destination folder, GoLive opens the Save For Web dialog box, shown in Figure B. This dialog box is also used in Photoshop, so it should look familiar. The dialog box contains numerous options for optimizing and saving images for the Web. It provides information on file size, download estimates, and file types, among other things. Notice that the large Preview window contains your lowest level layer of your PSD file–GoLive imports layers from the bottom up.
Note: You can ignore a layer simply by clicking Cancel in the Save For Web dialog box. GoLive skips it and opens the next layer.
Figure B: The Save For Web dialog box used in GoLive is the same one used in Photoshop 6.
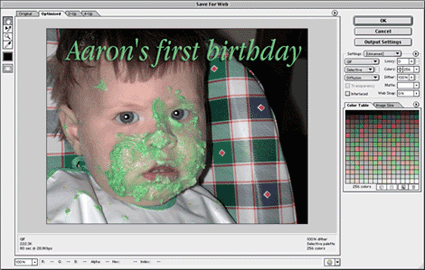
At this point, you can decide what type of image setting you want to apply so your images are best optimized for the Web. The first layer GoLive opened was our background image of the baby, which contained some rasterized text. The text could have been imported as a separate layer, but we knew that the background image and text would be static on our page so we combined them into one layer. Remember that you can use as many layers as you want, but keeping your PSD file organized helps keep your Web page organized.
This layer is perfect to import as a JPEG image, so we played around with the settings until we found a good image quality with an agreeable file size. The Save For Web dialog box is an excellent tool for optimizing your images since the Preview window displays how your images will look as you make setting changes. Once you’ve made your setting changes, click OK. GoLive saves the image to the chosen folder, places the image into a floating box and opens the next layer for optimization.
Note: GoLive names your floating boxes according to the names of your Photoshop layers. Adobe recommends that you don’t start your layer names with numbers, since some browsers have difficulty interpreting floating boxes with numeric names.
You can continue importing and optimizing the layers until you have all four images ready on the page. If you’d like to make adjustments to your boxes, GoLive offers a listing for your floating boxes. If it isn’t visible, open the Floating Boxes palette by choosing Window > Floating Boxes. As you can see in Figure C, our four layers are shown and each layer’s name has been transferred to the floating box. This makes it easy to find individual floating boxes for editing. The palette allows you to make a layer visible or invisible (by clicking on the Eye icon), or get really fancy-schmancy and animate some of your floating boxes using GoLive’s DHTML features.
Figure C: The Floating Boxes palette helps you keep organized and locate specific boxes quickly.
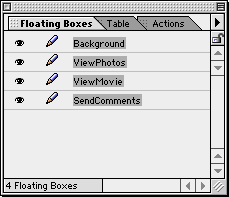
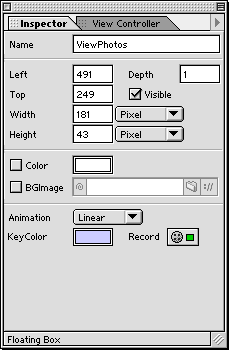
When you click on a floating box name, the corresponding image in your layout is highlighted and its information is displayed in the Inspector palette, as shown in Figure D. Hover your mouse pointer over the bottom of the image and it turns into a hand icon. This indicates that you can move the floating box around and even overlap floating boxes. Again, this process mirrors Photoshop’s layers workflow, but GoLive adjusts the code behind the scenes to make sure your alterations will display correctly in a browser. All that’s left is to save and publish your page to the Internet! Oh, and then surf a bit.
Figure D: Among other options, you can control the position and size of your floating box on the Inspector tab of the Floating Box palette.
Adding value to floating boxes
Of course, GoLive has plenty of features available for adding to floating boxes. Besides the visibility and animation features we spoke of earlier, floating boxes are the backbone to not only GoLive’s layering structure but also to its dynamic content abilities. The ability to create and control independent divisions of a Web page makes it easy to add JavaScript buttons to apply any number of interactive qualities.
For example, let’s change a static image into a JavaScript button and set it to display a simple alert message when clicked. First, in your Objects control panel, drag and drop a Rollover button on top of your pre-existing static image. While the floating box won’t change, the image is now referenced as a rollover. This allows you to add actions to the button.
Next, select your image on your Web page by clicking on it once. Open the Actions palette (Window > Actions) and click the New Action button . Select Mouse Click in the Events list box as the trigger, as shown in Figure E. Now click the Action button to view the actions available. Select Message > Open Alert Window. GoLive provides a dialog box for you to type your alert message.
Figure E: Click the New Action button to start a new event.

Save your work and preview your Web page in a browser. Now, when you click your button, an alert flashes on your screen to warn the viewer of the graphics nature of the photos, as shown in Figure F. This is a simple example, but the processes involved for adding other functionalities to your floating boxes are just as easy.
Figure F: Now our floating box button has an action applied that adds interactivity to our Web page.
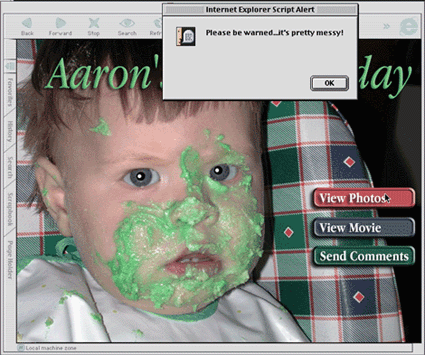
The final layer
Users of Photoshop will enjoy the familiarity and ease of getting their designs into Web format. We found our simple design imported very accurately, but our testing showed that GoLive ignored certain Photoshop 6 features such as shape layers. Overall, we found the process to be cooperative. As the gap between graphic artist and Web designer continues to close, GoLive’s ability to streamline the process of Web page development is sure to win them some fans.

Copyright © 2000, Element K Content LLC. All rights reserved. Reproduction in whole or in part in any form or medium without express written permission of Element K Content LLC is prohibited. Element K is a service mark of Element K LLC.
This article was last modified on July 20, 2021
This article was first published on August 21, 2001


