


Frame Resizing On the Double Click
You’ve placed an image into a selected Frame and decide afterwards that you’d like the Frame to Fit the whole image. Is there a quick way to accomplish this without applying any menu commands or dragging of bounding box points? If you’re using CS3 or later, you’re in luck.
Instead of dragging bounding box points, simply double-click on any corner bounding box point. The Frame will instantly resize to the image it contains.
If you double-click on a side center Bounding Box Point, the Frame will resize to fit the Image’s width leaving the height of the Frame untouched. If you double-click on a top or bottom center Bounding Box Point, the Frame will resize to fit the Image’s height leaving the width of the Frame untouched.
– Jeff Witchel
Make the Pasteboard Bigger
InDesign’s Pasteboard to the left and right of a page are plenty big enough to store design elements, but the default Pasteboard size above and below a page is just 1″ tall. To make the Pasteboard taller, go to the InDesign menu (PC: Edit) > Preferences > Guides & Pasteboard and increase the Minimum Vertical Offset in the Pasteboard Options section of the dialog window to any size up to 120″. Then click OK to apply.
– Jeff Witchel
Match Colors on Your Monitor and Your iPad
The iPad has a strange color gamut (range of colors). To get an approximate preview of iPad colors on your desktop, download Christian Albrecht’s ICC color profile for the iPad from https://bit.ly/xEI6nH.
Install this profile on your computer and then do the following in InDesign:
1. Be sure that Edit > Transparency Blend Space is set to Document RGB.
2. Be sure that Edit > Color Settings is set to North America General Purpose 2.
3. Choose View > Proof Setup > Custom.
4. Select iPad.icc for the “Device to Simulate” and check the Preserve RGB Numbers option.
5. Choose View > Proof Colors.
The colors on your monitor should now more closely match the colors on your iPad.
– Keith Gilbert
Tabbed Document Tips
By default in InDesign CS4, CS5, and CS5.5, documents open in a tabbed window format. If you don’t like the order of the tabs, you can click and drag the tabs to the right or left. You can also click on a tab and undock the document so it’s in a separate window by dragging it away from the tabs. Once undocked, you can click and drag the document by its title bar back up to the tabbed documents. When the tab section and the rest of the tabbed window is highlighted, release your mouse and the document will rejoin the tabbed window.
– Jeff Witchel
Printing a Booklet Made Easy
Printing out a brochure layout to create a client comp or a dummy was always an imposing task involving lots of cutting and pasting. In InDesign CS3 or later, however, there’s an easy way to print brochures in printers spreads on your desktop printer. Let’s say you designed an 8-page brochure that folds to 8.5″ x 11″. To output printers spreads, simply go to File > Print Booklet, and in the window that opens, use the Default settings and press Print. Your spreads will print out with page 8 next to page 1, page 2 next to 7, 6 next to 3, and 4 next to 5.
– Jeff Witchel
Panels Popping In and Out
You probably know that when your cursor isn’t in text, you can press the Tab key to make InDesign’s panels disappear and reappear. But with your panels hidden, you can also simply bring your cursor to the right or left edge of your Workspace and the panels will pop into view.
– Jeff Witchel
InDesign Templates for iPad Publications
When you’re creating an iPad publication, set InDesign’s measurement system to pixels and your “pages” (screens) to 1024 x 768. To download InDesign templates for iPad screens with these settings, as well as the correct transparency blend space and color, go to https://bit.ly/yiC79C.
– Keith Gilbert
Two Ways To Hide
In InDesign CS5, you can hide individual objects on the page by using the Layers panel or by pressing Cmd/Ctrl-3.
– from James Fritz
Use Custom Dictionaries for Spell Check
Sometimes you want InDesign’s spell check to go beyond the default dictionary. To add a list of custom words to the program’s dictionary, take the following steps:
1. Build a custom dictionary by choosing Preferences > Dictionary and clicking the New User Dictionary icon. Name and place the dictionary.
2. Create a text file with your list of words and save it as an unformatted .txt file.
3. Go to Edit > Spelling > Dictionary. Use the Target pop-up menu to choose the dictionary you created in step 1. Click the Import button and select the text file you saved in step 2. As long as the custom dictionary is chosen in the Preferences, InDesign won’t flag those words as misspelled.
– Sandee Cohen
Banish Form Alerts from PDFs
Once an interactive PDF contains more than 100 buttons, Acrobat displays a form helper banner even when there is no form. This is apt to confuse people viewing the PDF.
To prevent Acrobat from interpreting buttons as a form, choose File > Export, name the file, and choose Interactive PDF. In the Export to Interactive PDF dialog box, click the Security button. Check the option to “Use a password to restrict editing, printing and other tasks” and then input the password you want to control the setting. In the Changes Allowed menu, choose either “None” or “Inserting, deleting and rotating page.”
– Sandee Cohen
Control Leading
Here’s how to change InDesign’s default value for automatic leading: Close all open documents, then open Paragraph from the Type menu and choose Justification from the Paragraph palette menu. Reset the Auto Leading value (I like 100%) and click OK.
To change the default leading to a specific value, once again start with no documents open. Hit T to select the Type tool. In the Control bar, click the Character symbol at the far left to display the character-formatting options. In the Leading field, pick or type a value of your choice.
– James Felici
Hanging Punctuation
You can hang an opening quote mark using the Indent to Here character: Cmd+ (Ctrl+). This special character indents all subsequent lines in the paragraph to the point where you add the character, fixing the optical hole on the left edge of the text. It’s especially useful for pull quotes and callouts that begin with a quote mark.
– Nigel French
The Best Video Format
InDesign CS5 and 5.5 can handle many video formats: .mov, .avi, .mpeg, .flv, .f4v .mp4, and .m4v. But for optimum compatibility with the greatest assortment of viewing devices, I recommend the H.264-encoded video formats; that is, .mp4 and .m4v.
– Steve Werner
Get Smarter about Spot Colors
Are you working with spot colors? Turn on Overprint Preview (View > Overprint Preview) and keep it on so that what you see onscreen will be closer to what you get from your printer.
– David Blatner
Make “Cutting Corners” a Good Thing
Paper that has been cut into an unusual shape with a metal die is certainly an attention getter, but it’s also beyond many budgets. To achieve the effect without the cost, try a simple guillotine trim, which just slices off an edge of the page. In the example below by Design Ranch in Kansas City, MO, the upper right and lower left corners of a four-panel accordion were cut at angles.

– Trish Witkowski
More Elegant Alignment
Punctuation at the margin of a text frame can make the left or right sides of a column appear misaligned. Fix that by turning on InDesign’s Optical Margin Alignment: Select the story, choose Story from the Type menu, and check the Optical Margin Alignment box in the Story panel.
To turn off optical margin alignment for certain types of paragraphs (bullets and numbered lists, for example), choose the Ignore Optical Margin Alignment option in your Paragraph Style Options.
– Nigel French
Go Hollywood with InDesign
You can place a video file into an InDesign document in two ways:
1. Choose File > Place.
2. Click the Place a Video or Audio File button at the bottom of InDesign’s Media panel (Window > Interactive > Media).
Either way, it’s best to just click or drag the Place icon to create the media frame (rather than place it inside an existing frame) so the video doesn’t appear cropped.
– Steve Werner
Articles That Don’t Export
In InDesign CS 5.5, the new Articles Panel is a great new way to control the order of your content when exporting to ePub. But what if you have elements on your page that you want in the Articles panel, but don’t want to be included in the ePub? One option is to click on the “Create New Article” button at the bottom of the panel; give it a name; and then make sure to deselect the “Include Article” checkbox. Any elements that you add to this particular Article will effectively be ignored when exporting to ePub.
– Ron Bilodeau
Reveal Overset Text
You can see by the red plus sign on the right side of your text box that it contains overset text. To reveal the hidden text, type Command-Option-c/Control-Alt-c. The box will grow to just the right size.
– Michael Ninness
Banish Extra Rows When Converting Text to Tables
When you convert tabbed text to a table in InDesign, is there sometimes an extra row at the bottom of the table? If so, it’s because you selected the pilcrow (paragraph symbol) at the end of the line. To avoid that, simply don’t select the paragraph symbol at the end of the last line of type.
– Sandee Cohen
Preview Your Folio
After creating an interactive document with InDesign CS5.5’s Overlay Creator, test it before you download it onto your tablet. To test your open document, choose File > Folio Preview. Or, to preview the entire folio, click on the preview link at the bottom of the Folio Builder Panel after you selecting your folio.
– James Fritz
Create an Adhesive Tape Effect with Hard Light
One of my favorite transparency blending modes for creating realistic effects is Hard Light. It gives you a greater range of tones than you can get with Overlay or Soft Light, and it’s less prone to blowing out highlights or plugging shadows like Color Dodge and Color Burn will. One fun trick you can do with Hard Light is to simulate adhesive tape. Start with a rectangle in the shape of a strip of tape. Fill it with 20% black in the Swatches panel and set it to Hard Light in the Effects panel. You might need to reduce the opacity a bit, too. Now give it a very small drop shadow directly behind (with a Distance of zero or one) and voila: tape!
– Mike Rankin
Let InDesign’s Help Help You
Once you start looking, you’ll find InDesign’s subtle “help” prompts everywhere. For example, when you hover over the yellow Live Corner diamonds in the corners of a frame, InDesign displays a tool tip that reads, “Drag to set corner size. Opt-click to change shape. (Press Shift to change one corner.)” Similarly, hovering over the icons at the bottom of the Links panel displays all kinds of useful information, such as how many missing links, how many unique links, keyboard shortcuts, and more. Certain panels—such as the Data Merge panel, the Object States panel, and the Articles panel (the last one is new in InDesign CS5.5)—will under certain conditions offer helpful hints right on the face of the panel. The ultimate helper, of course, is the Tool Hints panel (Window > Utilities > Tool Hints).
– Keith Gilbert
Lines with Strokes
You’ve turned a line into an arrow using InDesign’s Strokes panel. But perhaps you can’t see the arrow clearly over a dark background, so you want to add a small white outline. Unfortunately, you can’t add two stroke colors to one object in InDesign. So cheat a little and add an Outer Glow effect instead! This creates the appearance of a dual stroke. You’ll probably want to set the blending mode to Normal and Opacity to 100%. To remove the fuzzy edge on the glow, change the Spread value to 100%.
– Cari Jansen
Use a Custom Dictionary
A custom dictionary is a great way to ensure consistent spelling of technical jargon for specific projects. To create a custom dictionary, choose Preferences > Dictionary, and click on the New User Dictionary icon. Give the dictionary a name, and store it anywhere you’d like. When you want to add a selected word to the custom dictionary, choose Edit > Spelling > Dictionary. Then, be sure to change the Target pop-up menu from the default “User Dictionary” to your custom user dictionary before adding your word. Be careful: If you add several words throughout a work session, and then InDesign crashes, you’ll lose all the words you’ve added in that session, even if you’ve been saving your InDesign file along the way. Curiously, InDesign doesn’t actually write the words you’ve added to the custom user dictionary file until you quit InDesign. So save and quit every so often!
– Keith Gilbert
Two Ways to Handle CSS
When exporting your InDesign composition to HTML for the Web (File > Export, then set Format to HTML), InDesign CS5.5 creates a list of CSS styles that appears in the Head section of the HTML file with style declarations (attributes). If the Include Style Definitions checkbox is selected in the Advanced area of the HTML Export dialog, InDesign will actually attempt to match the attributes of the InDesign text formatting with CSS equivalents! However, if this option is deselected, the HTML file includes empty declarations that can later be customized with a CSS editor like Dreamweaver CS5.5.
– Jerry Silverman
Scale Frame and Content to Specific Measurement Value
Say you have a frame that is five inches wide, and you want to scale it and the picture inside the frame down to three inches wide. You probably know you can change the width and height of any selected object to any specific value by entering the desired measurement into the Width and Height fields in the Control panel. However, that only changes the width and height of the selected frame, or the selected image within a frame-not both at the same time. If you use the Scale X and/or Scale Y fields in the Control panel, you do scale both the frame and its image simultaneously, but you have to do the math because the Scale X and Scale Y fields use percentages by default. Don’t want to do the math? You don’t have to. Simply enter “3 in” into the Scale X field.
– Michael Ninness
View a Story in Multiple Windows
InDesign lets you view one document in multiple windows. When working on a long, text-heavy document, it can difficult to judge the effect of text changes on pages that appear later in the document. For example, in a book or multiple-page article, you may want to adjust the text early in the story to shorten the story by a few lines. By viewing the document in two separate windows, you can adjust the text in one window and use a second window to see the effect your text changes are having at the end of the story. To get a second window, choose Window > Arrange > New Window.
– Jay Nelson
Add One Color Swatch from Another File
You can add colors from another file to the Swatches panel by choosing Load Swatches on the panel’s flyout menu. But what if you want to add just one color? Choose New Color Swatch. Under the Color Mode menu, choose Other Library, then select the file containing the colors you want to add. The colors from the file will show up as individual swatches that you can add one by one to your current file.
– Diane Burns
Kill the Stroke!
Did you just draw a rectangle and end up with a stroke on it that you didn’t want? You can quickly change the fill and stroke attributes of any selected frame by pressing the following keys: Press the X key to toggle between the Stroke and Fill attributes. Press Shift-X and the fill color and stroke color will swap places. The comma key (,) applies the default color to the fill/stroke; the period key (.) applies the default gradient to the fill/ stroke; and the forward slash key (/) sets the current fill/stroke to None. These shortcuts work in Illustrator, as well.
– Michael Ninness
The Spelling Menu
Sometimes you know a word is misspelled, but you’re not sure how to spell it correctly. With Dynamic Spelling enabled (Preferences > Spelling > Enable Dynamic Spelling), you can right-click on a flagged word to choose from a contextual menu of suggested corrections.
– Mike Rankin
Align Left Edge of Drop Caps
Often, when you create a drop cap in InDesign, the left edge of the character is not perfectly aligned with the left edge of the text frame. Some folks still use this old and painful trick: Insert a white space character in front of the drop cap and then manually add negative kerning to it. Ick! Instead, simply choose the Align Left Edge option in the Drop Caps and Nested Styles section in Paragraph Style Options. (Note: This is now enabled by default in CS5.)
– Michael Ninness
I Need My Space(bar)
Did you know that you can reposition an object while you’re drawing out a frame? As you draw out the frame, don’t release the mouse button. Instead, hold down the spacebar and drag the object to a new position. Then release the spacebar and finish drawing the object.
– Claudia McCue
The Incredible Growing Text “Frame”
Need a text frame that grows or shrinks depending on the amount of text it contains? Try a one-cell table. You can turn off the strokes, add a fill, and text inset. As long as the row height is set to At least (the default), the cell will change height according to the amount of text within.
– Diane Burns
Color-Coded Highlighting
Just about everyone has opened a document or placed copy only to see the text highlighted in a color. Here’s what those highlight colors are telling you:
Pink: Missing font.
Yellow: Hyphenation and Justification (H&J) settings have been violated.
Amber (dangerously close to yellow): One or more alternate glyphs have been substituted for one or more glyphs in a font’s standard set.
Green: Someone has applied manual kerning or tracking.
You’ll always want to fix the missing font problem. But the other three colors don’t necessarily mean anything is wrong; InDesign is simply alerting you to a change.
Track Down Obscure Glyphs
Uncommon glyphs come in three categories:
1. Characters you can enter using a keyboard, but only after a lengthy search for the proper key combination; for example, the pilcrow (Option/Alt-7) and the twisted sign of infinity (Option/Alt-5).
2. Characters that show up only in particular symbol or pi fonts. You can still type these on a keyboard, though it’s often faster to open InDesign’s Glyphs panel (Type > Glyphs), scroll through the list, and double-click the one you want.
3. The third type of glyph is beyond the realm of the keyboard; for example, the interpunct or the sound recording copyright. For a detailed how-to on inserting these characters, see my article “Tracking Obscure Glyphs” in the April/May 2011 issue of InDesign Magazine.
– David Blatner
Turn Letters Into Neon Strips
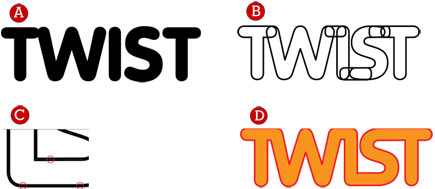
You can combine multiple letters into one continuous shape that looks like neon–without leaving InDesign! Start with a heavy, monoweight typeface, such as VAG Rounded Bold (A). Convert the text to outlines (Type > Create Outlines). For the T and W, overlapping the letter shapes is sufficient, but for the other letter combinations you’ll need connectors (derived from a rotated I). Overlap them as necessary to bridge the gaps (B). Tweak their shapes with the Direct Selection tool to ensure smooth joins, then combine the letters into one shape (Object > Pathfinder). The combined result shows several unnecessary anchor points, which you must remove with the Delete Anchor Point tool (C). Finally, apply fill and stroke colors (D).
Turn Around Apostrophes
When Use Typographer’s Quotes (Preferences > Type) is on, InDesign automatically converts straight or “dumb” quotes into curly or “smart” quotes during text entry. That’s usually desirable; however, this automatic conversion can produce unwanted results. For example, the presence of a space before abbreviated years like ’11 for 2011 incorrectly produces an opening single quotation mark. To produce the correct apostrophe in this situation, press Option/Alt-Shift-].
– Yves Peters
Drag-and-Drop Anchored Objects
Anchored objects are not new; InDesign users have long been able to place graphics and text frames into the flow by anchoring them to specific places in running text. But in InDesign CS5.5, instead of a clunky cut-and-paste operation, you can simply grab a little blue box in the upper right hand corner of your desired object, and drag the resulting insertion point indicator to where you want to anchor the object. Want to reposition your anchor point? No more scouring the Story Editor for that anchor icon! Drag the blue anchor box again, setting the insertion point at your new desired location.
– Colleen Wheeler
Turn on Track Changes
InDesign CS5 and 5.5 can track text changes, a handy feature when you’re collaborating on a document or reviewing one another’s work. Each team member should select a unique user name and tracking color (File > User), then enable tracking by going to Type > Track Changes.
– Pariah Burke
Move the Top Rule on a Table Cell
Unlike ordinary strokes that can be aligned on the outside, center, or inside of an object, table strokes can only straddle the boundaries of the cells. So what do you do when you want to move the top rule on a table cell down a bit? Instead of repositioning the rule, you can add another rule to the cell with the fill. Select only the top rule that needs to be evened out. You can add a rule just to the top of this cell by deselecting the proxy rules in the cell rule control box. (This box is visible only when cells are selected.) Click the lines in the proxy rule box so that only the top line is blue. That means that whatever formatting you create will be applied only to the top of the cell. Create a rule with the formatting as the top cell for the adjacent cell and the top of the two cells will be even.
– Sandee Cohen
Carve Shapes Out of Letters with Pathfinder’s Subtract Option

In the image above, I’ve subtracted a shape relevant to the word from the counter of one of the letters. To do this yourself, enter the word “CATS” and convert it to outlines (Type > Create Outlines). With the type selected, go to Object > Paths > Release Compound Path. Place a vector outline of a cat over the C, select both, and choose Object > Pathfinder > Subtract.
– Nigel French
Interlock Letters with the Pathfinder’s Intersect Option

In the image above, I’ve created the illusion of interlocking letters to give the design greater depth. To do this yourself, enter text and convert it to outlines, then copy the text frame and Paste it in Place. (It helps to put the copy on a separate layer and lock the layer beneath.) With the type (now frames) selected, go to Object > Pathfinder and choose the Intersect option. That leaves just the overlapping pieces, which you can recolor to give the illusion that the letterforms are interlocking.
– Nigel French
When to Use Presentation Mode
InDesign CS5’s Presentation Mode (View > Screen Mode > Presentation) sounds like a natural fit for PowerPoint-style presentations, but it’s not because any interactivity you’ve built into your layout (buttons, animations, transitions, etc.) won’t work. Presentation Mode is better suited for a quick review of your layout as someone looks over your shoulder.
– James Fritz
Create an Animation along a Path
Are you tired of the canned animations in InDesign CS5’s Animation panel? If so, create your own. Using the pencil or pen tool, draw a path that you would like to have an object animate along. Next, select the path and the object that you want animate and go to the Object menu > Interactive > Convert to Motion Path. Now your object will move along this path. To reverse the direction of the path, click to select the path and go to the Object menu > Paths > Reverse Path.
– James Fritz
Craft Cool Drop Caps
To create a drop cap in InDesign, insert your Type cursor into the paragraph where you want the large initial letter, type the number of lines for the drop cap in the Control panel, then specify the number of drop cap characters you want—usually one. To refine the look of the drop cap, choose Drop Caps and Nested Styles from the Control panel menu (or Option/Alt-click on either of the drop cap icons in the Control panel).
– Nigel French
Edit Without Ungrouping
To edit one object in a bunch of objects that are grouped together, double-click to drill down in the group until you isolate just the item you want to edit. If you press the Escape key, you can back out one step at a time, or deselect to leave the group completely.
– James Fritz
Lock It Away with CS5
When you want to prevent yourself from editing an object on the page, lock it by pressing Cmd/Ctrl+L. To unlock just the object, click the lock icon at the edge of its frame. To unlock everything on the spread, press Cmd+Opt+L (Ctrl+Alt+L). Another way to lock objects is to use InDesign’s Layers panel to individually lock any item on the page.
– James Fritz
Hit the Tab Key, Hide the Panels
IPress the Tab key (when you’re not typing or editing text with the Type tool) to hide all the panels on your screen. Hit the Tab key again to restore the panels. If you’ve chosen Preferences > Interface > Auto-Show Hidden Panels and you have some panels docked on the side of your screen, hovering the mouse over the edge of the screen will temporarily show the docked panels until you move the mouse away from the panels.
– Keith Gilbert
Who Needs the Align Panel?
Instead of using the distribution options in the Align panel, use InDesign CS5’s Live Distribute. With multiple objects selected, click and drag the resize handles. As you drag, hold the space bar and the space in-between the objects will change instead of the objects themselves.
– James Fritz
Put Your Files on a Diet
For the slimmest possible InDesign files, follow these rules:
1. Don’t copy and paste content from Photoshop or a web browser.
2. Don’t place images right out of a digital camera into InDesign.
3. Don’t leave extra items floating around (stuff on pasteboards, extra master pages or styles, and so on).
4. Do go to File > Save As to create a duplicate of your document.
5. Do resize images and set their resolution in Photoshop, not InDesign.
6. Do export as IDML or INX to clear out corruption and unneeded gunk.
– David Blatner and Mike Rankin
Stroll Through Multiple Tabbed Documents
When you have multiple tabbed InDesign documents in a window, press Command/Control and the ~ (tilde) key to view the document the right of the one you’re viewing. Press Command/Control-Shift-~ to see the document to the left of the one you’re viewing.
– Mike Rankin
Control Guides Quickly
Here are three quick ways to control InDesign’s Guides:
1. Step and Repeat. Select a guide and choose Edit > Step and Repeat, as you would with any object in the page.
2. Distribute. Select three or more guides and use the Distribute controls in the Align panel (Window > Object & Layout > Align). This is a great way to get equal spacing between them.
3. Change color. Select guides with the Selection tool, then choose Layout > Ruler Guides and pick from the absurdly long list of colors (including Lipstick and Cute Teal).
– Claudia McCue
Spot On
To create a new spot color swatch, Command-Option/Ctrl-Alt click the New Swatch button on the Swatches panel.
– Mike Rankin
Don’t Read Ancient Greek
Is there any point in greeking text nowadays? Wouldn’t you rather see the real letter shapes of your type? Unless you’re still working on the same computer you had in 1999 when InDesign debuted, you probably won’t notice any dip in performance if you turn off greeking altogether. Go to Preferences > Display Performance, and set Greek Type Below to zero for all view settings (Fast, Typical, and High Quality).
– Mike Rankin
Copy into a Fresh Frame
You can duplicate a placed graphic into a new frame just by selecting the graphic and option/alt dragging beyond the current frame. The new frame will have the same properties as if you drew it with the Rectangle Frame tool (no stroke or fill, Fitting of None, and zero for all crops).
– Mike Rankin
Spring-Loaded Tools to the Rescue
InDesign tries very hard to help you align objects when you drag by snapping them Do you dislike the Frame Edge Highlighting that appears when you mouse over frames in CS5? Spring-loaded tools can help. Frame edge highlighting only appears when you use one of the selection tools. With spring-loaded tools, you can press and hold single keys to temporarily switch to any other tool. As long as you hold the key for more than a second, you’ll switch back to your previous tool when you release the key. You have plenty of choices (t, , p, f, m, n, c, e, g, z, etc). Holding the spacebar also prevents the highlighting from appearing, and it’s a nice big place for your fingers to rest. Heck, you don’t even have to pay much attention to where you press–just rest your hand in the middle of the keyboard and lift it up when you want to select something. But don’t hold v or a, which are the shortcuts for the selection tools.
– Mike Rankin
Unsnap To It (Mac only)
InDesign tries very hard to help you align objects when you drag by snapping them into alignment with other objects, margins, and columns. Usually this is great, but it can become a, uh, drag, when there are a lot of items nearby and you literally can’t put something where you want it. To temporarily turn off the snap, press and hold the Control key as you drag.
– Mike Rankin
Open Files Quickly
Want to get to the Open a File dialog box quickly? If no documents are open, just double-click the application frame. (Mac users must have the application frame active.) This tip works in CS4 and CS5. [Editor’s note: There are a few system configurations in which this tip doesn’t work.]
– Bob Levine
You Don’t Need the Chain to Constrain Proportions
To force InDesign to constrain proportions when applying width, height, or scale values in the Control panel, press Ctrl+Enter/Command+Enter. This way, you can leave both chains “broken” and only constrain proportions when you mean to via the keyboard shortcut.
– Mike Rankin
Toggle Between Text and Cell in a Table
To toggle between selecting a cell and the text within that cell, click with the Type tool anywhere in the cell. Then hit the Escape key: Now the cell itself is selected. Hit the Escape key again, and the text is selected. You can keep hitting Escape, but you’ll never escape…
– Claudia McCue
Quick Color Swatch
If you’re creating a new paragraph style and you realize you don’t have the color you need in your swatches panel, just double click the color proxy to bring up the new color swatch dialog box.
– Bob Levine
Change Ruler Guide Orientations
Illustrator and Photoshop users have long had the ability to change the orientation of a ruler guide by pressing Alt/Option while dragging the guide from the ruler. With CS5, InDesign users can do the same. Note that in CS4 and earlier, pressing Alt/Option sets the current magnification as the view threshold for that guide and new ruler guides.
– Mike Rankin
Two Shadows Per Frame
If you place vector art or a silhouetted image in a frame, you can apply two shadows to the frame; one for the frame, and one for the graphic inside. Select the frame with the Selection tool, and apply the first shadow. Switch to the Direct Selection tool (or if you have CS5, use the new Image Grabber) and select the graphic itself, and apply the second shadow.
Note: Be sure the frame is large enough to reveal the entire shadow cast by the graphic inside; if not, the shadow will be cropped by the frame.
– Claudia McCue
Changing Presentation Mode Background Color
InDesign CS5 offers a new presentation mode (Shift-W) that is great for making quickie presentations. Your document is displayed full screen with a black background by default, but you can change the background color to gray by pressing “g” or to white by pressing “w”.
– Diane Burns
Export Images from Word Files
Did you know that Word’s DOCX file format is a glorified ZIP file? Change the extension to ZIP, unzip it, and you’ll find all of the document’s original assets, including the images as individual files in a folder. More importantly, InDesign can access the original high-resolution images when you place a DOCX file, even if they’re CMYK. The older DOC format converts all images to RGB PNG files.
– Bob Levine
Shift A Swatch
Do you like an existing swatch but want a lighter or darker version of it? As you’re creating or modifying the color in the Colors panel, just Shift-drag one of the sliders, and all of them will move together. (This works in Illustrator, too.)
– Claudia McCue
Scroll Through Your Fonts
Need to try out different typefaces on existing text? Select the text you want to change, insert your cursor in the font field of the Character panel, then use the Up and Down arrows to scroll through fonts, changing the selected type as you go.
– Erica Gamet
Have a Fit
To zoom into currently selected object(s), press Command-Option-(+)/Ctrl-Alt-(+) [plus sign]. This command also works when you’re editing text, but in that mode it may zoom in too close for comfort. Also, Mac users may notice that the shortcut conflicts with the Universal Access System Preference for screen zoom.
-Mike Rankin
Convert Corner Effects
You can convert any object that has Corner Effects applied to it to actual Bezier lines and points by choosing Object > Paths > Closed Path for a closed object, or Object > Paths > Open Path for an open path.
– Cari Jansen
Instapages
A super-fast way to create new pages directly after the currently selected (as opposed to targeted) page is to press Shift+Ctrl+P/Shift+Command+P. The new page will be based on the same master as the selected page. This shortcut also works to add pages to a master spread.
– Mike Rankin
OOPS! I HAD THE CAPS LOCK KEY ON
Inspired, you’re blindly typing your compelling copy at incredible speed. But you look up to realize that — doh! –the Caps Lock key has been on for quite some time.
That’s OK: InDesign offers a quick fix. Select the text, choose Type > Change Case, and select the correct approach from the submenu that appears. You can pick from UPPERCASE, lowercase, Title Case, and Sentence case.
– Claudia McCue
Snap Guides to Tick Marks
You like pulling guides out on to your pages, but you don’t like placing them at positions such as 10.256 cm? You can snap a guide to the nearest tick mark — and therefore to more normal values — if you hold down the Shift key while you’re dragging it.
– David Blatner
Secrets of the Application Frame
If you double-click on the background area of the Application Frame when no files are open, you’ll get the Open Document dialog box. This works in both InDesign CS4 and CS5.
– Sandee Cohen
Nail Down That Text Wrap!
It can be very quick and easy to base a text wrap on the edges of a placed graphic. But one downside of this method is that when someone edits the graphic, even just tweaking the color a little, your text wrap may unexpectedly change. To prevent this, select one of the text wrap points with the Direct Selection tool and nudge it just a tiny bit. Your text wrap won’t change, but the Contour Options Type in the Text Wrap panel will now be User-Modified Path, and it will not change if someone changes the graphic.
– Mike Rankin
Select All Guides
Don’t drive yourself crazy by trying to Shift-click on all the rulers in a document to select them and move or delete them. Instead, use this handy shortcut: Command-Option-G/Ctrl-Alt-G to select all guides. You can always Shift-click on the few you don’t need before moving or deleting.
– Erica Gamet
Apply Colors Quickly
To apply a color quickly, drag a swatch onto a frame, stroke, or table cell. This is also the easiest way to colorize a grayscale TIFF or PSD image.
– Claudia McCue
Keep Tabs on Preflight Errors
Look in the lower-left corner of InDesign’s document window to see whether you have any preflight errors. If the error number starts creeping up, go to the Preflight panel for more information.
Dynamic Rotation Cursor
In InDesign CS5, you can forever eliminate trips to the Tools panel to choose the Rotate tool. Hover just beyond any object’s corner with the Selection tool, and the cursor switches to a rotate icon. If you’ve selected multiple objects, they all rotate together — no need to group them.
– Michael Murphy
Bring Hidden Characters to Light
Hidden characters (also called invisibles) indicate the presence of non-printing characters, such as spaces, tabs, and paragraph returns. Most of the time, you don’t need to see these, but when you do, Choose Type > Show Hidden Characters. The characters will be in the same color as layer they’re on. When that’s light yellow, for example, the hidden characters may be hard to see even after you choose Show Hidden Characters. In that case, just change the color of layer in the Layers panel.
No More All-Caps in Panel Names
When text is in all-caps, it can be difficult to read. Why then are the names of InDesign’s panels in all caps? To change that, create a new, empty folder and name it “noallcaps”. Place that folder in the InDesign application folder. The next time you restart InDesign, all panel names will be the more-pleasing upper/lowercase!
– Colin Fleming
Add Tabs to Table Cells
To jump from cell to cell in an InDesign table, just press the Tab key. Handy, right? But to insert an actual tab character in a cell, you’ll have to go to Type > Insert Special Character > Other > Tab.
Control Layer Guides
Ruler guides are layer-specific: When you create them (Layout > Ruler Guides), they appear on whatever layer is selected at the time. To hide, show, or lock ruler guides by layer, go to the Layers panel and double-click a layer. The Layer Options dialog pops up, and now you can turn the relevant options on and off.
– Terri Stone
Paste Remembers Layers
When you want objects to stay on their original layers as you cut and paste them, check Paste Remembers Layers in the Layers panel drop-down menu. This even works for cutting and pasting between different documents.
– Terri Stone
Find Out Who Changed What
In InDesign CS5, you can track text changes in the current story or all stories in a document. You can make edits and insert notes either in the layout or Story Editor, but you’ll see changes highlighted only in Story Editor. And you must be viewing your text in Story Editor to accept or reject changes, using the new Track Changes panel.
– Claudia McCue
Mac Users, Explore the Application Frame
In CS4 on Mac OS X, Adobe introduced the Application Frame. It’s turned off by default, but if you choose Window > Application Frame, you’ll see a change on your screen. The InDesign user interface, plus whatever document(s) you’re working on, will be entirely contained in a single large self-contained window. If you grab the gray bar at the top of the window, all the bits and pieces of InDesign (except for floating panels) move with the Window. The gray backdrop hides the clutter of your desktop, it keeps panels out of the way of your document, and tiled-window layouts automatically adjust as you resize or move the window.
– Keith Gilbert
Make Your Own Accented Character
When a typeface is missing an accented letter, you’re not out of luck–you can make it yourself, as long as individual parts (the character and the floating accent, also called diacritical marks) are available in the font. Check the Glyph panel (Window > Type & Tables > Glyphs) for the accent, then type the character and then type the accent. Use baseline shift to raise or lower the accent to the desired position, and use extreme reverse kerning to center the accent over the character.
– Ilene Strizver
Convert Word’s Local Formatting to InDesign’s Character Styles
To quickly convert Microsoft Word’s local formatting to InDesign’s character styles, try these free and easy-to-use scripts: Preserve Local Formatting.jsx is by Dave Saunders and works for InDesign CS1, CS2, and CS3. PrepText.zip is by Jongware, and works with CS4 only. Both scripts can run through text and replace locally formatted bolds and italics, among others, with equivalent character styles. The scripts add the styles to the Character Styles palettes on its own — no need to create them yourself.
For links to the scripts and more information, see my article Easy Fixes for Microsoft Word Formatting in InDesign.”
— Anne-Marie Concepción
Import Options Are Important
When you place anything into an Adobe InDesign document (File > Place), you’ll get a whole new level of control if you click the Show Import Options checkbox in the lower left-hand corner of the Place dialog box before hitting the Open button. These Import options include Microsoft Word text and graphics; images (layered .psd files, .ai files, etc.), and PDFs.
Modified Gate Fold with Short Panels
Has InDesign CS5’s support of multiple page sizes piqued your interest in documents that go beyond the usual? Then check out Trish Witkowski’s video demonstration of a modified gate fold with short panels at https://www.foldfactory.com/fotw_archive.php#. It’s her April 7, 2010, “Super-Cool Fold of the Week”. And of course, while CS5 makes it easier to work with multiple page sizes, you can use any version of the program to design such a piece.
Meet the Content Grabber
In the past, you had to do the Texas two-step to select a graphic in an InDesign frame: Double-click to get the Direct Selection tool, click again to select the image, double-click again for the Selection tool. Rinse and repeat as necessary. In InDesign CS5, you just hover over a graphic frame with the Selection tool and a viewfinderlike icon appears. (I call it the Donut.) Click, and–poof–you’ve selected the graphic, without even changing tools. To leave this mode and return to dealing with the frame, press Escape or double-click.
– Claudia McCue
Clean Up Imported Word Documents
If you’ve imported a Microsoft Word document that’s riddled with problems (for example, two hyphens instead of an em dash, or tabs instead of paragraph indents), don’t repair your file line by line. Instead, use Edit > Find/Change and correct the problems with a single mouse click. In the Find/Change dialog box, on the Text tab, first define the scope of your search with the Search dropdown menu. Then use these Find What/Change To pairs to solve common problems:
Replace two hyphens with an em dash.
Find what: —
Change to: ^_
Multiple spaces after punctuation or used for indent.
Find what: [space][space]
Change to: [space]
Replace multiple tabs with a single tab.
Find what: ^t^t
Change to: ^t
Replace three periods with an ellipses.
Find what:…
Change to: ^e
Space before a carriage return.
Find what: [space]^p
Change to: ^p
Space at beginning of paragraph.
Find what: ^p[space]
Change to: ^p
Tab before a carriage return.
Find what: ^t^p
Change to: ^p
Tab after a carriage return.
Find what: ^p^t
Change to: ^p
– Pariah Burke
Next-Level Keyboard Shortcuts
You likely know and use the keyboard shortcuts for cut (Command/Control-X), copy (Command/Control-C), and paste (Command/Control-V). But what about these less-common keyboard combinations?
Mac
———————–
Paste Into: Command-Option-V
Paste in Place: Command-Option-Shift-V
Paste without Formatting: Command-Shift-V
Windows
———————–
Paste Into: Control-Alt-V
Paste in Place: Control-Alt-Shift-V
Paste without Formatting: Control-Shift-V
Convert Spot Colors to Process Colors
To convert a spot color to process, double-click the name of the swatch in the Swatches panel and change the Color Type from Spot to Process. If you used the Pantone color library to define the color, first change the Color Mode to CMYK. You can also specify that all spot colors are automatically converted to process when the job prints. Choose Ink Manager from the Swatches panel menu. You’ll see all the colors in your document. Click the All Spots to Process option and the spot color will be converted to process.
– Sandee Cohen
Banish Ugly Hyperlink Rectangles
To disable the Visible Rectangle option for multiple hyperlinks all at once, select them in the Hyperlinks panel, then go to Hyperlink Options in the panel’s drop-down menu and set Appearance to Invisible Rectangle.
– David Blatner
What To Include When Exporting Interactive InDesign Files to PDF
In InDesign, choose File > Export Adobe PDF to open the Export Adobe PDF dialog. If you have included bookmarks, that item must be checked in the Include section at the bottom. For buttons, transitions, and hyperlinks to appear in the PDF file, check Hyperlinks and Interactive Elements. If you’ve placed a movie or sound file, you’ll get the best results if you choose the Compatibility to be Acrobat 6 or higher.
– Steve Werner
Sync Files Across Multiple Computers
To ensure that everyone working on a project always has the latest versions of all of its related files, try a service like Dropbox or Windows Live Sync. They’re platform agnostic and can synchronize files across many computers, ensuring that you, the client, and anyone else involved all have the exact same files, updated in near-real-time.
– Pariah Burke
Enlarge Characters in the Glyphs Panel
InDesign’s Glyphs panel (Window > Type & Tables > Glyphs) reveals all the characters in a font. If you’re having trouble seeing exactly what those characters look like, make the glyphs larger by clicking the mountain button in the lower right corner. You can also filter the display by choosing options from the Show menu.
– David Blatner
Quickly Escape Quick Apply
You open the Quick Apply window and begin typing, then change your mind. A menu command is currently highlighted in the Quick Apply window. The fastest way to close the Quick Apply window without triggering the selected menu command is to press the Esc key.
– Mike Rankin
Create a Snippet with Multiple Objects
To create one snippet that contains several objects on a page, select the objects and drag and drop them to the desktop. You can also choose File > Export, then choose InDesign Snippet from the Format menu in the Export dialog box.
– Mike Rankin
Put Automatic Page Numbers on Top
To ensure that a text frame that contains an automatic page number always appears in front of document page elements, simply place the text frame on a master page and move it to its own top-most layer.
– Mike Rankin
Horizontal Pages Panel
By default, InDesign’s Pages panel has a vertical orientation. If you’d prefer your Pages panel to be horizontal, choose Panel Options… from the Pages panel menu. In the Panel Options dialog box, you’ll see a checkbox labeled “Show Vertically.” Deselect the option for the pages and/or the masters.
– Sandee Cohen
Hyphenate Words Your Way
To tell InDesign exactly where to hyphenate a word, open InDesign and go to Edit > Spelling > Dictionary. Do this with no document open to set the default for all new documents. Type the word in the Word field and then click Hyphenate. The tilde (~) characters indicate how InDesign will hyphenate the word. To change those settings, retype the word in the Word field using tildes as follows:
• One tilde (~) indicates the most desirable hyphenation position.
• Two tildes (~~) indicate a slightly less desirable hyphenation position.
• Three tildes (~~~) mark the least desirable hyphenation position.
• A tilde inserted before the word tells InDesign never to hyphenate the word at all.
Finally, click the Add Button to change the word to your customized setting.
– Sandee Cohen
No Kerning Pairs? No Problem
In many typefaces, there are no kern pairs for the number characters, and these characters occupy equal widths — a narrow number like a 1 uses the same amount of space as a 9 or 0. This is great for making numbers line up perfectly in columns down a page, but it can look awful when numbers are in body text. To make the numbers as beautifully spaced as the rest of the characters, place your cursor between the characters you want to kern and select Optical in the Character panel’s Kerning menu. By the way, InDesign has had the Optical kerning option since version 1!
– Jeff Witchel
Change One Corner of a Rounded Rectangle to a Point
Once you’ve applied rounded corners to a rectangle, you can change one or more curves to a corner point. Select the path you want to expand, and then click either the Open Path or Close Path icon in the Pathfinder panel (Window > Object and Layout > Pathfinder). Either one converts the electronic corner effect into actual path points. Choose Open Path if you’re converting an open path (like a Bezier line), or Close Path if you’re converting a shape (like a rectangle).
– Sandee Cohen
Change the Default Font
To change InDesign’s default font, open InDesign but don’t open any documents. On the Character panel, change the Font Family and Font Style dropdowns to your preferred default. Edit the “[Basic Paragraph]” style on the Paragraph Styles panel to match your new font. Quit or restart InDesign. From now on, every new document you create will use your chosen font. Note: You will lose this Basic Paragraph Style custom formatting if you copy-and-paste a paragraph into another document. If you’re sure all your documents will be created with this custom Basic Paragraph style, it’s probably okay. If not, create a new paragraph style and click on it while no documents are open. That, then, becomes your default paragraph style instead of the undependable Basic style.
– Pariah Burke
Find Out if an Image Is Flipped
In the past, editors and fact checkers couldn’t tell for sure if an image was flipped after it was placed in InDesign. But in CS3 and CS4, you can find out the truth by clicking on the image with either selection tool. If the image was flipped in InDesign, you’ll see a reverse “P” symbol in the Control panel. But beware! If the image was flipped in Photoshop, saved, and then placed in InDesign, there’s no trail of evidence left behind.
– Keith Gilbert
Optical Alignment Makes You Look Good
By default, InDesign vertically aligns type in a text frame by moving the character as far left or right as it can go. Unfortunately, smaller characters (such as punctuation marks) and characters with slanted strokes (such as A, W, and V) can look indented instead of flush to the edge. You can solve this problem by selecting the text frame, opening the Story panel (Type > Story), and checking the panel’s Optical Margin Alignment box.
– Jeff Witchel
Is an Image Stretched?
To find out if an image in your InDesign layout has been stretched, click on it with the Direct Selection tool (the white arrow). Only then will the Control panel’s Scale fields reveal the truth. To return the image to its original proportions, enter equal values in the X (width) and Y (height) scale fields.
– Keith Gilbert
InDesign Peers Helping Peers
The free LassoSoft InDesign email list is a good source of peer help. Once you sign up at ListSearch.com/InDesign/, you can email your questions to the list; all of the subscribers will see your question and can choose to respond. You can also search an archive of previous conversations at www.listsearch.com/InDesign/Browse/index.lasso. To get the most accurate answers, provide clear, concise information, including platform, operating system, and the exact version and build of InDesign (e.g., InDesign CS3 5.0.4) installed on your computer. To find this information, Ctrl-/Cmdclick About InDesign under the Help menu (Windows) or the InDesign menu (Mac).
– Bob Levine
Displaying Multiple Documents
By default, InDesign CS4 displays multiple documents as tabs. To change that, go to the Arrange Documents pop-up menu in the Application Bar and select Float All in Windows. (You can also choose Window > Arrange > Float All Windows.)
— Renée Dustman
Easy Calendar Layout
Building calendars in InDesign can be an exercise in pain, but Scott Selberg’s Calendar Wizard can help — and it’s free! This script takes the date ranges you provide and builds monthly calendars while you sit back and watch. It lets you start weeks on Sunday or Monday, supports styles, can include holidays and Moon phases, can add an image layer, and more. You can customize calendar layouts after the script runs, too. Download version 3 at https://calendarwizard.sourceforge.net. For a tutorial on using an earlier version of the script, see David Blatner’s article in the December 2007/January 2008 (#21) issue of InDesign Magazine.
– Jeff Gamet
When Saving Copies, Control Which File Stays Open
In InDesign CS3 and CS4, the keyboard shortcut Command+Option+S/Control+Alt+S saves a copy of your document and leaves the old document open. If you want to save a copy of your document and leave the copy open, use Command+Shift+S/Control+ Shift+S.
– George Norman, Hello Design Studio
Sort Paragraphs Alphabetically
For basic alphabetical sorting of paragraph text — bulleted lists, numbered lists, or just plain paragraphs — use SortParagraphs.jsx, a script that comes with InDesign.
In InDesign CS3 and CS4, go to Window > Automation > Scripts to open the Script panel, click the spinning arrow beside the Application folder to see its contents, then Samples, and finally JavaScript. That’s where you’ll find SortParagraphs.jsx. In InDesign CS2, first grab the script from the Adobe Web site, then drop it into the Presets/Scripts folder under your InDesign CS2 installation folder.
To sort your list, highlight a selection of paragraphs and double-click SortParagraphs.jsx on the Scripts panel.
– Pariah Burke
Document Repair With IDML
IDML (InDesign Markup Language) is an XML-based file format that InDesign CS4 can read and write. It can also help clear the cobwebs from a creaky old document. If you’re having trouble with a document (especially one created in a previous version of InDesign or converted from QuarkXPress and PageMaker), export it to IDML, then open the IDML file and work with the new InDesign document. You can even strip a document of third party plug-in information by disabling those plug-ins prior to opening the IDML file.
– Mike Rankin
Break Facing Pages into Single Pages
Here’s how to convert a facing-pages document into a single-page, non-facing pages document without affecting master page items:
Open the facing pages document. In the Pages panel menu, choose Allow Document Pages to Shuffle (CS3-CS4) or Allow Pages to Shuffle (CS2). (This should uncheck, or deselect, this option.) Grab the right-hand page of each spread and pull the page to the right of the spread until you see a vertical black bar appear and then release the mouse. This will separate the page from the spread, but the page will remain a right-hand page.
– Keith Gilbert
White Isn’t Always White
Some white paper is whiter or brighter than others, and that can affect the colors of your inks. To better judge how they’ll look, ask your print shop for a color profile targeted to the output device and substrate you’ve chosen. Once you have the profile, follow these steps to proof your work onscreen.
1. With InDesign closed, install the ICC/ICM file into the following path:
Windows: Windowssystem32spooldriverscolor
Mac: /Library/ColorSync/Profiles
2. Open your document in InDesign.
3. From the View menu, choose Proof Setup > Custom.
4. Select the newly installed profile from the Device to Simulate dropdown menu and check Simulate Paper Color, which will also automatically check Simulate Black Ink.
Click OK and, if your monitor is properly calibrated, you’ll see onscreen colors very close to what you’ll get off the printing press.
– Pariah Burke
The Best Place for Almost-Instant InDesign Help
Adobe’s very active User to User forums are such good resources, even Adobe’s technical and customer support refer people to the forums. You can subscribe to forums or specific topics via email, which lets you respond to any post the same way you would to an email without returning to the forum. You’ll also receive responses immediately after they’re posted. When plain text descriptions of your dilemma won’t do, you can also upload and attach files for others to analyze.
– Bob Levine
What Is the Registration Color Good For?
The InDesign Swatches panel includes four undeletable swatches: None, Black, Paper, and Registration. The purpose of the first three is obvious. You probably know not to use Registration for any object to appear on the printed page, but do you know why?
The Registration color prints on every ink plate. In CMYK, that means anything with Registration applied to it prints in cyan, magenta, yellow, and black. The result is usually not a nice rich black but rather the color of old mud. That’s why the Registration swatch should be reserved for registration marks and other information or structures that need to print on all plates (usually in the slug area), such as the client name, job number, and other specific information. The easiest way to include that information on the film is to set it in the slug area, in the Registration color swatch.
– Pariah Burke
Wrap Text around a Silhouetted Image
Place an image with a solid, contrasting background or an alpha channel or clipping path masking the background. Open InDesign’s Text Wrap panel, choose Show Options from the panel’s menu, and you’ll see seven Contour Options. From the Text Wrap panel’s Type pop-up menu, choose a contour option. Some, like Alpha Channel and Photoshop Path, are only available if they’re embedded in the image file. But this doesn’t mean you have to use a collage of empty frames to wrap text around a silhouetted image! Arranging the image behind the text (Object > Arrange > Send To Back) and choosing Detect Edges from the Contour Options’ Type pop-up menu often does the trick.
– Renée Dustman
Simulate Ripped Paper
With InDesign’s Pencil tool, draw a rough shape with lots of twists and turns. Take your time and go slowly. Be sure to hold the Option/ALT key as you release the mouse button so the shape is a closed path. Use the Effects panel to add an inner shadow. Place an image in the shape. By varying your drawing speed and angles, you can make your shape look like a cracked eggshell, peeling paint, torn paper, and so on.
For examples of and variations on this technique, see the August/September 2009 issue of InDesign Magazine.
– Mike Rankin
Automatic Drag-N-Drop Image Libraries
For image-intensive page layout in InDesign, selecting images visually is better than doing it by filename, and dragging and dropping is easier than File > Place. Rorohiko’s ImageLibraryLoader is a free script-based plug-in for Mac and Windows versions of InDesign CS, CS2, CS3, and CS4. It automatically builds a thumbnail library of images in a folder inside InDesign. That library is a floating panel from which you can drag entries and drop them into the layout without stepping out of InDesign. For more info and the download link, go to www.creativepro.com/article/free-all-just-what-youre-looking.
– Pariah S. Burke
Create Paragraph and Character Styles Automatically
If you often receive text from multiple sources that’s styled every which way, you need Thomas Silkjaer’s Auto-Create Paragraph and Character Styles script.
This free Mac- and Windows-compatible script scans a selected InDesign story for local formatting that differs from the Basic Paragraph style. The script then generates and applies new paragraph and character styles describing, and assigned to, the locally formatted text. Read more and download the script at…
– Pariah S. Burke
Turn Off Multiple Layers Simultaneously
InDesign’s layers are great, but sometimes you can end up with so many layers that it gets confusing. To instantly hide all layers except one, hold the Option/Alt key and click the eye icon of the layer you want to remain visible.
– Sandee Cohen
Simulate Duotones
This super-easy trick doesn’t create a true duotone, where the only colors are black and a second color (and where only two separation plates would result), but if you’re printing to a composite printer, it works very well.
First, place an image, then select the frame containing the image with the Selection tool. Apply a color to the fill of the frame. Select the image with the Direct Selection Tool. Choose Transparency from the Effects panel (Object > Effects > Transparency). Click on the Basic Blending Mode menu, and select Luminosity. Voila! You have a faux duotone!
– Diane Burns
One Business Card, Many Names
Using InDesign’s Data Merge feature can take the tedium out of generating business cards for a company with multiple employees. You design the card as usual and then combine it with a data file prepared in Microsoft Excel that lists the names and other information that changes. In the template card, you place fields for the real information, merge the file with the Data Source, and presto! Your result is a document with as many cards as there are records in the data source.
For step-by-step Data Merge instructions, see Rufus Deuchler’s “Automate This!” in the April/May 2006 issue (#11), also posted on CreativePro.com.
– Nigel French
Arrange Floating Windows
InDesign CS3 and earlier open multiple documents in individual floating windows. Don’t waste time dragging windows around onscreen in search of a particular document. Instead, choose Window > Arrange > Cascade. The active document is brought to the top of the stack, and the other InDesign files are staggered neatly behind. To activate a different document, click on its title bar.
– Renée Dustman
Go Native
To preserve any live transparency in files you place in InDesign, Adobe recommends working with native file formats, such as .AI and .PSD. This workflow not only lets you continue editing transparency effects in placed graphics, it can also improve final results.
– Mordy Golding and Renée Dustman
Sizing Up Business Cards Around the World
Are you creating business cards for other regions of the world but don’t know the standard card sizes for those regions? Well, now you do!
Australia, New Zealand (1.636 aspect ratio): 90mm x 55mm / 3.54 inches x 2.165 inches
China (1.667 aspect ratio): 90mm x 54mm / 3.543 inches x 2.125 inches
Czech Republic, Hungary (1.8 aspect ratio): 90mm x 50mm / 3.543 inches x 1.968 inches
Europe (1.545 aspect ratio): 85mm x 55mm / 3.346 inches x 2.165 inches
Japan (1.655 aspect ratio): 91mm x 55mm / 3.582 inches x 2.165 inches
US, Canada, Netherlands (1.75 aspect ratio): 89mm x 51mm / 3.5 inches x 2 inches
– Nigel French
Export InDesign Documents to Multiple Single-Page Files
When you want to export an InDesign document to multiple single-page files, try Page Exporter Utility, a free JavaScript that runs in InDesign CS2/CS3/CS4 on both PCs and Macs.
Download Page Exporter Utility at https://creativepro.com/page-exporter-utility-peu-5-script-updated-for-cs3/.
– Claudia McCue
Update TOCs
The easiest way to create a TOC for a long, structured document is to use InDesign’s automatic Table of Contents feature: Create your document, assign unique paragraph styles to the paragraphs you want in the TOC, choose Layout > Table of Contents, and tell InDesign which Paragraph Styles to include in the TOC.
InDesign won’t auto-update this TOC when your text or page numbers change, but that doesn’t mean you have to resort to manually updating the content yourself. Just choose Layout > Update Table of Contents at any time, and InDesign will make it so.
– Keith Gilbert
Two Baseline Grids in One Document
When you want the first line in a custom baseline frame to always line up with the main baseline grid, follow these steps:
1. Set the baseline grid for the document (Preferences > Grids). Let’s say the increment is 18 points.
2. Apply the paragraph command Align to Baseline Grid to force the text to align to the document-wide baseline grid.
3. Select the text frame that needs the custom baseline grid. Choose Object > Text Frame Options and click the Baseline Options tab. Set a custom baseline to, say, 12 points.
4. Set the Start of the baseline grid to be 18 points from the top of the frame. When the top of the text frame is positioned along the baseline grid for the main document, the first line of text in the custom text frame will automatically align on the document baseline grid. Then, the rest of the text aligns to the custom baseline grid.
— Sandee Cohen
Convert RGB Swatches to CMYK
If you import swatches, you may introduce quite a few RGB colors into your four-color print publication file. To quickly convert them, download and run the free RGB to CMYK script from InDesign scripting master Dave Saunders: https://pdsassoc.com/downloads/ConvertRGBtoCMYK.zip . Thanks to Bob Levine for the tip about Dave’s script!
Note that the colors may shift significantly because many RGB colors can’t be reproduced in CMYK. Also, the printed colors may not match what you see on screen. It’s always better to pick CMYK colors from a current printed swatch book.
– Pariah S. Burke
Skip the New Document Dialog Box
To create a new InDesign document without summoning the New Document Dialog Box, add the Opt/Alt key to the Cmd/Ctrl-N keyboard shortcut. The resulting new document will be based on whatever setting you last chose in the New Document dialog box’s Document Preset pop-up menu.
– Sandee Cohen
Universal Punctuation Keyboard Shortcuts
You won’t find em dashes, ellipses, and other common punctuation and special characters on your keyboard. Within InDesign, you can insert these characters the long way using the Glyphs palette or the Type > Insert Special Character menu. Or you can memorize the InDesign-only keyboard shortcuts. Or, you can save that bit of brain space for other things and instead use the standard keyboard shortcuts below, which work in almost any app:

– Pariah Burke
Applying — and Ignoring — Text Wrap
Sometimes you need text to wrap around one area of an object but not another. That’s when a little check box, located far away from the Text Wrap panel, comes into play. This little text wrap helper, Ignore Text Wrap, is at the bottom of the Text Frame Options dialog box under Object > Text Frame Options. Select the frame containing the text that you don’t want to be affected by an overlying item that has Text Wrap applied, and check Ignore Text Wrap.
— Diane Burns
Creating Complex Shapes
While InDesign’s Pen tool is the page-layout app’s only tool that lets you draw complex shapes, InDesign does have a handy panel that lets you create complex shapes from two or more basic shapes. When you select two or more objects, the Pathfinder panel (Window > Object & Layout > Pathfinder) provides five options for creating a single shape that’s generated from the selected objects: Add, Subtract, Intersect, Exclude Overlap, and Minus Back.
— John Cruise and Kelly Kordes Anton
Test Document Bleeds
Does your document have bleeds? Just before you output the file, test whether the objects off the page will print properly by turning on Use Document Bleed Settings in the Marks and Bleed pane of the Print dialog box (or the Export Adobe PDF dialog box).
— Steve Werner
Combine a Roll Fold with an Accordion Fold
This week’s tip is a little different — it’s a video! To watch Trish Witkowski demonstrate a roll fold with a nested accordion fold, go to www.foldfactory.com/foldoftheweek.php.
In just 60 seconds, Trish will help you understand a cool fold combination that makes a big impact on customers.
Frames First, Images Second
When you have to place a number of images into your layout, save yourself some effort and first set up the graphic frame with particular specifications (Fit Proportionally, fit content to frame, fit frame to content, etc.). That way you won’t have to fidget as much to make the fit.
Drag out the frame to the desired size and proportion. Select Object > Fitting > Frame Fitting Options. Define the Crop Amount or the Reference Point (the point from which your sizes will emanate), and select Fitting > Fit Content Proportionally. Once you define one frame, Option/Alt-drag it to make a duplicate with the same parameters. Now when you Place (Command/Ctrl-D) an image, it will come into the frame with the predefined sizing.
This tip applies to InDesign CS3 and CS4.
— Andrew Shalat
Using the Scissors Tool
You can use InDesign’s Scissors tool to convert a closed path into an open path and to cut an open path into two separate open paths. First, select it in the Tools panel, and then move the crosshair pointer over the edge of an object. When a circle is displayed in the middle of the crosshairs — indicating that the pointer is over the edge of the object — click the mouse button. An anchor point is added where you click. If you select this anchor point with the Direct Selection tool and move it, you’ll find another anchor point in the same place. This anchor point is the other endpoint if you cut a closed path. It’s an endpoint on a separate path if you cut an open path.
— John Cruise and Kelly Kordes Anton
Stay Away from System Fonts
When you’re preparing InDesign files for print on a Mac, stay away from System fonts. These include the Helvetica, Helvetica Neue, Courier, Symbol, and Zapf Dingbats fonts found in [Your computer] > System > Library > Fonts. They won’t print badly, but the names are the same as PostScript fonts you may also be have. Sometimes the wrong version can be substituted by mistake, causing incorrect spacing or missing characters.
— Steve Werner
New Tabs for Document Windows
If you’re not a fan of CS4’s tabbed document windows, you can disable them either temporarily or permanently.
Under Window > Arrange, there are commands that let you float one InDesign document outside the tabs or float all InDesign documents outside the tabs. Or simply drag the tab down a bit, and the document becomes a regular floating window.
For the permanent solution, go to Preferences > Interface and turn off the Open Documents as Tabs.
— Sandee Cohen
Setting Defaults for the Polygon Tool
To set defaults for the Polygon tool and the Polygon Frame tool, double-click either tool in the Tools panel. The Polygon Settings dialog box lets you specify the number of sides and, optionally, a star inset, which creates a starburst shape. The settings you specify are used for new polygons until you change settings again.
— John Cruise and Kelly Kordes Anton
Apply Effects to Objects Quickly
You just spent 30 minutes in InDesign’s Effects dialog box, settings options for the perfect effect. Now you want to apply the same effect to several other objects in the file quickly and easily.
Apply your settings in the Effects dialog box (Objects > Effects >) while no objects are selected to make your settings the default for the document. InDesign will automatically apply your perfect effect to each object you draw after that.
Or, select the formatted object and create a new object style in the Object Styles panel. Use Quick Apply (Command-Return/Ctrl-Enter) to format subsequent objects with the new object style even faster. Or finally, copy and paste formatting from one object to another. Double-click on the Eyedropper tool first to select which formats you want to copy. Then select the objects you want to format with the Selection tool. Switch to the Eyedropper tool and click on the object with formatting you want to copy.
— Renée Dustman
Remove Hyperlinks from Text in Word
Do you hate the blue links with the gray rectangles you sometimes get when you place Microsoft Word documents into InDesign? The fastest way to get rid of these automatic hyperlinks is in Word itself before you flow in the text.
Open the file in Word, select all, and type Command/Ctrl-6. (Use the 6 key on the main keyboard, not the number pad.) The URLs and e-mail addresses remain but are no longer hyperlinks, so InDesign imports them as regular text and doesn’t add its default grey rectangle hyperlink formatting to them.
— Anne-Marie Concepción
Quick and Handy Layout File Info
Do you want to know how large your InDesign file is or which folder it’s in? Check out the Info panel (Window > Info). When nothing is selected (Edit > Deselect All), the Info panel reports on the document itself. In addition to file size, you can also see the path to the active file on your computer or server. Usually the path appears truncated on the non-resizable panel, but if you hover your cursor over the readout, the tooltip shows the full path.
— Anne-Marie Concepción
Add Files to a Book
To add individual InDesign files to an InDesign book (File > New > Book), choose Add Document from the Book panel menu or click on the plus sign at the bottom of the Book panel. To add multiple InDesign files, drag and drop files from the Macintosh Finder, Windows Explorer, or Adobe Bridge into the Book panel. You can drag and drop multiple files at a time. You can even drag and drop a top-level folder, and all the InDesign files in that folder, as well as all the subfolders, will be added to the book.
This tip works in InDesign CS2 through CS4.
— Keith Gilbert
Help Needs Help!
Do you prefer the PDF User Guide/Help File to InDesign CS4’s HTML help? No problem. Just launch the HTML help, look in the upper-right corner for “Help (printable)”, and click the PDF icon.
–Claudia McCue
Safe Style Editing
If you have the Type tool in a text frame and realize you want to edit a Paragraph or Character Style but don’t want to apply that style to the selected text or paragraph, select Shift-Option-Command (Mac) or Shift-Alt-Ctrl (PC) and double-click on the style name you wish to change. Alternately, Control- or right-click on the style name in the panel and choose Edit “Style Name.” This tip applies to InDesign CS2 to CS4.
— Erica Gamet
Anchored Snippets
InDesign CS4 lets you import snippets directly into a text story, as inline or anchored objects. (If there is more than one object in the snippet, they must be grouped for this to work.) You can also apply an object style to the object (or group) before creating the snippet, which means that every time you place it in a story, it shows up in exactly the correct position.
— David Blatner, editorial director of InDesign Magazine
Find the Right Font
When you’re having trouble deciding on the best typeface or combination of typefaces for a particular project, try these sources:
* The Type Library section of the Adobe Web site lets you search for fonts by use.
* Each typeface on the Font Bureau Web site includes a list of comparable and compatible fonts.
* Independent blogs such as Typophile are populated with type-savvy folks who will give advice on font usage, identify orphaned fonts, and steer you toward little-known fonts that may have escaped your attention.
* Blogs associated with type foundries that don’t just promote their own products are great resources, as well. For example, a wonderful post on FontFeed, the blog affiliated with FontShop, explored alternatives to Helvetica with helpful background about the suggested typefaces and detailed characteristics that distinguish them from Helvetica.
— Pamela Pfiffner, author of “How to Cure Typochondria,” the cover feature in the December 2008/January 2009 issue of InDesign Magazine.
Draw, Reposition, Continue Drawing
Start drawing a frame in InDesign, then (still holding down your mouse button) press and hold the Spacebar so you can reposition the frame. Once it’s in the correct position, release the Spacebar and continue drawing.
– Claudia McCue
Compare Two Layouts
You have two InDesign layout files that look identical, but you suspect they’re not. Short of going through every page with a fine-toothed comb, how can you find the differences?
Simple: Export each layout to PDF with a unique name and then use the Document > Compare feature in Acrobat Pro 8 or 9. It can churn through even the longest layout files in a minute or so and present you with a page-by-page breakdown of where formatting, position, and/or text changes occur in the two PDFs you selected.
– Anne-Marie Concepción
Way Better than Standing on Your Head
In InDesign CS4, you can rotate an entire spread from the Pages panel, which is handy when you’re editing text that would otherwise be sideways or upside down on a page. However, you can’t rotate the spread to any arbitrary angle: just 90- or 180-degrees.
— David Blatner, editorial director of InDesign Magazine
Weird Lines in InDesign
Are you seeing purple or green lines as you move objects around the InDesign CS4 page? Maybe some arrows, too?
Nothing’s wrong with the software. Those lines and arrows are the new Smart Guides feature in action.
The purple guides are the alignment guides that pop up when your object is positioned at the center of the page. The plain green lines that pop up indicate when one object is aligned with the sides or center of another. When three or more objects are on a page, you may see green arrows and distribution indicators as you move one object around the page. These distribution arrows indicate that the space between the three objects is identical.
— Sandee Cohen, senior editor of InDesign Magazine; author of InDesign CS4 Visual QuickStart Guide
Wrapping Outlined Type Around a Path
Once type has been outlined, it’s very difficult to flow that type accurately around a curve. While Illustrator’s Warp or Envelope Mesh commands can get you part of the way, they often distort the letterforms.
Another option is to copy and paste the outlined type into InDesign CS3 or CS4, ungroup it, and then copy and paste the letterforms one-by-one on to the shape you want the type to wrap along. You can then select each letterform with the Type tool and manually adjust the letter spacing. The undistorted letterforms will follow the path you want.
If your workflow calls for it, you can then copy and paste the adjusted shape back into Illustrator. Once in Illustrator you may need to unmask the selection, but then you can continue with your wrapped type design.
— Jennifer Wills, principal, W+W Design
Navigation Shortcuts
Unless you work only on one-page documents, you need to navigate around InDesign files. To do so quickly, use these shortcuts:
• Temporary Hand tool = Option/Alt and the Spacebar
• Jump from page to page = Option/Alt -Page Down and Option/Alt -Page Up
• Jump from spread to spread = Option/Alt
• Jump to a specific page = Command/Ctrl-J
• Jump to the last page you were on in a document = Command/Ctrl-Page Up
Note that on laptops and some wireless keyboards, you have to add the fn key to the above shortcut combinations.
— David Blatner, editorial director of InDesign Magazine
Magnification Shortcuts
Everyone needs to zoom in and out on the page, so the more efficient you are at this, the more productive you’ll be throughout the day. Here are some frequently needed magnification shortcuts:
Zoom in a little: Command/Ctrl and = (equal)
Zoom out a little: Command/Ctrl and – (hyphen)
Actual Size: Command/Ctrl and 1
200 percent: Command/Ctrl and 2
400 percent: Command/Ctrl and 4
50 percent: Command/Ctrl and 5
Fit page in window: Command/Ctrl and 0 (zero)
Fit spread in window: Command-Option-0/Ctrl and Alt-0
Type in arbitrary zoom percentage: Command-Option-5/Ctrl and Alt-5
Toggle between last two zoom amounts: Command-Option-2/Ctrl and Alt-2
— David Blatner, editorial director of InDesign Magazine
InDesign Lock Files
Have you noticed file icons that contain the word “LOCK” and a little padlock? Those are InDesign Lock files. InDesign creates them when you have a file open so that no one else can work on it at the same time, but the Lock files are supposed to disappear when you close the file. If you’re seeing the Lock file icons after you’ve closed that file, something’s wrong, but it isn’t a nightmare. Just delete the icons — you won’t hurt anything.
— Sandee Cohen Senior Editor, InDesign Magazine; Author, InDesign CS4 Visual QuickStart Guide
Avoid Transparency Troubles
In the bad old days, printing an InDesign file with transparency caused problems. That’s no longer the case.
However, always ask your print shop what PostScript level they’re using to output an InDesign document before you submit it. Some shops prefer that you submit InDesign files as PDF/X files, which are flattened; while others may prefer you to submit an unflattened InDesign or PDF 1.4 (or later) file.
— Mordy Golding, instructor, consultant, and InDesign Magazine author
Copy Multiple Table Cells at Once
It used to be that when you copied tabular data from a word processing or spreadsheet document into an InDesign table, you had to do it cell… by cell… by cell. In InDesign CS3 and CS4, can copy and paste table data from multiple cells into multiple cells by choosing the cell, not the content of the cell.
— Keith Gilbert, instructor, consultant, and InDesign Magazine author
Find Patterns You Can Automate
To be efficient in InDesign, automate the repeating elements in your documents. For example, the Text Variables feature (new in CS3) is ideal for handling repeating elements, such as variable running heads in a book or catalog, or the current date.
You can find a list of premade text variables in the Type > Text Variables > Insert Variable submenu. If you don’t see any, your document was probably created in CS2 or earlier. You can load text variables from another InDesign document (such as one created in CS3) by choosing Type > Text Variables > Define, then clicking Load.
— David Blatner
Editorial Director, InDesign Magazine co-host, InDesignSecrets.com
Open A Window For A Fresh Look At Type
You’re laying out text, experimenting with different faces, colors, and styles. But when you select the text to change it, the colors invert, so it’s hard to tell what your changes look like.
To fix this, choose Window > Arrange > New Window. Nothing will be selected in the new window, so you can use it to preview all the changes you make to your type in the original window.
Note that this trick works for type on a path and tables, too.
— Mike Rankin, InDesign Magazine author, trainer, and blogger
Master Items and Books
Say you have several documents in a book, each of which ends on a right-hand (odd) page, and you want each following document in the book to start on a right-hand page.
In InDesign CS3, choose Book Page Numbering Options from the Book panel menu, then choose “Continue on next odd page” from the Page Order options. Click Insert Blank Page to automatically add a left-hand page to any document in the book that ends on an odd page.
However, the inserted pages are always based on no master page. To give those blank pages master page information, you have to manually drag a master onto them.
— Sandee Cohen Senior Editor, InDesign Magazine Author, InDesign CS3 Visual QuickStart Guide
Show Guides at Certain Zooms Only
When you zoom out on your InDesign document, do all those guides clutter up your screen? Sure, you can hide the guides or turn off the layer showing the guide or change the view options for the guides on a layer. But here’s a better technique. Before you start dragging guides out, go to Layout > Ruler Guides, and change the View Threshold from 5% to something higher, like 101%. From that point on, any guide you create will only be visible when you are zoomed in to 101% or higher. This means that guides that you need for close up work are visible when you’re zoomed in, but they’re not visible when you zoom out to see the entire page.
— Sandee Cohen Senior Editor, InDesign Magazine Author, InDesign CS3 Visual QuickStart Guide
Unlink Text Boxes Without Disturbing Their Contents
You can unlink text boxes without disturbing the boxes’ contents by running one simple script that you already have.
In InDesign CS3, open your Scripts panel (Window> Automation> Scripts) and look in the Application folder, then the JavaScript folder. You’ll see a script called SplitStory. Place your cursor in one frame of the story and double-click the script name in the panel. InDesign will split all the frames of the story into individual frames.
— Sandee Cohen Senior Editor, InDesign Magazine Author, InDesign CS3 Visual QuickStart Guide
Make All Frames the Same Height or Width
So you have a whole bunch of frames on the page, and you want them all to be the same height (or width).
Select one of the frames and enter the correct height (or width) in the H (or W) field in the Control panel. Press Return.
Now, select all the other frames you need to fixe. Choose Object > Transform > Transform Again Individually.
Presto! All of the frames change their height (or width) to the previous amount.
— Sandee Cohen Senior Editor, InDesign Magazine Author, InDesign CS3 Visual QuickStart Guide
Keyboard Shortcut to Restore Default Workspace
Do you want to quickly restore your InDesign CS3 workspace to the default but don’t know the keyboard shortcut for Window > Workspace > Default Workspace? Don’t bother looking in the Keyboard Shortcuts list — it’s not there. But you can make your own shortcut.
Begin by going to Window > Workspace > Default Workspace. Select Window > Workspace > Save Workspace, and name the workspace something like Default Workspace. That places the saved workspace at the top of the saved workspaces.
Then go to Edit > Keyboard Shortcuts and click the New Set button to create your own custom set and name it anything you want. Choose Window menu under Product Area. Scroll down and find Workspace: Load 1st Workspace. Now assign a keyboard shortcut to that command. Be sure to click Assign before clicking OK.
Because the workspace is forced to the top of the list, you’ll always have a keyboard shortcut for that workspace which is the default layout.
— Sandee Cohen Senior Editor, InDesign Magazine Author, InDesign CS3 Visual QuickStart Guide
Guides as Snippets
Way back in 2005, InDesign Magazineprinted this tip from Erica Gamet:
“You can save a page’s guides by selecting them and choosing Add Item from the Library’s palette menu or by clicking the New Item button at the bottom of the palette. Then, when you want to use the same set of guides on another page, simply select it in the Library and choose Place Item(s) in the palette menu. This places the same guides, in the same positions, on the new page. You can’t add to or place guides from a Library using drag and drop.”
But today, there’s another way to work: Save your Guides as Snippets. Instead of adding them to a library, just select the guides and choose Export as InDesign Snippet. The Guides will be fully visible in Adobe Bridge, where they can be dragged onto new InDesign pages.
— Sandee Cohen
Senior Editor, InDesign Magazine Author, InDesign CS3 Visual QuickStart Guide
Rotation — Clockwise or Counter-clockwise
Have you ever had that moment of doubt as to which direction InDesign’s rotation angle is going to move your object? Are positive numbers clockwise or counter-clockwise?
I can’t remember myself, but there’s a little cheat that helps me look smart in front of a class. Just take a quick peek at the Rotation tool in the Tools panel. Notice that it indicates a counter-clockwise direction. That’s your clue that positive numbers rotate objects counter-clockwise. Negative numbers go clockwise. This half-second glance saves me a lot of undos.
— Sandee Cohen
Senior Editor, InDesign Magazine Author, InDesign CS3 Visual QuickStart Guide
A Better Selection Tool
Have you ever wished the Direct Selection tool were a little less destructive? For instance, I like to be able to select the image within a frame, but I hate when the Direct Selection tool inadvertently moves a point in that frame. That means I have to press down on the Direct Selection tool slot in the Tools panel, then choose the Position tool. (To find the Position tool, use the keyboard shortcut Shift+A, or put your pointer over the Direct Selection tool in InDesign’s toolbox and hold down your mouse button.)
Instead, think of the Position tool as the Direct Selection tool but without the ability to edit points and paths. Bonus: The Position tool still lets you change the dimensions of a frame. It’s the best of the Selection and the Direct Selection tools!
— Sandee Cohen
Senior Editor, InDesign Magazine Author, InDesign CS3 Visual QuickStart Guide
Houdini Hidden Panels
Presenting, for your entertainment and enjoyment, the amazing “Houdini Hidden Panels.”
You may know that pressing the Tab key or the Shift-Tab key will hide all of InDesign’s onscreen panels. And pressing Tab or Shift-Tab will bring them back.
But here’s the trick worthy of the great Houdini! With the panels hidden, bring your mouse over the area where the panels were originally hidden. Pause for a second.
The hidden panels automatically pop into view!
You can then choose a tool or use the panel commands. Then when you move the mouse away, the panels disappear.
— Sandee Cohen
Senior Editor, InDesign Magazine Author, InDesign CS3 Visual QuickStart Guide
Open Bridge with InDesign’s Browse Command
You probably know that you can launch and navigate through Bridge by clicking the Bridge icon on the right side of InDesign’s Control panel. But you don’t have to click on that icon to open Bridge. The File > Browse command (Cmnd-Opt-O/Ctrl-Alt-O) also opens Bridge with a single keystroke — no mousing required!
— Sandee Cohen
Senior Editor, InDesign Magazine Author, InDesign CS3 Visual QuickStart Guide
Make the Default Display High Quality
There are some documents, especially those with placed Adobe Illustrator files, that I want to always open at High-Quality Display. But even when I switch the file to View > Display > High-Quality Display and save the file, the file reopens with the Typical Display.
That’s because the control for the view for a document isn’t the view at which the document was last saved. You need to go to Preferences > Display Performance and change the Default View to High-Quality to make sure the document always opens in that display setting.
— Sandee Cohen Senior Editor, InDesign Magazine Author, InDesign CS3 Visual QuickStart Guide
Unlock the Mystery of Locked Guides
Say you’re pulling guides down onto the page. Oops, you didn’t get one of them just yet. You try to select and move the misplaced guide. No luck! You can’t select any of the guides, much less unlock them. You check whether the Lock Guides command (View > Grids and Guides > Lock Guides is active, but it’s not chosen.
Here’s the secret: There are TWO commands for Lock Guides. The second is in the Layer options (Layer panel menu > Layer Options for ).
Amazingly, when the guides are locked through the Layers panel, the View menu may not reflect that lock.
— Sandee Cohen Senior Editor, InDesign Magazine; Author, InDesign CS3 Visual QuickStart Guide
Place Images Like CS3 or CS3
As you may know, InDesign CS3 has a terrific feature that lets you load a cursor with multiple images from the Bridge, Finder, or Windows Explorer by dragging multiple files into an InDesign document window. Once you drag, you can click to place each image individually.
But what if you want to go back to CS2 behavior and place all of the files at once? Simple! Once you drag onto the page, hold the Cmd/Ctrl-Shift key. You’ll see a multiple image icon that consists of three “pages” and a small rounded triangle. Click the icon to place all the images in the loaded cursor.
— Sandee Cohen Senior Editor, InDesign Magazine; Author, InDesign CS3 Visual QuickStart Guide
Using SWF files in PDF files?
For a while now, Macintosh users have been frustrated by the inability to import SWF files into InDesign and PDF files. This inability wasn’t due to Adobe products’ limitations, but to Apple QuickTime. Fortunately, the newly released Acrobat 9 fixes that problem. Mac users can once again import SWF movies into their PDF files.
— Sandee Cohen Senior Editor, InDesign Magazine; Author, InDesign CS3 Visual QuickStart Guide
Protect Master Page Items
A feature that debuted in InDesign CS3 lets you make a master page object impervious to being overridden on the document pages.
Select the object on the master page and turn off the toggle command “Allow Master Item Overrides on Selection” from the Pages panel menu.
This command makes it possible to “protect” items you never want overridden on the document page. For instance, you might not want automatic page numbers to be moved or modified.
This tip was inspired by a post by Robert Levine in the Adobe InDesign User to User forum.
— Sandee Cohen Senior Editor, InDesign Magazine; Author, InDesign CS3 Visual QuickStart Guide
Scaling without Grouping
In previous tips, we’ve told you that you can scale grouped text and images together by holding the Cmd/Ctrl+Shift key and then dragging. But grouping can be awkward, as objects all move to the same layer.
Fortunately, you can resize multiple objects without grouping them. Select all the objects and switch to the Free Transform tool in InDesign’s toolbar. Then simply drag on a corner of the selection and hold the Shift key to constrain the proportions.
Your objects scale together without being grouped.
— Sandee Cohen Senior Editor, InDesign Magazine; Author, InDesign CS3 Visual QuickStart Guide
Make a Smoother Text Wrap
Let’s say you’re trying to wrap text around something. You open the Text Wrap panel (Window > Text Wrap), select Show Options by clicking the tiny triangle on the panel’s right side, and choose Detect Edges, Alpha Channel, or Photoshop Path in the Contour Options dropdown menu.That usually works well, but occasionally it produces a text wrap path with more points than is convenient. If so, use the Pen tool to make a path with no fillor stroke that’s a simpler version of the object you want to wrap around. Then you need only to select the simple path and choose Wrap Around Object Shape in the Text Wrap panel.
For more on InDesign text wraps, see “Take Control of Text Wrap” on CreativePro.com.
— Sandee Cohen Senior Editor, InDesign Magazine; Author, InDesign CS3 Visual QuickStart Guide
What’s a Slug?
Besides being a garden pest (or the slacker in the office), in InDesign the Slug area is an area that may or may not be set to print. You’ll find the Slug area in the New Document dialog box (File > New) by clicking the More Options button. The Slug area is a handy place to stash information about the client, product, insertion date, and so on. You can choose whether to print the Slug by clicking Marks and Bleed and then checking the Include Slug Area checkbox in the Print dialog window.
— Sandee Cohen Senior Editor, InDesign Magazine; Author, InDesign CS3 Visual QuickStart Guide
Learn a Foreign Language
Well, maybe not the whole language, but you can learn the names of the days of the week as well as the months of the year in French, German, Spanish, Estonian — any of the languages built into InDesign.
Create a new Text Variable (Type > Text Variables > Define) and then click the New button. In the Type dropdown menu, choose one of the date options, such as Output Date or Modification Date. Then use the Date Format controls to insert the code for Day Name and Month Name. Save this new text variable with the name “Lingua.”
Now that you’ve defined the variable Lingua, you can insert it into a text frame (Type > Text Variables > Insert Variable> Lingua). It should show up in English if that’s the language for your text. Now the fun part: Select the variable and in the Control or Character panel, change the language from English to something else. Ta da (or voilà) — the days and months change to the language you just selected. Note: Some languages, such as Russian, may not display the correct glyph characters.
— Sandee Cohen Senior Editor, InDesign Magazine; Author, InDesign CS3 Visual QuickStart Guide
Clear a Page’s Guides at Once
Want to clear out all the guides on a page fast? Press Cmd-Opt-G (Mac) or Control-Alt-G (Windows). This selects allthe guides on the spread. Tap the Delete key and they’re gone!
— Sandee Cohen
Senior Editor, InDesign Magazine; Author, InDesign CS3 Visual QuickStart Guide
Where Am I?
Have you ever opened an InDesign file (say, by using the app’s File > Open Recent command) and then wonder where that file is located? There are several ways to find a file’s path location, but some are platform-specific. Here’s an OS breakdown.
Cmd-click the title bar (Mac only):
The easiest way to find the location of a file within InDesign is to hold the Command key and click the title bar for the document. The complete path will be displayed. But this path can’t be selected.
Address bar for Windows Explorer (Windows XP and Vista):
You can also find the path within Windows Explorer by setting the option to open the Address bar and clicking the name of the file. Or you can find the path by right-mouse clicking a file in Explorer and choosing Properties.
And here’s a related tip for Windows Vista users: To display the hidden pop-up context menu items, hold down the Shift key, then right click on the file or folder. You will see the Copy as Path command. Choose Copy as Path and then you can paste the full path to the file or folder.
Text Variable File Name (Mac and Windows):
Finally, you can define a text variable within InDesign for the File Name of a document. There is an option to display the full path of the file. Insert this text variable in the pasteboard or slug area of your document on the master page and you’ll always have the file path staring right back atcha!
— Sandee Cohen
Senior Editor, InDesign Magazine; Author, InDesign CS3 Visual QuickStart Guide
How Spaces at the Start or End of a Line of Text Affect Centering
Let’s say you have a single line of text that you need to center in the frame. It’s no problem to click the center alignment icon in the Paragraph panel. But what if that line of text has an extra space at the end of the paragraph? Do you have to delete the extra space at the end of the line? Does the extra space affect the position of the text?
Fortunately, the answer is “No.” InDesign ignores an extra space at the end of a line when centering text. However, the opposite is not true. An extra space at the start of a paragraph will affect the position of a line when centering text.
— Sandee Cohen
Senior Editor, InDesign Magazine; Author, InDesign CS3 Visual QuickStart Guide
Reposition as You Create Objects
So you’re right in the middle of drawing a frame or a line and you realize that you need the object a little further up the page so you can get a better idea of how big it should be. There’s no need to stop the drag and reposition — just hold the spacebar and you can move the object anywhere you want. When you’re satisfied with its position, release the spacebar (but not the mouse) and continue to draw. This tip also works while drawing in Photoshop or Illustrator!
— Sandee Cohen
Senior Editor, InDesign Magazine; Author, InDesign CS3 Visual QuickStart Guide
A Quick Way to Load Scripts
Perhaps, like me, you can never remember the path to where InDesign scripts are stored. Fortunately, we don’t have to.
Open InDesign and go to the Scripts panel (Window > Automation > Scripts). Right-mouse click (Windows) or Control-click (Mac) on any script in the panel and choose Reveal in Explorer (Windows) or Reveal in Finder (Mac). This opens the folder that holds the scripts. Now you can simply drop a script in the folder without navigating through a long path.
— Sandee Cohen
Senior Editor, InDesign Magazine,
Author, InDesign CS3 Visual QuickStart Guide
Placing a Cascade of Images
If you’ve been reading these tips for a while, you know that you can select a whole bunch of images to load into the cursor, then use the up/down arrow keys to cycle through the images. But did you know that you in CS2 and CS3, can place all the graphics in a cascade (one slightly overlapping the other) on the page by holding Cmd-Shift (Mac) or Ctrl +Shift (Windows) and then clicking with the cursor? Try it!
— Sandee Cohen
Senior Editor, InDesign Magazine,
Author, InDesign CS3 Visual QuickStart Guide
Customizing Text Wraps
Once you’ve applied a text wrap to an object (Window > Text Wrap), you can modify that wrap by choosing the Direct Selection tool (white arrow) and clicking on the wrap’s nodes (anchor points). But to add new nodes to the text wrap, switch to the Pen tool.
Position the Pen cursor over a point you want to delete and you’ll see a little minus sign (-) next to the cursor. Click to delete the point. Position the Pen cursor where you want to add a point and a plus sign (+) appears. Click and a point appears at that position. You can even reshape type of point using the Convert Direction Point Tool, which you can quickly access by holding the Option (Mac) or Alt (Windows) key.
Switch back to the Direct Selection tool to move the points.
— Sandee Cohen
Senior Editor, InDesign Magazine
Author, InDesign CS3 Visual QuickStart Guide
The Numbered List Feature — Not Just for Numbered Lists Anymore!
There’s no need to limit InDesign’s Numbered List feature to inserting numbers before text paragraphs. For example, perhaps you would like to have the word “TIP” followed by a colon in front of certain paragraphs. The easy way to do this is to define a numbered list by choosing a paragraph style and, in the Paragraph Styles panel, clicking on the flyout menu and mousing down to Paragraph Style Options. In the resulting Paragraph Style Options window, select the Bullets and Numbering option in the left-hand pane.
In the right-hand pane, set the List type as Numbers and leave the Format option set as None. But then, in the field for Number, enter the word TIP followed by the code for a tab (^t). You can even apply a character style to this non-numbered list.
There are two big benefits to this process:
1. You don’t have to type the word TIP and insert a tab character.
2. If your client decides to change the word “TIP” to “NOTE”, you simply change the style definition, and the word will change everywhere that style is applied.
— Sandee Cohen
Senior Editor, InDesign Magazine,
Author, InDesign CS3 Visual QuickStart Guide
Fitting Text Frames to Content
The command Fit Frame to Content (Object > Fitting…) automatically expands or contracts a text frame to fit the text within. But you can also use some nifty double-clicks to accomplish even more. Double-click the control handle on the bottom of the frame to force that side to expand or contract to hold the text. Double-click the control handle on the right side of the frame to force that side to expand or contract to hold the text. And finally, double-click the control handle on the bottom right corner of the frame to force both the bottom and right sides to expand or contract to hold the text.
— Sandee Cohen
Senior Editor, InDesign Magazine
Author, InDesign CS3 Visual QuickStart Guide
Close the Tabs Panel
In versions of InDesign before CS3, the same keyboard shortcut opened and closed the Tabs panel (Shift+Ctrl+T for Windows; Shift+Command+T for Macs).
In CS3, that keyboard shortcut only opens the Tabs panel. However, if your insertion point is blinking within the Tabs panel, you can press the Esc key to close the panel.
— Sandee Cohen
Senior Editor, InDesign Magazine
Author, InDesign CS3 Visual QuickStart Guide
Reverse the Direction of an Arrow
When you add an arrowhead to an open path, the arrowhead appears at either the start of the path or the end. However, you might want to change the placement of the arrowhead from one end of the path to the other. The quickest way to do so is to choose Object > Paths > Reverse Path. That will change the start of the path to the end and the end to the start. You can also click the Reverse Path icon in the Pathfinder panel.
— Sandee Cohen
Senior Editor, InDesign Magazine
Author, InDesign CS3 Visual QuickStart Guide
Lost Your Welcome Screen?
Remember the screen that welcomed you to InDesign when you first launched the program? If you’re like most people, you clicked Don’t Show Again at the bottom of the screen and forgot all about it. But it’s not just for newbies. It includes a handy list of the recent items you’ve worked on, as well as links for support groups.
To bring it back, go to the Help menu and choose Welcome Screen. Uncheck don’t show again, and you’re set.
— Sandee Cohen
Senior Editor, InDesign Magazine
Author, InDesign CS3 Visual QuickStart Guide
Select and Distribute Guides
Guides are objects, but they have a few special properties when it comes to selecting them. If guides are the only objects on a layer or document, hit Cmd/Ctrl-A to Select All the guides.
However, when there are any selectable objects (frames or rules) on the page or layer, Select All won’t select the guides.
Once you have selected the horizontal or vertical guides for a page, you can use the Align panel’s (Window > Object & Layout > Align) Distribute command to place the guides equally on a page.
— Sandee Cohen
Senior Editor, InDesign Magazine
Author, InDesign CS3 Visual QuickStart Guide
Moving Gradients between Illustrator and InDesign
You may know that the Adobe Swatch Exchange format (ase) does not support transferring gradient swatches between InDesign and Illustrator. But does that mean that InDesign and Illustrator can’t trade swatches? Not at all.
To get a gradient from Illustrator into InDesign, simply copy/paste or drag/drop an object that contains a gradient from Illustrator into InDesign. The gradient will automatically show up in the Swatches panel.
It’s not quite as simple to get a gradient from InDesign into Illustrator. If you copy/paste or drag/drop an object from InDesign into Illustrator, the gradient will appear, but it won’t be added to Illustrators Swatches panel. You’ll need to ungroup and release a few clipping paths to coax the object to display the gradient in the Gradient panel.
You can add this unnamed gradient to the Swatches panel by first showing the options in the Gradient panel, then dragging the small gradient preview square from the Gradient panel into the Swatches panel. You now have a named gradient from InDesign in Illustrator’s Swatches panel.
— Sandee Cohen
Senior Editor, InDesign Magazine
Author, InDesign CS3 Visual QuickStart Guide
The Fifth Text Wrap Option
InDesign CS3 added tons of controls for all sorts of commands to the Control panel. This makes it easy to add text wraps to objects without going to the regular Text Wrap panel. Watch out, though.
There’s an extra text wrap option that is only available in the regular Text Wrap panel, and not in text wrap options in the Control panel. The fifth text wrap option is Jump to Next Column (or frame or page). This command ensures that the text wrap object is the final object in the column.
But you’ll never know the option is there if you look only at the Control panel for your text wrap commands.
— Sandee Cohen
Senior Editor, InDesign Magazine
Author, InDesign CS3 Visual QuickStart Guide
Use the Script Label Panel for Notes
How do you add notes to others working on a document? If you’re working within text frames, you’ve got the handy Note tool. But what if you want to make a comment about an image or other non-text element on a page? How can you give the next person who works on the file instructions about that object?
Here’s how to do it in CS3: Select the image, then open the Script Label panel (Window > Automation > Script Label). Write anything you want in the area inside the panel — there’s room for hundreds of words.
Tell the next person working on the document to keep the Script Label panel open. When any object is selected, the note will appear in the panel.
— Sandee Cohen
Senior Editor, InDesign Magazine
Author, InDesign CS3 Visual QuickStart Guide
Transparency Grid for InDesign
You may be familiar with the Transparency Grid in Photoshop or
Illustrator. This checkerboard pattern sits behind artwork to let you know which areas are transparent and which are filled with white or a color. InDesign doesn’t have an actual Transparency Grid, but another feature can act as one.
Choose Preferences > Grids and make sure the Grids in Back option is checked. Click OK. Then choose View > Grids & Guides > Show Document Grid. If you see the Document Grid beneath something, that something is transparent.
— Sandee Cohen
Senior Editor, InDesign Magazine
Author, InDesign CS3 Visual QuickStart Guide
Working with Layers
Have you ever had a long list of layers in the Layers panel and wanted to turn off the visibility for all except one? Instead of clicking madly up and down the list, hold the Option/Alt key and click on the layer you want to see. That layer will remain visible while the others are turned off. The same technique can be used to lock all the layers except the one you want to work on.
— Sandee Cohen
Senior Editor, InDesign Magazine
Author, InDesign CS3 Visual QuickStart Guide
Dragging Effects from Object to Stroke to Fill
It’s easy to forget to target just the stroke or fill when you apply an effect such as a drop shadow to an InDesign frame. But instead of deleting the effect and then reapplying it to the correct attribute, you can drag the little “fx” label in the Effects panel from Object to Stroke or Fill.
If you want to add the effect from the stroke to the fill, hold the Opt/Alt key as you drag. You’ll keep the effect on the first attribute and duplicate the effect onto the second attribute.
— Sandee Cohen
Senior Editor, InDesign Magazine
Author, InDesign CS3 Visual QuickStart Guide
More Detailed Previews in Bridge
You can preview InDesign documents in Bridge, but most of the text may be greeked; that is, appear only as gray lines. You can create a bigger preview, with more details, from within InDesign by going to Preferences > File Handling with no document open. Under the section for Saving InDesign Files, change the Preview Size to Extra Large 1024 x 1024. From that point on, each document you save will have a more detailed preview, and most text will be visible in Bridge.
— Sandee Cohen
Senior Editor, InDesign Magazine
Author, InDesign CS3 Visual QuickStart Guide
Leading like Quark?
Unlike QuarkXPress, InDesign applies leading as a character attribute. This means that you can have a paragraph with one line at a certain leading and another with a different leading. One way prevent mis-matched leading is to make sure you select an entire paragraph before changing any leading.
If you’d prefer that InDesign’s leading work more like QuarkXPress, go to Preferences > Type and set the Type Option for Apply Leading to Entire Paragraphs. Now when you change the leading in one line, the change applies to the entire paragraph.
Warning: Even after making the change in Preferences, it’s still possible to create paragraphs with mis-matched leading: for example, when you copy text with different leading into another paragraph. So if you copy and paste text, your next step should be to select the entire paragraph and set the leading.
— Sandee Cohen
Senior Editor, InDesign Magazine
Author, InDesign CS3 Visual QuickStart Guide
Sorting Styles
All styles in their panels (Object, Paragraph, Character, Table, and Cell) are usually listed in the order they are created — from first to last. You can instead sort them alphabetically by choosing Sort by Name in each of the styles panel menu. But you can also drag styles from one position to another, letting you customize the order in any way that makes sense to you.
— Sandee Cohen
Senior Editor, InDesign Magazine
Author, InDesign CS3 Visual QuickStart Guide
Place EPS Images without the “White Background”
If you have legacy vector files saved in the EPS format (this includes Illustrator, FreeHand, and CorelDraw files), they may show up with a white background when you place them into InDesign. There are many ways to fix the problem, but here’s my favorite:
Choose Show Import Options when you place an EPS file and check the Rasterize the PostScript option under Proxy Generation. Don’t panic, you’re not actually rasterizing the vector information; you’re only changing how the preview appears.
From that point on, you don’t have to select Show Import Options; InDesign applies the setting to all new placed images.
I prefer this solution because other methods require changing the file from EPS to AI. That’s not always possible for FreeHand or Corel files, and it can take a while to process a large library of legacy documents. My method also works with any platform and doesn’t require changing any other ID preferences.
— Sandee Cohen
Senior Editor, InDesign Magazine
Author, InDesign CS3 Visual QuickStart Guide
Clear Overrides of Mixed Paragraph Styles
The Clear Overrides button at the bottom of the Paragraph Styles panel lets you quickly strip out the local formatting (indicated by a plus sign) in a paragraph. But you don’t have to limit your selected text to a single paragraph style. Select a whole bunch of text, or even all the text in a story. Even though no one single paragraph style is selected, the Clear Overrides button still cleans up all the different paragraph styles.
— Sandee Cohen
Senior Editor, InDesign Magazine
Author, InDesign CS3 Visual QuickStart Guide
Use Quick Apply to quickly edit styles
The Quick Apply feature does more than just allow you to apply styles. Press Cmd/Control-Return/Enter to open the Quick Apply panel. Then, type as many letters as necessary to get to the name of a specific style. BUT, instead of pressing the Return/Enter, press Cmd/Control-Return/Enter again. You’re now in the Style Options dialog box for that style! Make your edits and then close to change the style definition.
— Sandee Cohen
Senior Editor, InDesign Magazine
Author, InDesign CS3 Visual QuickStart Guide
What’s New in CS3?
Have you updated to InDesign CS3 but have the nagging feeling that you’re working with it like it’s still CS2? To see what’s new in InDesign CS3 as you work, go to Window > Workspace > New and Improved. This changes your menus so that new and modified features appear in blue.
— Sandee Cohen
Senior Editor, InDesign Magazine
Author, InDesign CS3 Visual QuickStart Guide
Easier ways to modify and replace a template
Ever want to modify and then replace a template? If you simply double- click the template file or drag it onto the InDesign application, you have a copy of the template or an untitled document. That means you have to then rename the template with the same name as the original, and then replace the original.
Instead, choose File > Open, and navigate to the template file. When you choose the template file, look at the bottom of the dialog box and click the option to Open Original. This will open the template file as a template, instead of a copy or untitled document. Once you’ve made your changes, just save and close the document. You don’t have to rename or write over the original file.
— Sandee Cohen
Senior Editor, InDesign Magazine
Author, InDesign CS3 Visual QuickStart Guide
Double Paths Copied from Illustrator
Watch out when you copy paths from Illustrator into InDesign. Depending on the attributes applied to the path in Illustrator, you may wind up with more than one path in InDesign. For instance, double strokes or fills will always create multiple paths in InDesign. But even a single fill and stroke with a Twist effect will create multiple effects. The easy way to tell if you’ve pasted in multiple objects is to look at the Fill/Stroke display in the Tools panel. If you see question marks instead of colors, you know you’ve got multiple objects.
— Sandee Cohen
Senior Editor, InDesign Magazine
Author, InDesign CS3 Visual QuickStart Guide
See Guides Only at Certain View Magnifications
When you zoom out on your InDesign document, do all those guides clutter up your screen? Sure, you can hide the guides or turn off the layer showing the guide or change the view options for the guides on a layer. But here’s a better technique. Before you start dragging guides out, go to Layout > Ruler Guides, and change the View Threshold from 5% to something higher, like 101%. From that point on, any guide you create will only be visible when you are zoomed in to 101% or higher. This means that guides that you need for close up work are visible when you’re zoomed in, but they’re not visible when you zoom out to see the entire page.
— Sandee Cohen
Senior Editor, InDesign Magazine
Author, InDesign CS3 Visual QuickStart Guide
Turn a Frame to a Grid of Frames
Need a whole grid of frames? You could use the Step and Repeat feature, but if you know how large you want the grid and not necessarily how large each frame should be, Step and Repeat can be a hassle. Instead, just draw one big frame to cover the size you want the grid to cover. Then, while that’s selected, open the Scripts panel (Window > Automation > Scripts) and double-click on the MakeGrid script. That converts any single frame into a bunch of frames on a grid, according to your specifications (how much space between each one, and so on). This script is installed automatically in CS3, but in CS2 you’ll need to install it from the sample scripts that come on the installer discs. To learn how to install scripts, or find where to download them from the Web (in case you don’t have the installer discs anymore), go to: https://indesignsecrets.com/free-bundled-scripts-on-adobecom.php
–David Blatner
Editorial Director, “InDesign Magazine,” co-host, InDesignSecrets.com
Sizing a Group or Image in CS3
InDesign CS3 radically changed the rules for scaling groups and images. You used to be able to select an image or a group and change the W or H fields in the Control panel and have it scale everything to that measurement. No longer! Fortunately, the functionality isn’t gone, it just moved. To scale a frame and its image, or all the objects in a group, to a specific width or height, type that measurement in the scaling fields (the X or Y percentage fields, that usually say 100%). For example, if you replace 100% with “20 cm” then the object or group scales to that size.
–David Blatner
Editorial Director, “InDesign Magazine,” co-host, InDesignSecrets.com
Getting Your Buttons and Hyperlinks Into PDFs
It’s easy to make a button in InDesign with the Button tool, or by selecting any object and choosing Object > Interactive > Convert to Button. And it’s relatively easy to make a hyperlink using InDesign’s Hyperlinks panel (even though the user interface for hyperlinks definitely leaves something to be desired). But the number one problem people have with these interactive features is them not functioning once they get to Acrobat. Why? In almost every case, it’s that they’ve neglected the most important step: Turn on both the Hyperlinks and Interactive checkboxes in the Export PDF dialog box. Without that last crucial step, you don’t get bubkes!
–David Blatner
Editorial Director, “InDesign Magazine,” co-host, InDesignSecrets.com
Resizing Tables by Dragging
You can resize a table with the Type tool by dragging the right or bottom edge. But if you want to resize all the rows, hold down the Shift key while you drag the bottom edge. To resize all the columns proportionally, Shift-drag the right edge. Or, to resize the table rows and heights at the same time, just drag the lower-right corner of the table with the Type tool. Resizing the table using this technique does not scale the text in the table.
–David Blatner
Editorial Director, “InDesign Magazine,” co-host, InDesignSecrets.com
Quicker PDF Export of Books
You can open the PDF Export dialog directly from the Book palette by holding down the Option (Mac) or Alt (Windows) key while selecting the Print icon in the Book palette.
–John Feld
Switch Between Selection Tool and Direct Selection Tool
There are several ways to switch between the Selection tool and the Direct Selection tool quickly. When you’re not editing text, you can press V for the Selection tool and A for the Direct Selection tool. I recommend that you use Edit > Keyboard Shortcuts to assign your own custom keyboard commands for these two tools that will also work when editing text.
You can also press Control/Ctrl-Tab to alternate between the Selection tool and the Direct Selection tool. In CS3, you have even more options. When you’re editing text, you can press Esc to switch to the Selection tool. And double-clicking on a frame or graphic with the Selection tool switches to the Direct Selection tool (and vice versa)!
–David Blatner
Editorial Director, “InDesign Magazine,” co-host, InDesignSecrets.com
Select a Table’s Text or Cell
To select a cell within a table, click the cell with the Text tool and press the Esc key. This will select the cell. To place the text cursor in the cell, press the Esc key again.
— John Feld
See What Files are Loaded
The Place dialog box in InDesign CS3 lets you select more than one item in a folder at a time and import them all at once. To select more than one item in the dialog box, Shift-click (to select contiguous items) or Command/Ctrl-click (to select discontiguous files). After you click Open, InDesign loads all the files into the Place cursor, showing you a thumbnail of the first one along with a number that shows the total number of files loaded. You can rotate through the loaded files by pressing the left or right (or up and down) arrows on your keyboard. If you decide you want to “throw away” one of the files (remove it from the Place cursor), press Esc.
–David Blatner
Editorial Director, “InDesign Magazine,” co-host, InDesignSecrets.com
Align Guides to Objects
Of course, you can align objects to ruler guides. But you can also align ruler guides to objects. Just select the object and aim for one of the object’s handles as you drag the guideline. The guideline will snap to the handle
–Claudia McCue
Quick Zoom Shortcuts
I love shortcuts, especially when navigating around my documents. Here are some of my favorites involving zooming in and out.
* Command-Option-5 highlights the zoom field in the lower-left corner of the document window. Just type the percentage you want and press Enter.
* Double-click the Hand tool to fit the spread in the window (or press Command-Option-zero/Ctrl-Alt-0)
* Double-click the Zoom tool to jump to 100% (or press Command/Ctrl-1).
* Command/Ctrl-spacebar-click zooms in, Command-Option/Ctrl-Alt-spacebar-click zooms out.
–David Blatner
Editorial Director, “InDesign Magazine,” co-host, InDesignSecrets.com
Select a Table’s Text or Cell
To select a cell within a table, click the cell with the Text tool and press the Esc key. This will select the cell. To place the text cursor in the cell, press the Esc key again.
— John Feld
Creating a Knockout Rule
Want a line that has a “knockout area” on either side of it? For example, a line that when placed over an image will still be visible because it has white areas around it. It’s easy to do: Select the line, make it at least one point thick, and change its style to a double line (double stripe). Now in the Stroke palette, set the line color to Paper and set the Gap color to Black (or whatever color you want the visible line to be). Finally, make an object style out of it, so you don’t have to take these steps again!
–David Blatner
Editorial Director, “InDesign Magazine,” co-host, InDesignSecrets.com
View Image Scaling with a Shortcut
Assign keyboard shortcuts to Select Container and Select Contents (Edit > Keyboard Shortcuts > Product Area: Object Menu). Now when you have an image frame selected with the Selection tool, you can quickly see the image’s true scaling amount in the Control palette’s Scale fields by using the shortcut for Select Contents. Press the shortcut for Select Container to get back to where you started.– Anne-Marie Concepción
Quick Duplications
You probably already know you can hold down the Option (Mac) or Alt (Windows) key to drag and duplicate objects. The Option/Alt key can perform the same duplication function during other operations, too. For example, you can hold down the Option/Alt key as you choose Flip Horizontal from the Control palette menu. InDesign will duplicate and then flip the selected frame. Or place the cursor in the X field of the Control palette and change the value. Then press Option/Alt-Enter and InDesign moves a duplicate of the object to the new location.
— Claudia McCue
Apply Only Color Attributes with the Eyedropper
If you load the attributes of an object with the Eyedropper tool while holding down the Shift key, the Eyedropper loads only the color of the object (ignoring all other object attributes). If you load attributes of an object with the Eyedropper and hold down Shift while applying the attributes to another object, InDesign applies only the color to the object.
— Eliot Harper
Select the Return
You can triple-click or press Ctrl-Shift- or Command-Shift- to select a line. Both of these combinations also select the Return.
— John Feld
Switch Swatches
The New Swatch button on the Swatches palette duplicates any selected swatch. To duplicate the swatch and open the New Color Swatch dialog, hold down Option/Alt while clicking it. To create a spot color version of a swatch, select the swatch and hold down Command/Ctrl while clicking the new swatch icon. You can also switch among RGB, CMYK, and Lab modes inside the Color Swatch dialog box by holding down Shift while clicking on the color proxy.
— Eliot Harper
Find Missing Fonts
If you search for a missing font using the Find Font dialog box and can’t locate the troublemaker on a page, cancel out of the Find Font box and bring up the Story Editor. Your cursor will be where the missing font is.
— Jamie McKee
Quick Single-spread Documents
Do you want a two-page spread all by itself in its own file? Simply create a new two-page document and check the Facing Pages option as you create the file. Then turn to page one and choose Layout > Numbering & Section Options and start the page numbering at 2. Click OK to leave the dialog box, and you’re done. Because it’s an even number (page 2), InDesign moves it to the left side of the spread
— Keith Gilbert
One-Click Selection in Palettes
If you’re manually clicking or dragging inside of fields in palettes to select the fields’ contents, you’re doing it the hard way. Just click the label or icon to the left of the field-its contents are automatically selected, ready for you to replace it with new values. Remember that you can press the Up and Down arrow keys on your keyboard to increment a field’s current setting
— Anne-Marie Concepción
Change Color Modes Quickly
To change the color mode (RGB, CMYK, LAB) in the Color palette, Shift-click on the color spectrum bar (the color picker). If you see an out of gamut warning (the yellow triangle with exclamation point), click on the symbol to force the color to the nearest in-gamut color.
— Erica Gamet
Say Hi to the Alien
In QuarkXPress, there’s a hidden alien that could be induced to walk on to the screen and eradicate a selected page item with his ray gun. InDesign also has an alien, this one friendly. To see it, make a new Printing Preset (File > Print Presets > Define) and name it “Friendly Alien”; the settings don’t matter. Save it, then go to the Print dialog, change the Print Preset to Friendly Alien, and click on the Preview window in the lower left corner. Soon a small space ship will appear.
— John Feld
Fix Flaky Files
If your InDesign file is behaving erratically, it may be damaged. One easy troubleshooting technique is to choose File > Export and export the file in the InDesign Interchange format. This will create an .inx file. When you open the .inx file, InDesign rebuilds the file from the ground up — hopefully without the problems of the original.
— Keith Gilbert
Navigate the Control Palette
When you use the Control Palette, you don’t need to open as many palettes. You can choose to dock the Control Palette at the top or bottom of your screen, or you can drag its left edge to tear it off and create a floating palette. To jump easily to the first field in the Control palette, press Command/Ctrl-6. From the first field, use Shift-Tab to highlight the Reference Point box. Use the arrow keys to highlight a specific Reference Point and press the Enter key to selec
— Erica Gamet
Apply Swatches to Frames and Tables
You can apply a swatch to any frame or stroke by dragging a swatch from the Swatches palette and dropping it in a frame or on a stroke. Try this method for tables, too; you can apply a swatch to any table cell or cell border
— Eliot Harper
Obtain Exact Color Values
The eyedropper tool lets you view the exact color used in a .psd, .tif, or .jpg file. However, it provides only an approximate color match for .eps images or for vector artwork. Furthermore, it doesn’t sample spot colors from vector artwork. To see the exact CMYK or spot color that will be used to output any image or artwork on your page, activate the Separations Preview palette (Shift-F6). Choose Separations from the View popup menu and move your cursor over your artwork. The exact ink percentages are displayed next to the inks in the Separations Preview palette
— Keith Gilbert, from InDesign Magazine #7, Aug/Sept 2005
Turn the Tools Palette
You can rotate and elongate the Tools palette so it fits your screen size and working style. For example, a longer, narrower Tools palette is good when your screen is small. If you rotate the palette, it can reside at the bottom right of the screen, where there’s usually little action. Change the orientation in the Preferences dialog box or by double-clicking on the tab of the Tools palette
— John Feld, from InDesign Magazine #7, Aug/Sept 2005
Move Precisely
Sometimes the most precise way to move objects on a page is to use your keyboard’s arrow keys. Press arrow keys to move items in 1-pt increments. (That’s the default; you can change this preference in the Units & Increments panel of the Preferences dialog box.) Add the Shift key to move items in 10-pt increments (or 10 times the current increment value). Press Command (Mac) or Ctrl (Windows) and the Shift key to move items in .1-pt increments (or one-tenth the increment value).
— Keith Gilbert, from InDesign Magazine #7, Aug/Sept 2005
Add Ruler Guides Fast
To quickly add a ruler guide, double-click on a ruler to create a guide out from that point. For instance, for a vertical guide at 3 inches, double-click at 3 inches on the horizontal ruler. Add the Shift key to snap to the nearest ruler tick mark
— Erica Gamet, from InDesign Magazine #7, Aug/Sept 2005
Make Tints
You can easily create a named, tinted color from any color in your Swatches palette in InDesign (including CMYK builds). Open your Swatches palette (Window > Swatches), choose the color you want to start with, type a percentage in the Tint box, then immediately click the New Swatch icon at the bottom of the palette. The new color is named the same as the original with the percentage indicated to the right of the name. Changes to the original color are reflected in the tint based on that color
— Erica Gamet, from InDesign Magazine #7, Aug/Sept 2005
Maintain Vectors from Illustrator or FreeHand
Paths and shapes from Illustrator or FreeHand can be placed and edited directly in InDesign. Simply copy the item or items from the source document (Illustrator or FreeHand) and paste into your InDesign document. The paths are now fully editable within InDesign. To copy paths from Illustrator 10 and up, be sure that AICB is checked and the Preserve Paths button is selected in Illustrator’s File Handling & Clipboard preferences.
— Erica Gamet, from InDesign Magazine #7, Aug/Sept 2005
Switch Measurements Quickly
To use a unit of measure other than the one displayed (for example, centimeters instead of inches), type in the amount and the proper abbreviation for your desired unit of measurement and InDesign converts it for you. For example, if you set your measurement preferences to inches but want a three-millimeter drop shadow offset, enter 3mm in the Drop Shadow dialog box. You can also quickly switch to another unit of measure for the rulers by Control-clicking (Mac) or right-clicking (Windows) on either ruler and choosing the new unit of measure
— Erica Gamet, from InDesign Magazine #7, Aug/Sept 2005
Paragraph Styles = Diagnostic Tool
When you edit a file created by someone else, you may not know the full range of styling applied to text. To find out, place the cursor in the text and create a New Paragraph Style. The dialog box immediately displays every style applied to the object.
— Tracey Lawrence, from InDesign Magazine #7, Aug/Sept 2005
Reset Your Kerning and Tracking
The easiest way to reset the kerning and tracking for a range of selected text is to press Command/Ctrl-Option (Mac) or Alt-Q (Windows). I run all my copy with Optical Kerning on by default, as it does most of the work before I begin to edit.
— Matt Davis, from InDesign Magazine #7, Aug/Sept 2005
Sample Images with the Eyedropper
Use the Eyedropper tool to sample colors from placed images. With the Eyedropper tool selected, move over the desired color in the placed image. Click to sample the color, then click the New Swatch icon in the Swatches palette, or Add to Swatches from the Color palette to store the color as a swatch. The eyedropper samples the color in the same color mode as the placed graphic. For example, sampling an RGB image creates an RGB swatch. Now you can apply that new color to an item by clicking on it with the full Eyedropper. When you want to sample a new color, be sure to use Option/Alt-click to get the empty Eyedropper.
— Erica Gamet, from InDesign Magazine #7, Aug/Sept 2005
Build Guide Libraries
You can save a page’s guides by selecting them and choosing Add Item from the Library’s palette menu or by clicking the New Item button at the bottom of the palette. Then, when you want to use the same set of guides on another page, simply select it in the Library and choose Place Item(s) in the palette menu. This places the same guides, in the same positions, on the new page. You can’t add to or place guides from a Library using drag and drop
— Erica Gamet, from InDesign Magazine #7, Aug/Sept 2005
Suppress a Color Onscreen and in Output
Some publishers use a special spot color for items in a layout they don’t want printed in certain situations, such as teacher’s annotations in a textbook. The print vendor produces the teacher’s edition normally — using all color plates in the file — but doesn’t print the spot color plate for the student edition. The problem with these sorts of projects is that it’s impossible to proof the student edition onscreen or in composite print/PDF output because there’s no Hide command for individual inks or colors.
The solution is to create a new spot color that’s white, named something like Hidden. When you need to suppress the unwanted ink for onscreen proofing, alias it to the Hidden color (using Ink Manager inside the Swatches palette menu) and turn on Overprint Preview in the View menu. Abracadabra, the color disappears. It will also print and export as it displays. Just don’t forget to turn off the ink alias before you send the file to the print vendor.
— Anne-Marie Concepción, from InDesign Magazine #7, Aug/Sept 2005
Find that Color
Find/Change can’t search for a color swatch unless it’s applied to text. If you need to find all instances of a color used in a document, temporarily turn it into a spot color (if it’s not already) from its Swatch Options dialog box. Choose View > Output Preview > Separations, turn off all color plates except the new spot in the Separations palette, and scroll through your document. You’ll see black “ink” appear everywhere the color is used. (For very long documents, you may find it faster to print only that spot color plate to separations and leave the Print Blank Pages checkbox off so you only get the pages with spot colors on them.) Change the color back to its original color mode if necessary when you’re done
— Anne-Marie Concepción, from InDesign Magazine #7, Aug/Sept 2005
Find Font Errors
If you suspect that errors in printing may be related to font problems, turn everything into outlines and print again. If the problem goes away, you have a font issue to deal with. Start by uninstalling the font from your font manager if you have one; otherwise just delete and replace the font. Don’t leave any font as an outline, as it prevents editing and makes for a much larger file
— John Feld, from InDesign Magazine #7, Aug/Sept 2005
Same Image, Multiple Frames
For an interesting effect, you can make one image look as if it’s inside multiple frames:
- Place the image in a circular frame.
- Use Edit > Step and Repeat to create a row of frames.
- Using the DIRECT Selection tool, shift-click to select each IMAGE (not frame).
- Using the Alignment controls in the Control Palette, align first the top edges and then the left edges of the images within the frames. (Yes, you can align images just like you can align frames!)
- Poof! It looks like you’re looking through portholes.
Here’s another method: Place the image in just one of the frames and choose Object > Arrange > Bring to Front. Now choose all the frames (the image frame and the empty frames) and choose Object > Pathfinder > Add. The image in the topmost frame appears in all the frames.
— Claudia McCue, from InDesign Magazine #7, Aug/Sept 2005
Sort Menus Alphabetically
To sort menus in the menu bar in alphabetical order, select the required menu while holding Ctrl+Shift+Alt (Windows) or Shift+Option+Command (Mac). This shortcut sorts the menu and sub-menus in alphabetical order; it’s also useful for sorting fonts in the Type > Font menu
— Eliot Harper, from InDesign Magazine #7, Aug/Sept 2005
Shadow One Word
Wouldn’t it be nice to have a shadow behind just one word in text? You can: Copy the word into its own text frame, choose Object > Fitting > Fit Frame to Content (or press Command/Ctrl-Option/Alt-C), and apply a drop shadow to the frame. Copy the frame to the Clipboard, then highlight the word in the main text and paste. The text of the word will be replaced with the shadowed inline frame.
— Claudia McCue, from InDesign Magazine #7, Aug/Sept 2005
Thread Frames Fast
Situation: Big story in a frame, no existing empty text frames to thread it to, can’t autoflow for whatever reason. Solution: The fastest way to manually thread a story, starting with just a single overset text frame, is to click on the overset icon with the Selection Tool to load the overset text in the cursor; then hold down the Option key (Mac) or Alt key (Windows) and drag out successive text frames. Every frame you Option/Alt-drag is automatically threaded to the previous one.
— Anne-Marie Concepción, from InDesign Magazine #7, Aug/Sept 2005
Page Guides vs. Spread Guides
To create a horizontal ruler guide that crosses all pages of a spread, drag the guide onto the page while your cursor is on the pasteboard area to the left or the right of the spread. Or press Command/Ctrl while dragging a guide to make it a spread guide.
— Keith Gilbert, from InDesign Magazine #7, Aug/Sept 2005
Zoom-sensitive Ruler Guides
Hold down the Option key (Mac) or Alt key (Windows) while dragging out a ruler guide to make it visible only at the current zoom level and larger. If you zoom out, the guide will disappear. When you zoom back to the previous magnification or above, the ruler guide will reappear
— Keith Gilbert, from InDesign Magazine #7, Aug/Sept 2005
Harmless Error
When you open a file and get an alert saying, “Cannot open resource file,” it probably means that the last time you quit the program with that file open, the Scripts palette was open and included a script. The alert is harmless-just cancel it and continue. To prevent its recurrence, close the Scripts window before closing the document.
— John Feld, from InDesign Magazine #7, Aug/Sept 2005
Don’t Forget the Info Box
The Info box, which shows the size and location of a selected frame, can be a very useful tool. Select an image and the Info box displays size, active and effective resolution, color space, and ICC profiles. Select a text box with the Text tool and the Info Box displays a count of characters, words, lines, and paragraphs. (It also shows this information for linked text boxes.) Select the frame with a Selection tool instead, and the box shows the current fill and stroke colors. When nothing is selected, the Info Box displays information about the document itself
— John Feld, from InDesign Magazine #7, Aug/Sept 2005
Show Options When Placing
When you place content into your layout, click the Show Import Options checkbox to intercept a file and perform certain functions, such as stripping formatting from a Word file. You can access the Import Options dialog by holding the Shift key when you click on the Place button in the Place dialog box
— Mordy Golding, from InDesign Magazine #7, Aug/Sept 2005
Preview Image Moves
When moving a cropped image inside a frame, hold down the mouse button for about a second before you move the object. You’ll get a ghosted preview of the whole image in the frame
— Jamie McKee, from InDesign Magazine #7, Aug/Sept 2005
Type-size Shortcuts
To change type size and leading incrementally, start by setting increment size (Preferences > Units & Increments). In your document, use Shift-Command/Ctrl-< to decrease the point size of selected type by one increment, and Shift-Command/Ctrl-> to increase the point size. Add the Option/Alt key to these combinations to multiply the increment by five. You can change leading via Option/Alt-Up and Option/Alt-Down arrow key combinations. Add the Ctrl/Command key to these combinations to multiply the increment by five
— Erica Gamet, from InDesign Magazine #7, Aug/Sept 2005
Copy Text Formatting
Do you need to copy text formatting from one location to another? To do it quickly, select the Eyedropper tool, click on text you want to sample, and then use the Eyedropper to click or drag over text you want to modify. This technique even copies text attributes from one document to another. To set which qualities the Eyedropper tool will copy, double-click the Eyedropper tool and enable or disable the individual attributes
— Erica Gamet, from InDesign Magazine #7, Aug/Sept 2005
Reveal Custom Kerning
One person’s idea of appropriate kerning can be a compacted visual disaster for another person. My limit for the loosest and tightest kern is 30 (thousandths of an em). That means if some copy is kerned into -20 I will never go over +10 elsewhere in the document.
To see where kerning has taken place outside of paragraph and character styles, go to Preferences > Composition, select the Custom Tracking/ Kerning option, and click OK. In normal view mode (not in preview mode), InDesign now highlights in green text with custom tracking and kerning.
— Matt Davis, from InDesign Magazine #7, Aug/Sept 2005
Quickly Convert Corner Points to Curves
Everyone knows that you can use the Direct Selection tool (the white arrow) to select a point on any frame. But did you know that if you hold down the Command and Option keys (Ctrl and Alt on Windows) you can drag on any corner point to convert it to a Bezier curve? Alternately, you can click once with those modifier keys on a curve point to convert it to a corner point.
Split Stories
A frequently-requested feature by InDesign users is the ability to split a long text thread into multiple pieces so that each text frame retains the text that’s in it, but that the frames are no longer linked. There is no built-in feature to do this, but Adobe does bundle a script that does it for you. It’s called SplitStories and you can find it on your install discs. Or, go to https://www.adobe.com/products/indesign/xml_scripting.html and download the bundle of scripts from there.
Better Text Wrap
When you assign a text wrap to an imported graphic, be sure to first select the graphic with the Selection (black arrow) tool. This applies the text wrap to the frame, not the frame’s contents, which makes it easier to delete the graphic or replace it with a new graphic without deleting the text wrap
— Keith Gilbert, from InDesign Magazine #7, Aug/Sept 2005
Break Words
To manually break a word at the end of a line, use a discretionary hyphen. Put your cursor where you want to break the word, then choose Type > Insert Special Character > Discretionary Hyphen or Command/Ctrl-Shift-Hyphen. If type should reflow so the word is no longer at a line ending, the discretionary hyphen disappears. To hyphenate a word that never breaks on that hyphen, use a non-breaking hyphen: Type > Insert Special Character > Nonbreaking Hyphen. To prevent a word or string of text from breaking, select the text and choose No Break from the Character or Control palette menu
— Erica Gamet, from InDesign Magazine #7, Aug/Sept 2005
Edit Text Frames
You can edit text frames just like graphics frames and transform them into almost any shape. Use the Selection or the Direct Selection tool to select the text box, and then use the Pen tool to add anchor points. You can manipulate these anchor points just as you would any vector path
— John Feld, from InDesign Magazine #7, Aug/Sept 2005
Multi-column Text, One-Column Headline
Making one headline span several columns of text in a multi-column text frame takes some trickery. Here’s one way to do it.
- Use the Text tool to create a text frame.
- In Text Frame Options, choose the desired number of columns.
- Use the Type on a Path tool on the text frame outline and type the headline.
- Position the text brackets so that the text begins and ends above the text frame.
- Thread the text frames by selecting the headline out-port and connecting it to the text frame.
- To vertically distance the headline from the body text, apply a baseline shift to the headline.
Why bother with all these steps? Because you can use Object Styles and Apply Next Style to format this type of frame and its content with one click. Also, both the headline and the body appear together in the Story Editor.
— Rufus Deuchler, from InDesign Magazine #7, Aug/Sept 2005
Delete Preference Files
You can delete InDesign’s preference files when launching InDesign. To display this option dialog, launch InDesign, then immediately select Ctrl+Alt+Shift (Windows) or Ctrl+Option+Command+Shift (Mac OS).
— Eliot Harper, from InDesign Magazine #7, Aug/Sept 2005
Extending a Line
Need to add rows or columns to a table? Here’s the fastest way to add rows at the end of a table or columns at the right hand side of a table:
- Hover your Text tool cursor over the bottom or right edge of the table so that the cursor changes to a double arrow.
- Now, press and hold down the mouse button — but still don’t move the mouse.
- Press and hold down the Option/Alt key.
- Now move the mouse down (for extra rows) or to the right (for extra columns). The more you drag, the more rows or columns InDesign adds.
The Environment Dialog Box
One of the most useful dialog boxes in InDesign is also one of the least seen: The Environment dialog box. You can find this little creature by holding down the Command/Ctrl key and choosing About InDesign (from the Help menu on Windows, or the application menu on the Mac). The Environment dialog box tells you all about your version of InDesign, including what plug-ins are running. More importantly, it tells you about the current document, such as: Was it originally a QuarkXPress or PageMaker file? When was it last saved? And what special plug-ins were used to create it?
Jump from One Master
Do you have lots of master pages in your document? Need to jump from one to the next? It’s a hassle to double-click on each of them in the Pages palette. Don’t bother: Just use the Next Spread or Previous Spread features from the Layout menu. Better yet, just use the shortcuts: hold down Option/Alt and press Page Up or Page Down. When you’re viewing any master page, this shortcut takes you to the next (or previous) one.
Build Guide Libraries
You can save a page’s guides by selecting them and choosing Add Item from the Library’s palette menu or by clicking the New Item button at the bottom of the palette. Then, when you want to use the same set of guides on another page, simply select it in the Library and choose Place Item(s) in the palette menu. This places the same guides, in the same positions, on the new page. You can’t add to or place guides from a Library using drag and drop.
— Erica Gamet, InDesign Magazine #7, Aug/Sept 2005
Stroke Frame and Table Corners
Here’s how to make a stroke that appears only at the corners of a frame:
- Create a new dashed stroke style by choosing Stroke Styles from the Stroke palette menu. Call it something like Corners.
- Apply the stroke to a text or graphic frame and give it an adequate stroke width.
- Return to the stroke style to edit Corners.
- For Pattern Length, insert a value that’s much larger than your frame.
- For Corners, choose Adjust Gaps (which will keep the length of the dash fixed).
- Choose Preview for real time fine-tuning.
- Move the little ruler arrow until you achieve the desired result (or enter a value for Length).
You can then apply that stroke to any frame (of any size) and the corners will be identical for all objects. For surprising effects, try it on tables, too.
— Rufus Deuchler, InDesign Magazine #7, Aug/Sept 2005
Look Back at History
If you hold down the Command/Ctrl key while you choose About InDesign from the InDesign menu (Mac) or Help menu (Win), you’ll see the Component Information dialog box. It tells you exactly what version of InDesign you’re running and which plug-ins are installed. The Document History section of the dialog tells you when the document was first created and by what version of InDesign, when it was last saved, whether the file was ever converted from Quark or PageMaker, and other information. All of it may be useful for diagnosing a troublesome document.
— Keith Gilbert, InDesign Magazine #7, Aug/Sept 2005
Quick Switch for Measurements
You know you can type any measurement into any number field. (For example, even if your measurement preferences is set to inches, you can type “3p” into the X field to position an object at three picas.) But sometimes it’s helpful to actually change InDesign’s rulers. You can change the ruler measurement system in the Preferences dialog box, but here’s an even faster method: Press Command-Option-Shift-U/Ctrl-Alt-Shift-U. Each time you press this shortcut, InDesign rotates through to the next measurement system (millimeters to centimeters to ciceros, and so on). One more technique you should know about: You can right-click on a ruler (or Control-click with a one-button mouse) to set the measurement system for that one ruler.
Recompose All Stories
Sometimes you need to re-compose all your stories in your InDesign document. This could be because you changed your hyphenation method, because you switched languages, or for a handful of other reasons. Or perhaps you simply want to make double-sure that all of your stories are composed with the very current settings. But how to do that?
One way is to turn on the checkbox “Recompose all stories when User Dictionary is modified” in the Dictionary panel of the Prefences dialog box. Now make any change in the user dictionary, save this change, wait until the stories have been re-composed, and finally revert the change in the User Dictionary.
A much faster method is to choose Edit > Keyboard Shortcuts, choose the product area “Text and Tables,” scroll down the list to the entry “Recompose all Stories immediately” and assign a keyboard shortcut to it. Save your change, and then just type your new keyboard shortcut! –Courtesy of Rudi Warttmann, ITIP.biz
Place a Guide with a Click (or Two)
You can place a guide on your page by double-clicking at the appropriate position on the horizontal or vertical ruler. (If you can’t see the rulers around the page, choose View > Show Rulers, or press Command/Ctrl-R.) Even better, hold down the Shift key when you place the guide and it will be placed at the location of the nearest ruler tick mark. That is, you don’t have to click exactly on the 100mm tick mark to get a guide there; just get near that tick mark and Shift-double-click.
Switch to the Next Window
I almost always work with several InDesign document windows open at the same time and I often need to swtich from one window to the next. Sure, I could use the Window menu to do this, but it’s often much faster to press Command/Ctrl-tilde to switch to the next window Command-Shift/Ctrl-Shift-tilde to switch to the previous window. The tilde key is in the upper-left corner of the keyboard on US keyboards.
If you have a non-US keyboard, the keyboard shortcut might be different. You can customize it to whatever you want by choosing Edit > Keyboard Shortcuts, picking “Views, Navigation” from the Product Area popup menu, and finding the Next Window and Previous Window commands.
Jump to the End of the Story
One of the best ways to get efficient in InDesign is to learn the keyboard shortcuts for navigating around text. For example, you probably know that Command/Ctrl-Down Arrow moves to the beginning of the next paragraph. Here’s a few that I find many people don’t take advantage of:
- Command/Ctrl-End jumps to the end of the current text story
- Command-Shift/Ctrl-Shift-End selects from the current text cursor position to the end of the story, even if the end of the story is overset (past the end of the last text frame).
- Replace the Home key above to jump or select to the beginning of the story.
- Note that on some keyboards, you may have to add another modifier key. For example, on my PowerBook I have to add the “Fn” key before pressing the right-arrow key to select to the end of the story (because Fn-Right Arrow equals the End key on my keyboard).
Thread Backwards
Just about everyone knows that you can click on the out-port of a text object to click on or draw another text frame that creates or continues a text thread. But you can also click on the in-port of a text frame-even if it’s the first frame in the thread-to start the thread in a different frame. This is especially useful when you place a story, then realize you want the headline in its own frame so you can give it a drop shadow.
— Mordy Golding, from InDesign Magazine #7, Aug/Sept 2005
Linking Multiple Text Frames
You can easily link three or more text frames using the Option/Alt key. To link existing text frames, click in the overflow box of the first frame, then Option/Alt-click in each subsequent text frame. To create and link text frames on-the-fly, create the first frame, click in its overflow box, then Option-click and drag to create each subsequent frame.
— Erica Gamet, from InDesign Magazine #7, Aug/Sept 2005
Lock Objects when Aligning or Centering
If you select two objects on your page that aren’t overlapping and use the Align or Control palette to center them, both objects will move. That can be very annoying if you wanted one of them to stay put. Similarly, if you align two objects horizontally, the left-most object always stays in position and the other one moves. Fortunately, you can tell InDesign that an object should not move by selecting it and choosing Object > Lock Position (Command/Ctrl-L). If an object is locked when you use the Align features, then all the objects align to it.
Speedy One-Word Spell Check
InDesign CS2’s new Dynamic Spelling feature — it flags misspelled words as you type-is useful and convenient for on-the-fly corrections, but it can be distracting, especially when you’re trying to concentrate on something other than spelling. For the best of both worlds, assign a keyboard shortcut to Dynamic Spelling with Edit > Keyboard Shortcuts. Keep the feature turned off (it’s off by default), but when you’re curious if a certain word is spelled correctly, use the keyboard shortcut to briefly toggle it on. If the word is misspelled, it’ll sprout a (non-printing) red underline. Right-click on the word to choose the correct spelling or add it to the dictionary from the contextual menu. If the word is spelled correctly, nothing changes — no underline appears. Press the shortcut again to toggle Dynamic Spelling off and continue with your work.
— Anne-Marie Concepción, from InDesign Magazine #7, Aug/Sept 2005
Fast Word Replacement
Create your own shorthand dictionary for words you type all the time (or that tend to slow you down) by using InDesign CS2’s new Autocorrect feature. The secret is to create a string of text that would not otherwise occur; this is a placeholder for your desired text. For instance, if you routinely butcher the capitalization of the word “InDesign,” set up the text “qq” to stand in for “InDesign” by opening the Autocorrect pane in Preferences, choosing Add, and entering the Misspelled Word (qq) and the Correction (InDesign). Now when you type the word “qq,” Autocorrect swaps the correct text for the placeholder. Autocorrect ignores the string of text if it occurs within a word.
–Erica Game, from InDesign Magazine #7, Aug/Sept 2005
Quick Tints of Colors
Need a color a little lighter or darker than the one you’ve got? When you edit or create a new color (in the Colors palette or the New Color Swatch dialog box), you can hold down the Shift key while dragging the sliders to make all the others sliders move, too. The result is a more or less saturated version of the color you started with.
What’s That Override?
To see local overrides in InDesign CS2, hold the mouse over the plus sign of the name of a paragraph or character style name in the Paragraph Styles and Character Styles palettes.
— Jamie McKee, from InDesign Magazine #7, Aug/Sept 2005
No More Rasterized Text
Drop shadows and other transparency can be very effective, but not when small text such as a caption rasterizes in the flattening process at print time. For worry-free designs, create at least two layers in your document: One at the top level for all of your text, and one at the bottom level for all of your images. Text that appears above a transparency effect in the stacking order will never rasterize.
— Mordy Golding, from InDesign Magazine #7, Aug/Sept 2005
Removing a Frame from a Thread, Part 2
I previously suggested a method for removing a text frame from a story. Several people wrote to ask me why I shouldn’t just delete the frame itself. Sure, that works, but the hard part is keeping the frame on the page and just making the story skip past it. Then tip-of-the-week reader Arsim Shala from Kosovo wrote me with a great solution: Select the frame you want removed, cut it to the clipboard (Command/Ctrl-X), and then paste it back in the same place (Command-Option-Shift-V/Ctrl-Alt-Shift-V). Now, if you want the frame to be empty, double-click on it to place the Text cursor in the frame, press Command-A/Ctrl-A to select all the text, and press Delete. This is one of those tips that is much faster to do than to explain in writing.
Thanks for the tip, Arsim! In appreciation, we’re going to give you a free 2-issue subscription to InDesign Magazine! (You can pick any two past issues, or be signed up to get the next two issues free.)
Typing a Tab in a Table
Need to place a tab character inside a table cell? You can choose Type > Insert Special Character > Tab. Or, even easier, on the Macintosh, just press Option-Tab. If you do this a lot on Windows, you should apply a keyboard shortcut to the Tab character by:
1. Choose Edit > Keyboard Shortcuts
2. If you haven’t already created a custom shortcut set, click New Set
3. Choose Type Menu from the Product Area popup menu
4. Choose Insert Special Character: Tab from the Commands list.
5. Choose Tables from the Context popup menu.
6. Type a keyboard shortcut (such as Ctrl-Alt-Shift-Tab) in the New Shortcut field.
7. Click Assign and then click OK.
Remove A Frame From a Thread
You’ve linked four text frames (lets call them A, B, C, and D) but now you realized that frame B was supposed to be some other text story, so you want to take it out of the thread. Can you do it? First, unlink text frame A from the thread by double-clicking on its out port with the Selection tool. Next, select text frame B and unlink it from the thread by double-cliking on its out port. Finally, select frame A and link it to frame C (by clicking frame A’s out port and then clicking anywhere on top of frame C). This works because when you unlink text frame A, InDesign preserves the thread from frame B to C, to D.
Custom Placeholder Text
When you need to fill a text frame (or a bunch of linked text frames) with “dummy” text, place the text cursor in the frame and choose Type > Fill with Placeholder Text. InDesign applies the current text formatting (the style of the text where the cursor was placed) to all the text it adds. By default, the text is quasi-Latin based on the Lorem Ipsum text that designers have been using for decades. However, if the Caps Lock key is held down, InDesign uses random words from an oration by Cicero. Don’t like that either? Save any text file (ASCII txt file only) in the InDesign application folder with the name placeholder.txt and InDesign will use that text instead!
Centering Objects on the Page, Part 2
Last week’s tip focused on aligning objects to the page (rather than other objects on the page). I received a number of emails pointing out that InDesign Magazine already published another solution to centering an object on a page:
1. Select the object(s) and cut them to the clipboard (Command/Ctrl-X).
2. Press Command/Ctrl-0 (zero) to go to Fit in Window view.
3. Paste (Command/Ctlr-V)
I like this method of centering objects, but it is not always entirely precise. Sometimes (depending on the actual percentage view when you are in Fit in Window), the object appears slightly off center — though usually only a tiny distance from the center.
For other cool methods of centering and aligning objects on your page, see the article in an upcoming issue of InDesign Magazine!
Center an Object on the Page
InDesign offers all kinds of cool features, but some of the basic features it lacks can leave you scratching your head. For example, the Align palette and the Control palette make it easy to align two or more objects along their edges or centers. But how do you align one or more objects to the page itself? The trick is to create an object that is the same size as the page itself. I typically press F (for the Frame tool), draw out a small frame, press Command/Ctrl-6 to jump to the Control palette, type zero-tab-zero-tab-W-tab-H-enter (where H and W are the width and height of the page). Now select that object along with the ones you want to align and use the aforementioned palettes to align them. Store the big object as a snippet in Bridge, a Library, or your desktop for use later, and then (optionally) delete it from the page.
Duplicating a Page
Need to make a slight variation on a layout but keep the original? You can duplicate a page in your document by holding down the Option/Alt key while dragging it in the Pages palette.
Moving Objects Behind Other Objects
You know that you can select one object behind another one by Command/Ctrl-clicking, right? Just keep clicking with Command/Ctrl key held down until you select the one you want. But now how do you move that object? You could use the Control palette to adjust its X and Y coordinates. Or, even cooler: Just drag the centerpoint of that object. If you drag anywhere other than the centerpoint, you move the topmost object. But the centerpoint moves the object itself.
Go and Fit in Window
You know you can jump to a particular page by double-clicking on it in the Pages palette. But did you know that you can hold down the Option/Alt key while double-clicking to jump to that page and switch to Fit Page in Window at the same time?
Copying Color Swatches
Michael Brady pointed out a clever way to copy color swatches from one document to another in InDesign CS2: Just select them in the first document (Command/Ctrl-click to select swatches that aren’t next to each other) and then drag them from the palette to the second document (the one you want to add them to). Simple, easy, fast. I wish we could do that with paragraph styles and object styles, too!
Target That Page
If you drag the vertical scroll bar halfway down, you’ll end up about halfway through your long InDesign document. But if you follow that by pressing Shift-Page Down (to jump to the next page), you may end up on a very unexpected page. Why? Because this keyboard shortcut takes you to the next page after the currently-targeted page in the Pages palette, not the one you’re actually looking at. So after dragging the scroll bar, click once anywhere on the page or pasteboard. That targets this spread. Now the shortcut will work as expected.
Linking Two Full Frames
Unlike QuarkXPress, InDesign can link two text frames when both frames contain text. When you do this, the stories in the text frames are merged into a single story. If the text in the first text frame did not end with a carriage return, InDesign will run the text in the second frame into the last paragraph of the first text frame.
Follow-up on Search and Replace Quote Marks
One of my favorite things about tips & tricks is that they are sometimes so obvious, and yet I learn new ones all the time. Here is a great example.
In response to last week’s tip about converting straight quotes to curly (“typographer’s”) quotes, Martin Braun wrote to us from Germany:
“I think there is an even faster way to set all quotation marks to typographer’s style: Just replace all quotation marks by another character or combination of characters that is not included in the text (e.g. “###”). Then replace “###” with ” (the quotation mark). InDesign will automatically use the correct quotation mark.” (Note that this only works when the Use Typographer’s Quotes checkbox is turned on in the Preferences dialog box.)
Thanks, Martin!
Search and Replace Quote Marks
I was recently sent a file that had straight quotation marks (both single and double) instead of curly (typographer’s) quotes. It turns out that it’s harder to replace these than it should be. Here are two methods, each with their pros and cons.
- Method 1: Find/Change
It’s easy to search for quotes: Just type a single or double quote mark in the Find What field of the Find/Change dialog box. But how do you convert a straight single quote to a curly quote? There is a keyboard shortcut (different on Mac OS and Windows) to type curly quotes, but why bother trying to remember it? Just pick a special character from the little flyout menu to the right of the Change To field (it’s the one labeled with a small black triangle).Unfortunately, you have to pick either the left or the right quote — so you should probably search for a space character followed by a quote first. That will find most of the beginning quotes (because there is usually a space before an open quote mark). Replace that with a space followed by the Single or Double Left Quotation Mark (from that flyout menu). Next search for all the paragraph characters (again, from that menu) followed by a quote mark. That’ll find all the quote marks at the beginning of a sentence. The quote marks that are left over are probably close marks, so you can search for all the rest of the quote marks and change them to the Single or Double Right Quotation Mark. - Method 2: Export/Import
Here’s a far faster way to accomplish the same thing. (Thanks to Anne-Marie Concepcion for the clue to this solution.) Place the flashing text cursor in the story and choose File > Export. Then choose InDesign Tagged Text from the Format popup menu and click Save (noting where you’re saving the file, of course). Now select the whole text story in your document, delete it, choose File > Place, and select the file you just saved out. Before you click OK, turn on Show Import Options. Now, when you click OK, InDesign offers you the option of replacing your quotes with typographer quotes. Turn it on, click OK, and you’re done.
The first solution takes longer, but is great when you have a bunch of different text stories in your document (or you want to search across multiple open documents). The second solution is faster, but only works one story at a time.
Save All Open Documents
I have 15 InDesign files open, and I’ve just performed a Find/Change across them all. (Did you know you can do that? Just choose All Documents in the Find/Change dialog box.) Now I want to save them all. It’s a hassle to switch to each window and choose File > Save. Avery Raskin to the recue! He recently pointed out to me the hidden keyboard shortcut for Save All: Command-Option-Shift-S (or Ctrl-Alt-Shift-S). That just saved me a bunch of time. That’s what I like about InDesign: You learn something new everyday.
Hide and Seek Side Palettes
To expand or contract all the side palettes (the palettes that are stashed along the left or right side of the monitor), press Command-Option-Tab, or Ctrl-Alt-Tab. Alternately, you can Option/Alt-click on one of the palette tabs to expand or contract all the side palettes on that side of the screen.
Clear Overrides in a Paragraph
You’ve got a paragraph with a paragraph style applied, but part of the paragraph has local overrides (like font, size, color, or whatever) that you want to get rid of. If you select some text (such as a word or two) and click the Remove Overrides button in the Paragraph Styles palette, InDesign removes any local formatting applied to that text. But if you place the cursor in the paragraph and don’t actually select any text before clicking this button, InDesign removes the local formatting from the entire paragraph.
Get Those Points
You’ve applied a Corner Effect to a frame, but now you want to edit the path slightly with the Direct Selection tool. Unfortunately, the Corner Effects don’t actually place editable points on your frame; they just simulate the rounded corners or inverse corners (or whatever effect you’ve applied). The Pathfinder palette to the rescue! In CS2, simply open the Pathfinder palette (Window > Object & Layout > Pathfinder), select the frame, and click the Open Path or the Close Path button. The corner effects suddenly get converted to real Bezier points!
Manage Your Palettes Better
Let’s face it: InDesign has a LOT of palettes, and a huge amount of time each day is spent just opening the right set of palettes, positioning them, closing other palettes, and so on. Make life easier for yourself by creating workspaces. Workspaces remember which palettes are opened (or closed) and where they’re located on the screen. To make a workspace, set up the screen just the way you want it and then choose Window > Workspace > Save Workspace. InDesign then lets you name your workspace whatever you want. Later, when your palettes are all mixed up again, you can choose that workspace from the same Workspace submenu. Make one workspace for editing text, one for laying out pages, one for proofing, and so on.
Aligning Decimals in a Table
How on Earth are you going to align the decimal points in that column of numbers in your table? No problem. Just select the whole column (choose the Type tool and click over the top of the column when you see the bold down-arrow cursor), open the Tabs palette (Window > Tabs), select the Decimal Tab Stop in the palette, and click in the palette’s ruler where you want the decimals to be aligned. The cool thing is that this works without you typing a tab character into each cell!
Go Back to the Previous Page
Two of my favorite underused features in InDesign are the Go Back and Go Forward commands (hiding under the Layout menu, even though they should be under the View menu). Let’s say you’re in the middle of your document and you decide to jump to a master page. Now, you want to return to the page you were last on. Choose Go Back! (Faster, press Command/Ctrl-Page Up). It’s like navigating back through pages you’ve seen in a Web browser. Then you can choose Go Forward (Command/Ctrl-Page Down) to navigate forward again.
Drag Into New Frame
You know you can drag-and-drop a graphic or text file into InDesign from the Finder, Windows Explorer, or Bridge. But if you drag the file on top of an empty frame, InDesign fills that frame with the incoming file. If that’s not what you want to do, hold down the Command/Ctrl key while dragging. This forces InDesign to create a new frame for it.
Fast Edit Original
If you select an image and click the Edit Original button in the Links palette (or choose Edit > Edit Original), InDesign launches the program that created that graphic. Actually, it’s based on whatever application the operating system thinks should open the file. So if you export a PDF from InDesign, re-import it into another InDesign page and then choose Edit Original, the PDF opens in Acrobat (not InDesign, of course). The fastest way to choose this feature: Option/Alt-double-click on a graphic with the Selection or Direct Select tool.
Show Your Options
The Show Options checkbox inside the Place dialog box is sticky — that is, if you turn it on, it remains on each time you place until you turn it off. However, instead of turning on and off the checkbox, hold down the Shift key when you click the Open button. The Shift key forces the Options dialog box to open whether or not the checkbox is on.
Tip from Creative Suite Conference
Here’s a tip I just learned today while attending a session at “The Creative Suite Conference” in London. While I already knew that Adobe Bridge can display a thumbnail preview of the first page of InDesign documents, I didn’t realize that it could show a preview of every page… if you save your file as an InDesign template. (You can choose between a document and a template in the Save As dialog box.) Because Bridge can scroll through these thumbnails, you can effectively use Bridge as a (low-res) InDesign reader, even if you don’t have InDesign running. Note that when you open a template file, you’ll get a new “Untitled” document unless you choose “Open Original” in the Open dialog box. Using Open Original will open the file with its proper name.
–Courtesy of Branislav Milic and Sandee Cohen
Better Drop Shadows
Want better-looking drop shadows? Normal drop shadows are cool, but they’re too pure. You’ll get a much more natural drop shadow if you increase the Noise value in the Drop Shadow dialog box a little — you only need 5 or 6 percent to help.
Switch to Type Tool Fast
If you double-click on a text frame with either the Selection tool or the Direct Select tool, InDesign automatically switiches to the Type tool and places the blinking cursor where you double-clicked. Need to get back to the Selection tool again? Here’s one way to do it: Command/Ctrl-click on the text frame and then press V.
Change Object Shape
Need to change one frame shape into another? Check out the Convert Shape submenu (under the Object menu). Want to make a bunch of objects into starbursts? First double-click the Polygon Frame tool to open the Polygon Settings dialog box and specify settings for a starburst. From then on you can select any frame and then choose Object>Convert Shape>Polygon to get those same starburst settings.
More Quick Apply Features
Here are some hidden shortcuts for the Quick Apply feature in CS2: Press Command-Return (Mac) or Control-Enter (Windows) to open the Quick Apply feature. Now you can type a few characters of a style name. They don’t have to be the first characters; typing “B2” will find “Bhead2” and “2B or not 2B.” If more than one style appears in the list, you can press the up and down arrow keys on your keyboard to navigate them.
Now, you can press Enter to apply the selected style, Option/Alt-Enter to remove all local overrides and apply the style, or Option/Alt-Shift-Enter to remove all local overrides including character styles before applying the style. If you’re not sure which style you want to apply, press Shift-Enter, which applies the style, but leaves the Quick Apply window open. Or press Esc to cancel the Quick Apply.
Change Object Shape
Need to change one frame shape into another? Check out the Convert Shape submenu (under the Object menu). Want to make a bunch of objects into starbursts? First double-click the Polygon Frame tool to open the Polygon Settings dialog box and specify settings for a starburst. From then on you can select any frame and then choose Object>Convert Shape>Polygon to get those same starburst settings.
Rearranging Colors
Almost no one uses the Registration color (which applies 100% of all colors… a big problem for everything except printer marks). So why is it at the top of the Swatches palette? Because most people don’t realize you can reorder your Swatches palette: Just click-and-drag the swatches up or down. Move that Registration color to the bottom of the list while no documents are open and it’ll stay there for all future files.
Import Lots of PDF Pages
You can more than one page of a PDF at a time in CS2 by turning on the Show Import Options checkbox in the Place dialog box, then choosing which pages you want to import (or select All to import the whole thing). After you click OK, you’ll see the Place PDF cursor. Each time you click you’ll place another page of the multi-page PDF. Or Option/Alt-click to place all the selected pages on the same page.
Fast Edit via Quick Apply
Quick Apply is one of my favorite features in CS2: Just press Command/Ctrl-Enter to open the Quick Apply window, type a few characters of a style name (character style, paragraph style, or object style), and press Enter to apply it. But did you know that if you press Command/Ctrl-Enter after choosing the style name (instead of Enter), InDesign opens the edit dialog box for that style? Much faster than navigating through the palettes, especially when you have a lot of styles.
Quick Custom Underlines
Trying to navigate through submenus to find the Custom Underline and the Custom Strikethrough dialog boxes is a hassle. Instead, just Option/Alt-click on the Underline or Strikethrough buttons in the Control palette. Try holding down the Option/Alt modifier key when you click on various buttons or icons in the Control palette; it opens all sorts of hidden dialog boxes.
Scaling by Dragging
If you select more than one object on your page, you can scale them all quickly by holding down the Command/Ctrl key while dragging a corner handle. However, you must either group the objects first (and then Command/Ctrl-drag the group’s corner handle) or Command/Ctrl-drag the corner of any text frame within the non-grouped selection. If you don’t group and then Command/Ctrl-drag a frame that isn’t a text frame, only that one frame changes size. Weird, eh?
Transform and Duplicate
Select an object, place your cursor in the Rotate field of the Control palette, and type a rotation number — such as 30 degrees. If you press Enter, the object is rotated 30 degrees. If you add the Option/Alt key when you press Enter, you rotate a copy of the object instead. It works in all the fields! If you want a duplicate of a frame, but this one should start at 20 picas from the left side of the page, type 20p into the X field and press Option/Alt-Enter. And so on.
Trivia: Find the Ways to Add a Swatch
Anne-Marie Concepción recently tried to stump me by asking me to name all the places in InDesign that you can create a new color. There’s the Color and the Swatches palette, of course. But where else? In CS2, you can double-click on the Fill icon at the bottom of the Tool palette to open the Color Picker. (Which is, by the way, my least favorite feature in the entire program.)
There’s also another way that works in both CS and CS2: The Drop Shadow feature lets you create new colors if you change the Color popup menu to something other than Swatches. But there’s another hidden way… one that actually lets you save the color you make as a swatch: When you create or edit a paragraph or character style, you can double-click on the fill or stroke color in the Character Color panel. This opens a dialog box that lets you create and save a swatch.
Can you find any other clever ways to create colors in InDesign? (Importing them from an EPS, PDF, PSD, or DCS file doesn’t count!) Email me at david@indesignmag.com with your favorite tips.
Right Align Tab with Leader
You know you can type Shift-Tab to create a right-indent tab (or choose Right Indent Tab from the Type>Insert Special Character menu). But how do you apply a tab leader (like dots) to it? Can’t do it in CS, but you can in CS2: Just apply a tab leader to the last tab stop in that paragraph. If there isn’t already a tab stop, then add one anywhere in the paragraph and apply a leader to it. The right-indent tab always uses the leader from the last tab stop.
Reset the Zero Point
It’s easy to change the zero-zero point of the document rulers: Just drag from the corner where the two rulers meet and let go of the mouse button where on your page (or pasteboard) you want the zero-zero point to sit. But how do you get the zero-zero point back to the upper-left corner? No problem: Double-click that little square where the rulers meet to reset back to the ruler default position.
Change a Palette Value Again and Again
You might now know if you want an object to be rotated 20 degrees, or 25 degrees, or 30 degrees… but you know you like typing these values numerically rather than just using the Rotate tool. After selecting the object on your page, click once on the Rotate icon in the Control palete (clicking on the icon selects all the text in that field) and type 20. Now instead of pressing Return/Enter, hold down the Shift key and press Return/Enter. This rotates the object but leaves the rotation field selected in the palette! If you don’t like it, you can type a new value without having to take the time to click in the field again. It’s a little timesaver, but it’s the kind of thing that can save you a lot of time over the course of a week.
Turn On and Off Curly Quotes
Sometimes you want to type a curly (“typographers”) quote and sometimes you want a straight quote. But by default, InDesign always converts straight quotes to curly quotes as you type. Isn’t there a way to get both? Sort of. Press Command-Option-Shift-‘ (that’s the quote key on your keyboard) — or Ctrl-Alt-Shift-‘ in Windows. This turns off the quote converter preference, so now you’ll get your straight quotes. Press the shortcut again to turn the converter back on to get your curly quotes.
Dramatic Backgrounds for Preview
When you show your InDesign pages to your art director or client, consider turning on Preview mode to hide all non-printing objects (click on the Preview Mode icon at the bottom of the Tool palette, or press W when not in a text frame). Then press Tab to hide all your palettes. For even more dramatic results, open the Preferences dialog box, choose the Guides & Pasteboard panel, and choose Black from the Guides and Pasteboard dropdown list. The black preview color boosts the visual contrast of the colors on your page and makes it look great.
Lower the Size of Your Files
An InDesign file can get larger (and larger, and larger) each time you save it. It’s really a good idea to choose File > Save As every so often and give the InDesign file a new name. Using Save As clears out all the gunk that builds up over time. Here’s another option: Deselect all objects on your page and then choose File > Export to export the entire file. Choose InDesign Interchange (.inx) from the Format popup menu in the Export dialog box. Once you have exported the file in the INX format, open that INX file in InDesign and then do a Save As. This really cleans out the file of any weirdness that might have crept in.
Colorize Color Images
You can colorize a color image (make it look like a duotone) by selecting the picture frame with the Selection tool and choosing a fill color from the Swatches or Color palette. Now click on the image with the Direct Select tool and choose the Luminosity blend mode in the Transparency palette. If the image is in grayscale, choose Darken instead. Note that this will convert spot colors to CMYK, so it’s better to select a process color.
–Courtesy of Branislav Milic, Brussels https://www.milic.com/indesign/index.html
Select Everything on a Layer
You can select all the objects that live on a specific layer on your page by Option/Alt-clicking on the layer’s name in the Layers palette.
Printing Non-consecutive Pages
You can print non-consecutive pages and page ranges by typing in the page numbers in the Range field of the Print dialog box. For instance, you could type ?3, 6, 14-18?. This also works in the Export PDF dialog box. To print the fifth page of a document that starts on a page number other than 1, type +5 (the plus sign means absolute page number). So to print the third through fifth pages, you would type the really confusing: +3-+5.
Fast Saves from Word
You should never use Fast Save in Microsoft Word before importing text into InDesign. To get around Fast Save, go to the Preferences dialog box in Microsoft Word and turn off the Allow Fast Saves check box.
Explanation: When Word’s “Fast Save” feature is turned on, each time you save your Word document it just saves what is different from the previous version, like an “incremental backup.” When you place this file into Word, InDesign has to sift through the original document, plus every notation about how that document was changed. It lowers the reliability rate significantly. When you turn Fast Save off, Word saves the document more or less as though you had done a “Save As,” so you get a clean version of the file. It takes a little longer to save from Word, but it’s worth it. Of course, if you always use Save As before placing your file in InDesign, then it probably doesn’t matter.
The Style Plus Sign
A little plus sign appears in the Paragraph Styles and Character Styles palettes when the cursor is in some text that has local formatting (beyond the style description). If you’re using paragraph and character styles properly, this symbol shouldn’t appear very often. If you’re not sure what local formatting has been applied, Option/Alt-click on the New Style button in the Paragraph Styles or Character Styles palette. Look at the listing of attributes in the Style Settings list at the bottom of the palette; the items in the list (after the + sign) are the local formatting.
Watch Out When Typing
Remember that many keys are keyboard shortcuts when you’re not typing in a text frame. For example, pressing the period key fills the current shape with the last-used solid color. Pressing comma fills the object with a gradient, and pressing / (slash) fills it with None. These are great time-savers, but if you press one of these accidentally, you may not be so happy. Here’s one of my favorites: Shift-X swaps the fill and stroke colors of selected objects.
Import Multiple Images and Text Files
Do you want to place a whole bunch of files at the same time? Just select them in a Macintosh Finder or Windows Explorer window and drag them on top of your InDesign document. You can import both pictures and text this way (even both at the same time), and InDesign creates frames for each one automatically. Note that if you drag just one image or text file on top of your InDesign document and you let go of the mouse button while the cursor is over an empty frame, that file will be placed into the frame.
Switch Text Mode
If you’re editing text and you want to change to a different tool, you can’t press the tool’s keyboard shortcut (because you’ll just type that letter in the text). Instead, Command-click/Ctrl-click on the text frame, then press the shortcut.
Style Editing
You can double-click on a style in the Paragraph Styles or Character Styles palettes to edit that style. However, if you have text selected, you’ll automatically apply that style to the text! If you want to edit the style but not apply it to the current selection, hold down Command-Option-Shift/Ctrl-Alt-Shift when double-clicking on the style.
Fractions in Arithmetic
You can type fractions in palettes or dialog boxes instead of decimals. To get 1/5 inch, type 1/5″. To place a text box 3 7/8 inches from the left side of the page, type 7/8in in the X field of the Transform palette, then press Shift-Return (to perform the calculation but leave cursor in the field. Then press the right arrow key and type +3in.
Lock First Line to Baseline Grid
Often, sidebars in magazines or newsletters are set in a different font and leading than the main body text. You can make the first baseline of that sidebar lock to the leading grid by first turning on Align to Baseline Grid for the whole paragraph, and then selecting Only Align First Line to Grid from the Paragraph or the Control palette menu.
Redefine Styles
Need to change the definition of a paragraph style? Instead of using a dialog box, just select a paragraph that has the style applied to it, and change its formatting. Then, to update the paragraph style based on the changes you’ve made to the text, choose Redefine Paragraph Style from the Paragraph Styles palette menu (or press Command-Option-Shift-R/Ctrl-Alt-Shift-R).
Viewing Without Bleeds
If objects bleed off the sides of your pages, you can view your document without bleeds (that is, as it will look in its final printed form) by clicking the Preview button at the bottom of the Tool palette — or by pressing W while no text is selected. The Preview mode hides all non-printing objects, including guides and objects for which Non-printing is turned on in the Attributes palette.
Jump to a Page
The fastest way to jump to a specific page is to press Command-J/Ctrl-J, then type the page number, then press Return or Enter. You can even jump to a master page: instead of typing a page number, type the prefix of the master page (like “A” for A-Master Page).
Highlighted Text
Sometimes you’ll open a document and find some text highlighted in pink, yellow, or green. Pink highlight means the font is missing or wrong. Yellow highlight means the H&J Violations is turned on in the Composition panel of the Preferences dialog box (the more saturated the yellow, the more egregious the violation of the hyphenation or justification settings). Green highlights show up wherever you have applied manual kerning or tracking when the Custom Tracking/Kerning feature is turned on in the same preferences panel.
Export JPEG
Need to get a quick comp of a page to a client who may or may not have Acrobat? Try exporting the page as a JPEG graphic (File>Export), which can be opened in any Web browser or graphics program. Similarly, if you want a thumbnail-sized reproduction of a graphics-rich page (like reprinting the cover of a magazine but only a couple inches tall), export that page as a JPEG instead of a huge PDF or EPS file. The JPEG file is always 72 dpi, but that’s usually good enough for a quick comp or for a thumbnail image.
Scroll Wheels are Your Friend
That scroll wheel on your mouse is pretty cool for scrolling up and down. But did you know that if you hold down the Shift key while you turn the wheel you scroll to the left or right? And if you hold down the Command/Ctrl key, InDesign zooms in and out on your page.
Redefine Styles
Need to change the definition of a paragraph style? Instead of using a dialog box, just select a paragraph that has the style applied to it, and change its formatting. Then, to update the paragraph style based on the changes you’ve made to the text, choose Redefine Paragraph Style from the Paragraph Styles palette menu (or press Command-Option-Shift-R/Ctrl-Alt-Shift-R).
This article was last modified on December 12, 2025
This article was first published on October 27, 2011

Recommended for you


This Week in InDesign Articles, Number 105
A weekly roundup of InDesign-related links, videos, articles, and cool stuff on...
Send Those Crash Reports!
Recently, Zak Williamson of Adobe put out the call to InDesign users to please s...
Comments are closed.