
Inside Photoshop: Enhance Your Images with Photographic Edges

Excerpted with permission from Element K Journals
Application: Photoshop 5/5.5
Operating systems: Macintosh, Windows
Have you ever wanted to add a unique element to an image, but weren’t exactly sure what it needed? An easy way to add impact to an image is by creating photographic edges. This technique originally stems from photography, but in Photoshop you can create similar effects like those shown in our cover image. In this article, we’ll demonstrate how to create interesting edges by using a Quick Mask and a series of different filters.
The Technique
Modifying pictures through the use of photographic edges is a fairly simple process that can add impact to ordinary images. To begin, you’ll first need to select an RGB image you want to experiment with. Once you have an image, you’ll create a mask. Then you’ll edit the mask using any of the filters Photoshop has to offer. After applying a filter, you’ll remove the mask and delete the surrounding area of your image to reveal the modified edges.
Creating a Quick Mask
To begin, open an RGB image you want to work on and then use the Rectangular Marquee tool to make a selection, leaving a 0.5-inch border around your image. Then click the Edit In Quick Mask Mode button on the Toolbox (or press the letter Q on the keyboard). The area outside of your selection now appears with a red overlay, as shown in Figure A. The mask is actually protecting the area of the image that it’s covering. This way, when you apply your filters to the image, the edges where the mask and the unmasked areas meet will be the only areas that are affected.

Figure A
The red overlay around the image shows where we applied the Quick Mask.
Applying the Spatter Filter
We’ll use the Spatter filter now to create a jagged edge. Select Filter > Brush Strokes > Spatter. In the Spatter dialog box, you’ll see a preview of the filter in the Preview window. Adjust the Spray Radius and Smoothness of your brush to your preference by moving the sliders or inputting a numerical value. For our image, we selected a Spray Radius of 10 and a Smoothness of 5. When you’re ready, click the OK button. If you want to increase the effect of the filter at this point, press cF ([Ctrl]F in Windows). You can continue applying the filter until you achieve your desired results.
Once you’ve finished applying the filter, click the Edit In Standard Mode button on the Toolbox or again press the letter Q. Now select the inverse of your selection by choosing Select > Inverse or by pressing c[shift]I ([Ctrl][Shift]I in Windows). Then simply press [delete]. Now your image appears to have torn edges, as shown in Figure B.

Figure B
To create this ragged-edge effect, we applied the Spatter filter.
Experimenting with Different Filters
Now that you have a basic understanding of how to create photographic edges, let’s try applying different filters to our mask. But first, let’s make our image’s edges a little more chaotic by adjusting our initial mask. To do so, open an RGB image, and as you did before, make a selection using the Rectangular Marquee tool and then click the Edit In Quick Mask Mode button. Now, rather than applying the filter, select the Paintbrush tool. Painting with black will add areas to your mask, and painting with white will remove areas from your mask.
You can also try experimenting by painting with different percentages of black in order to add areas of muted texture from the filter. Figure C shows how we created a new mask by adding and subtracting areas of our original mask.

Figure C
Use the Paintbrush tool to create a unique mask around your image.
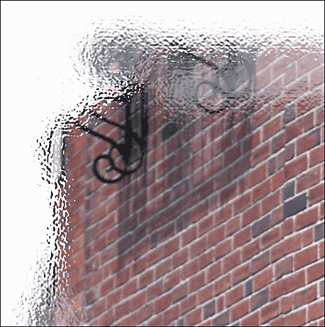
The Glass Filter
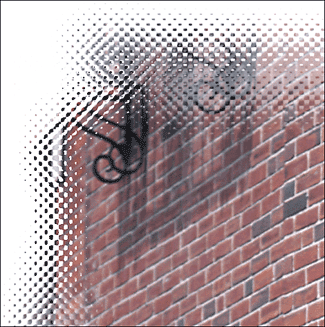
For our second example, we’ll apply the Glass filter to get a bumpy, broken effect, as shown in Figure D. When creating our mask, we manipulated the edges using the Paintbrush tool again to add visual interest. Select Filter > Distort > Glass. When the Glass dialog box appears, experiment with the different settings to create new edges. The settings we used to create our textured edges are shown in Figure E. Each texture in the Texture pop-up list creates an entirely different look, as shown in Figure F. You can choose from one of the following four preset textures: Block, Canvas, Frosted or Tiny Lens, or load one of your own textures. Sample each one to see which works the best with your image.

Figure D
We created these edges by applying the Glass filter, using the Frosted texture.
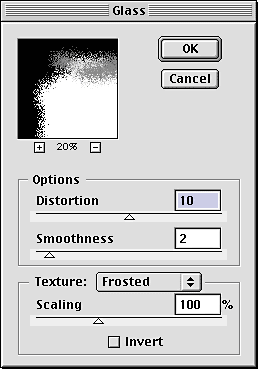
Figure E
To create the effects shown in Figure D, we made our adjustments in the Glass dialog box.

1) Block texture
2) Canvas texture
3) Tiny Lens Texture
Figure F
When using the Glass filter, you can create different effects depending on the texture that’s applied.
The Wind Filter
Another filter that creates interesting edge effects is the Wind filter. Apply a Quick Mask to your image as we did before. This time select Filter > Stylize > Wind. Set your preferences in the Wind dialog box and click OK. For our example, we chose the Blast option from the Method area and the From The Left option from the Direction area, as shown in Figure G. You’ll notice that this only affected one side of your image. In order to apply the effect to the other side of the image, select the Wind filter again. Don’t click on the shortcut under the filter menu for Wind, it will just repeat the same filter you applied. Again, choose Filter > Stylize > Wind, except this time, in the Direction area, click the From The Right option button, then click OK.
Now that you’ve completed two sides of your image you’ll have to rotate the canvas to apply the filter on the remaining sides. You can rotate the canvas by selecting Image > Rotate Canvas > 90deg. CW. Now repeat the previous steps to apply the Wind filter to the right and left sides. When you’ve completed your effects, go back to the menu and choose Image > Rotate Canvas > 90deg. CCW. Then disengage your mask by pressing Q, choose Select > Inverse, and delete the selected area. Your final image should look similar to our example shown in Figure H.
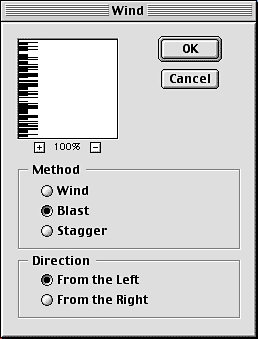
Figure G
To give all your edges a wind blown effect, you’ll have to apply the filter four different times.
Figure H
We created these edges by applying the Wind filter to each edge.
Take It to the Edge
In this article we’ve only touched on a few effects that can be applied to the edges of an image. Take the time to experiment with the other filters that Photoshop has to offer; no doubt you’ll be pleasantly surprised.

Copyright © 2000, Element K Content LLC. All rights reserved. Reproduction in whole or in part in any form or medium without express written permission of Element K Content LLC is prohibited. Element K is a service mark of Element K LLC.
This article was last modified on January 3, 2023
This article was first published on February 3, 2001
Commenting is easier and faster when you're logged in!

Recommended for you

Building an Underwater Scene in Photoshop, Part 1
The Oscar-winning film The Shape of Water opens with a stunning sequence in whic...

Batch Process Images with PhotoBulk
If you work on a Mac and regularly have to process images to size, optimize, or...
CreativePro Tip of the Week: Using the Oil Paint Filter in Photoshop
This CreativePro Tip of the Week on using the Oil Paint filter in Photoshop was...