Inside QuarkXPress: Getting Creative in a Page Layout Application
Version: 4.1
Operating Systems: Macintosh, Windows
No matter how easy software manufacturers make it to import and export images from one application to another, it would still be a lot easier if you could just create everything you need in one application. Eventually, that may be possible. For now, however, we’re resigned to the fact that we need at least two different kinds of applications–one for page layout and one for creating graphics. That doesn’t mean QuarkXPress is completely devoid of a graphic capacity. In fact, you can express your creativity in many ways with the use of the application’s various features and a little imagination. QuarkXPress is great for handling all those little embellishments you need while working with page documents. Can you imagine if you had to go to another application just to create a gradient blend or a special shape, such as a star? Thankfully, you can create such things right in QuarkXPress. With all the time you save not having to open other applications, you can get really inventive. For example, just by combining a few graphic elements, you can create something a bit more complex, like the medals shown in Figure A. To show you how easy these medals were to make, let’s re-create them together.
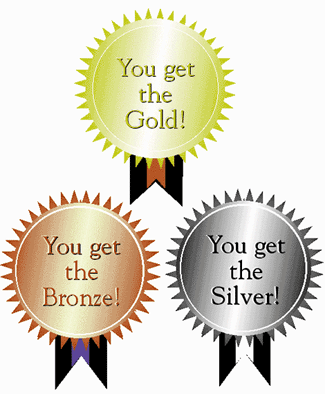
Figure A:
QuarkXPress has a wide range of graphic capabilities, especially with the help of various XTensions like Super Step & Repeat.
Smelting the Ore
Deciding and defining what colors you’ll use is always a good place to start. Getting just the right color can be the most difficult aspect when creating art. The second hardest thing is getting the blend just the way you want it. If the color or blend is wrong, the whole piece can be a disaster. So let’s start by creating the three commonly used colors for medals: gold, silver and bronze. These are great colors to add to your Colors palette. If you get them just right, not only do they add to a design, people may mistakenly think you spent extra on metallic ink!
To begin, open a new QuarkXPress document and then open your Colors palette (press [F12])if it’s not already. Now, select Edit > Colors. From the Colors dialog box, click New to bring up the Edit Color dialog box. Enter Gold in the Name text box, select CMYK from the Model pop-up menu, and deselect the Spot Color check box. Next, enter these CMYK percent values: C-9/M-16/Y-96/K-11. Click OK and then save. Later on, you can repeat these steps to create the bronze color using these CMYK percent values: C-20/M-75/Y-100/K-20. For the silver, simply create the same blend using black and white.
Forging the Medal
Now that we’ve created the colors we’re going to use and have saved them in the Colors palette, we can begin working on the medal. To do so, we’re going to use the Oval Picture Box tool and the Super Step & Repeat XTension.
The Making of a Star
Now, let’s create the starburst that shows from behind the circular part of the medal. First we need to make a star on which the starburst is built. There are several ways to do this. We’re going to cheat a bit, but you can also manually create the star with the Bézier tool. To create the star, select the Rectangle Text Box tool and draw a text box that’s about 1-inch square. Then, select the Content tool and, from the Measurements palette, choose the Zapf Dingbats font at 72pt. Type H while pressing the [shift] key. Now, with the star selected, choose Style > Text To Box. To size the star, choose Item > Modify to bring up the Modify dialog box. In the Box tab, change both the width and height of the star to 4 inches and click OK (at this point, you can delete the star font).
Now we can add some color by selecting Gold from the Colors palette while the star is still selected. Once again, choose Item > Modify. In the Blend area, choose Circular Blend from the Style pop-up menu, and White from the Color pop-up menu, then click OK. Next, choose Super Step & Repeat from the Item menu. In the Repeat Count text box, enter 20, and in the Angle text box, enter 18. Choose Center from the Rotate & Scale Relative To pop-up menu. Click OK and your single star transforms to look like our star in Figure B. To finish the starburst, select all the layers of the star ([c]a on the Mac, [Ctrl]A in Windows) and then group them ([c]g on the Mac, [Ctrl]G in Windows).
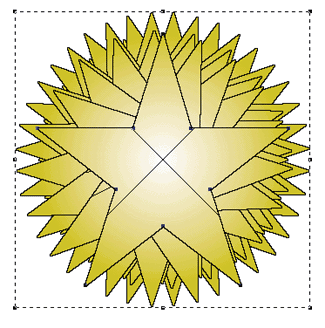
Figure B:
You can watch as Super Step & Repeat performs its magic before front of your eyes.
Plate Making
To create the faceplate of the medal, you’ll create three proportional circles. By stacking each upon the other, you’ll achieve the effect of a rim around the circumference of the medal.
First, select the Oval Picture Box tool and create a circle large enough to cover just up to the area where the points of the star begin. Our circle was 3.941 inches wide by 3.941 inches high. With the circle still selected, click on the Background Color icon in the Colors palette and then choose Item > Modify. Select Gold from the Color pop-up menu in the Box text box. In the Blend text box, choose Mid-Linear Blend from the Style pop-up menu, and enter -10 in the Angle text box. Choose Yellow from the Color pop-up menu and 20% from the Shade pop-up menu. Next, click on the Frame tab and enter 0.45 pt in the Width text box. The default settings for Style (Solid) and Frame (100% Black) are fine for this example. Click OK to accept these changes.
With the circle still selected, copy and paste it onto the first circle by pressing [shift][option] and selecting Edit > Paste (press [Shift][Alt] and select Edit > Paste in Windows). Then, reduce its height and width by about a quarter of an inch. You can do this by either dragging while pressing the [shift] key or entering specific dimensions in the Height and Width text boxes in the Measurements palette. Nudge the circle into the center of the first circle with the [arrow] keys. Now, make the circle’s background and frame color white, via the Colors palette.
To make the third circle, paste another copy of the first circle. Center it the same way you did the second circle, and reduce its size by about three-eighths of an inch. Thus far, your medal should look like that shown in Figure C.
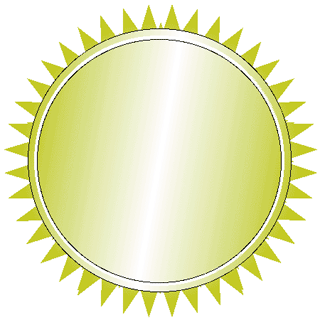
Figure C:
We stacked three circles upon each othertwo with a 0.45-inch black rule and one solid whiteto create the illusion of a rim around the faceplate.
Making an Impression
The next step is to add the text. We used three layers of text to create an embossed effect. First, create a circle with the Oval Text Box tool about the same size as the medal. Then, simply enter a line of text with an appropriate size and font, and color it black. Be sure to turn off the Runaround option. Next, copy and paste the text, making the second layer white. Place that layer over the black text and just to the left. Now, paste a third line of text, color it gold, and place it over the white text, just to the right of the white text. You’ll find it much easier to do this off to the side of the medal, so that you’re only dealing with three layers instead of seven. Once you have the text the way you want it, as shown in Figure D, you can group it and position it on top of the medal.
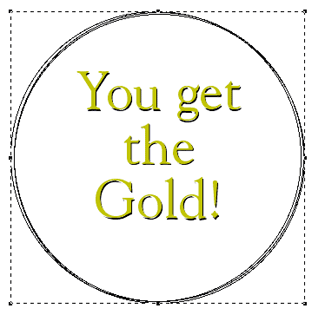
Figure D:
The text used in this example is Goudy 48/48, with a center alignment.
Ribbon Making
The piece de resistance is the ribbon. It’s simple to create using the Bézier Picture Box tool. Before drawing the ribbon, though, create a guide for the tool to follow, as shown in Figure E. Now just draw the outline of the ribbon by clicking in the appropriate areas, where the guides intersect. Color the ribbon with a background fill of Black. To finish the job, create another guide for the tool to follow for the red portion of the ribbon, as shown in Figure F. Then, group the pair and place the ribbon behind the medal.
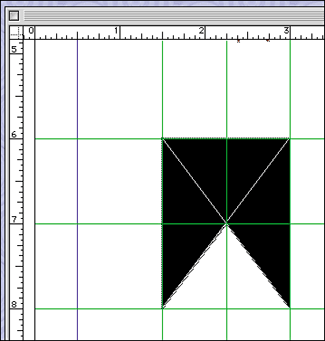
Figure E:
Creating guides enables you to take advantage of the Snap To function, which helps to create perfectly straight lines when drawing an object freestyle.
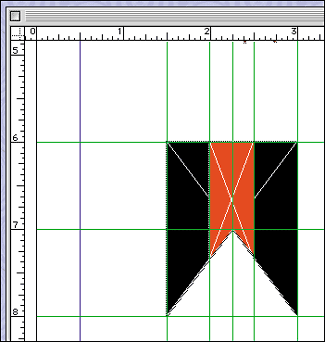
Figure F:
Once the guides are set, you just point-and-click the Bézier tool where the guides intersect. The lines will stay straight automatically.
Take a Bow
Congratulations! You’ve created a graphic image in a page layout application worthy of a gold medal (or at least silver or bronze). Best of all, you’ve added to your palette two very useful colors: gold and bronze.

Copyright © 2000, Element K Content LLC. All rights reserved. Reproduction in whole or in part in any form or medium without express written permission of Element K Content LLC is prohibited. Element K is a service mark of Element K LLC.


