
Lighting Tips for Shooting HD Video with SLR Cameras

This tutorial is courtesy of the Photoflex Lighting School.
![]()
With the recent advent of HD video functionality in SLR cameras, photographers are now able to shoot stills and video, all with the same camera! And just as with still photography, you need good lighting equipment for top-quality video results.
But what if you only have strobe lighting? The FirstStudio Portrait Kit, which this lesson uses to demonstrate basic interview lighting, is well-suited for the budding videographer.
Lighting Equipment:
The Hard Light
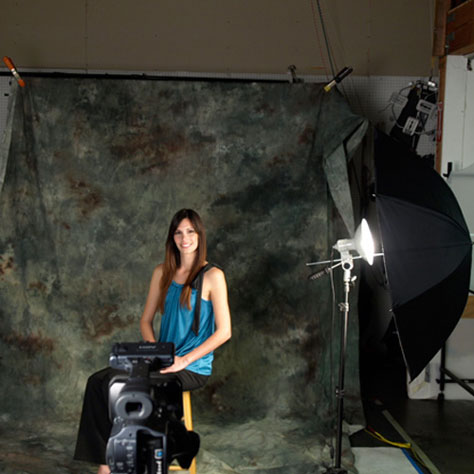
For our first example, we wanted to illustrate the characteristics of a hard light source on our subject. Here, we set up one FirstStar head and pointed it directly toward our subject.
Even from this set-up shot, you can see how our subject’s shoulder is washed out (overexposed) and that the shadows across her face are hard and sharp (Figure 1).

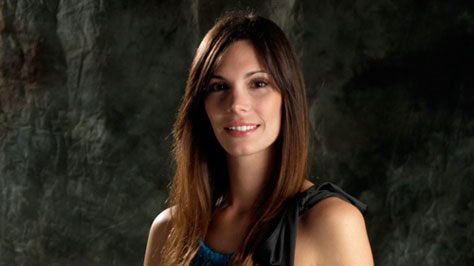
Below, you can see the resulting image. Notice how this high-contrast light creates hard shadows across the face, as well as on the left side of the background. This type of lighting is often overly distracting to the viewer due to its high contrast (Figure 2).

Adding an Umbrella
Softening a hard light through the use of an umbrella has long been a tradition for photographers and has recently become a staple approach for videographers and those shooting with SLRs with HD video capability. The umbrella helps to create a much broader and softer light that is much more natural looking than the light created by a bare light head.
With a reflective umbrella attached to this first light, we positioned the unit so that it was roughly at face level to our subject. We then angled the umbrella so that it provided just enough wrap-around soft light across the face (Figure 3).
From this vantage point, you can see how far the umbrella is positioned to the right of our subject — roughly four feet away from our subject, and at approximately a 90-degree angle to the camera (Figure 4).

As you can see from the result below, the lighting is significantly different from the previous result. Here, the light is soft and reminiscent of window lighting. But due to its wide positioning, it is also fairly dramatic, leaving the left side of the face deep in shadow (Figure 5).

Although the dramatic impact of one soft light source like this can be tempting to use, keep in mind that most interview lighting configurations consist of at least two to three lights in order to create a rich, dynamic look.
Adding a Hair Light
Next, we added another FirstStudio light (without umbrella attached) to serve as a hair light and positioned it about 8 feet behind our subject, approximately 7 feet high. We then angled the head directly at the back of our subject’s neck (Figure 6).

NOTE: One thing to be cautious of with your hair light is lens flare. You may need to adjust your light and pull it further out to the left or raise it up higher in order to keep it from spilling into your camera lens. Alternatively, you can use “flags” (black foam core, a 12″ Black/Silver LiteDisc or something similar) to prevent flare from occurring.
The positioning of the hair light is typically determined by personal preference. Some like the hair light directly over their subject, while others prefer it come in from behind at an angle, either from the left or the right.
Here, we chose to use the left side in order to visually balance out the direction of the main light. You may also want to keep your hair light on the opposite side of your main light to prevent it from overpowering, or washing out, one side (Figure 7).

As you can see from the result (Figure 8), our lighting is starting to really take shape. The hair light helps to add a sense of dimension to the shot, as well as to separate our subject from the background.
The Fill Light
Next, we brought in our third FirstStudio light with umbrella attached to serve as a fill light. For most interview setups, you’ll want your fill light to be backed off two to three feet so as not to compete with what the main light is providing.
Having the two frontal lights on either side of your subject at the same distance can make your subject’s face appear flat and dimensionless. However, if you’re looking to create a newsroom/informational interview look, then you may want to move your fill light in closer. Still, it’s usually best to try and keep both lights from being of equal distance. One to two feet can make a big difference in your lighting ratios (Figure 9).

Here, our fill light on the left is almost as far back as the camera, with the main light just off to the right of the camera, roughly four feet from the subject (Figure 10).

Remember to adjust your fill light by moving it back and forth until you get the effect you’re looking for. This fill light essentially controls the overall level of contrast, and to a certain extent, the level of visual “drama” in your shot. You can also control the light output somewhat by feathering, or angling, the umbrella left or right in relation to your subject.
In our final result above, we see just how well this fill light has performed. It illuminates the left side of the face enough to soften the shadows cast from the nose, but does not entirely flatten out our subject’s features (Figure 11).

The result shows how each light compliments the other and works to create an arresting and dynamic lighting configuration for this interviewee.
Comparisons
Figure 12 shows the last three results:

Keep in mind when viewing this lesson that your lighting treatment may need to be modified somewhat to what’s been demonstrated here, depending on the characteristics of your subject’s face. Different faces will require different lighting approaches. In short, there is no “right way” to light every face and this lesson should only be viewed as a general guideline.
Above all, remember to experiment with your lights and have fun!
This article was last modified on January 6, 2023
This article was first published on March 30, 2011
Commenting is easier and faster when you're logged in!

Recommended for you
Pin the Tail on the Camera
They say necessity is the mother of invention, but it’s clear nowadays that Kick...

Image Editing in Lightroom 5: Correcting Overexposed and Underexposed Images
The following is an excerpt from The Adobe Photoshop Lightroom 5 Book: The Compl...
Lightroom 4 Ships with Lower Price
After two months in public beta, Adobe Photoshop Lightroom 4 is now shipping. Th...