Master Templates in Dreamweaver, Part II
As you read in the previous article in this series — Master Templates in Dreamweaver, Part I — Dreamweaver’s Template feature streamlines the process of adding pages to a Web site. Templates also make sitewide changes to global page elements, such as navigation bars and copyright notices, a snap. However, some designers are afraid that templates lead to pages that look like they’ve been produced in a factory: all alike in appearance and with no visual individuality.
If you stick with the basic template features, that can happen all too easily. Fortunately, with a little template magic and some clever CSS, you can easily create pages that differ in style even though they’re related to a single, master template (Figure 1).
Figure 1. With a little CSS magic, and a little-known Dreamweaver template feature, you can build visually unique pages using just one Dreamweaver template.

Let’s Start with a Demonstration
The techniques you’ll be learning in this tutorial require a little bit of patience. There’s some initial setup of CSS that, depending on how much individuality you give your pages, can take time. But once that work is out of the way, building your site is as simple as building any template-based site… in other words, really easy! So before I lay down all the steps and you’re eyes glaze over, let’s look at the finished product.
1. Launch Dreamweaver and choose Site > New Site. Click the Advanced tab in the Site Definition window and type “Dreamweaver Templates Finished” for the site’s name. Click the folder icon to the right of the “Local Root Folder” field and select the folder you downloaded: templates_site_finished. Click OK to finish defining the new site.
2. In the Files panel, double-click the file home.html, or choose File > Open and open the file home.html in the templates_site_finished folder. This is a template-based page, built using the template file from part I of this series. You can tell it’s a template because of the yellow “Template: design list” tab in the upper right corner of the document. You’ll also notice that on the home page the “about us” link is highlighted in the navigation bar, and “About Us” appears in large text at the top of the page. Because these two items are in an uneditable region of the template, you can’t select them. However, using a cool Dreamweaver template feature called “Editable Tag Attributes” you can fix those two problems and drastically change the look of the page, in one step.
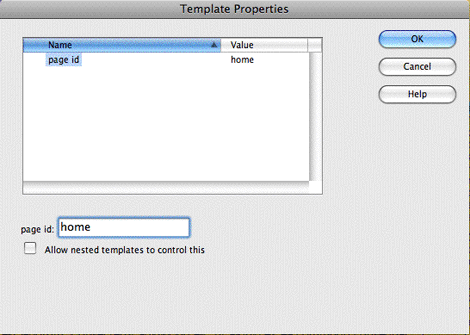
3. Choose Modify > Template Properties. The Template Properties window appears (Figure 2). There’s one item listed here: “page id” with a value of “about”. In the text field at the bottom of the window, change “about” to “home.” Click OK, and the page’s background color changes, as does the top banner and navigation bar. Pretty slick.
Figure 2. The Template Properties window.

4. Repeat steps 2 and 3 for the file news.html. In the Template Properties window, change “about” to “news” and click OK. Wow, another totally different looking page, created with the same template file!
Download the files for the templates site in progress.
Download the files for the finished template site.
So How Does This Work?
This trick brings together CSS and a Dreamweaver template feature called Editable Tag Attributes. Dreamweaver lets you make any attribute of a tag inside a non-editable region editable. In other words, you can edit a particular property of a tag without actually changing the tag itself. For example, you could make the src property of an image editable in a template file — then when you create a new page based on that template, you could change the src of the image (in other words, swap in a new image file on that page.)
In this tutorial, you’ll make the ID property of the <body> tag editable. Normally, you can’t change the ID of the <body> tag on template-based pages, since it’s considered part a locked, uneditable region. But with Dreamweaver’s editable tag attributes, you can assign different IDs to each template-based page. For example, <body id=”about”>, <body id=”home”> and <body id=”news”>.
This may sound less than useful. And it is, by itself. But if you use this with CSS descendent selectors, you’ve got yourself a powerful mechanism for customizing the look of template-based pages. If you don’t already know, a descendent selector, is a type of style that formats a HTML tag based on the HTML tags that surround it. For example, the selector h1 strong is a descendent selector that applies to <strong> tags, but only when they are inside a <h1> tag. In other words, this style will have no affect on <strong> tags inside a paragraph, a <div> or any other HTML tag.
Using descendent selectors, you can create custom styles that only apply to tags that appear on particular types of pages. Here’s how:
1. Add an ID to a page’s <body> tag. This ID essentially “identifies” that page as being of a particular type. For example, <body id=”about”> can identify a page in the “About Us” section of a site.
2. Create descendent selectors that only apply to that page. For example, say you wanted the background color of pages in the “About Us” section to be yellow. You could then add the following CSS to a stylesheet: #about { background-color: yellow; }.
And that’s the technique in a nutshell. Let’s put it to use.
Modifying the Template
For this part of the tutorial, you’ll modify an already created template page. (If you don’t know how to create templates, make sure you go through part 1 of this tutorial.)
1. Launch Dreamweaver, choose Site > New Site. Click the Advanced tab in the Site Definition window, type Dreamweaver Templates for the site’s name; click the folder icon to the right of the “Local Root Folder” field and select the folder you downloaded — templates_site. Click OK to finish defining the new site.
2. In the Files panel, expand the Templates folder and double-click the file “design list.dwt” (or choose File > Open and open the file “design list.dwt” in the Templates folder inside the templates_site folder). This is a template complete with two editable regions.
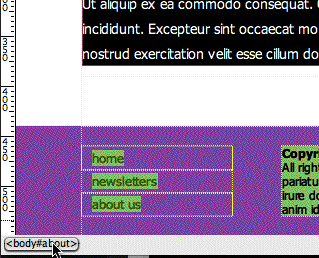
3. In the tag selector at the bottom left of the document window, click <body#about> (Figure 3). This selects the <body> tag.
Figure 3. The Tag Selector in the bottom left of the Document window is the most precise way of selecting an HTML tag.

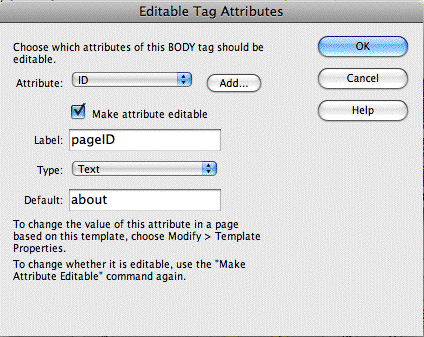
4. Choose Modify > Templates > Make Attribute Editable. The Editable Tag Attributes window opens (Figure 4.) This window lets you make a property of the selected tag editable on template-based pages. You can choose a property from the drop down menu. (Only properties that are already set on the particular tag appear in the menu, however. To add a property that’s not listed, click the “Add” button.)
Figure 4. Normally all of the HTML inside a template’s locked regions are off limits — they can’t be changed in template-based pages. However, you can make an HTML attribute — src, href, ID, or class, for example — editable in template-based pages by using the “Editable Tag Attributes” feature.

5. Check the “Make attribute editable” box and change the Label field to “pageID”. The label is what you’ll see while working within Dreamweaver. You can set the label to anything that will help you remember what you’re making editable. One warning, however: Don’t use any weird characters of spaces for the label, or the editable tag attribute feature might not work.
6. The “type” option let’s you choose the type of data allowed by the property. Most of the time, it’ll be “text,” but if you are making the src attribute of the <img> tag editable, or the href attribute of a <link> editable, then choose URL. This will make sure Dreamweaver’s link management tools correctly update links in these tags.
7. Finally, leave “about” as the default value in the Editable Tag Attributes window. Whatever you type here will be the value used in freshly minted template-based pages. In other words, when you create a new template-based page from this template, that new page will start off with <body id=”about”>. You can then change value as you did in the demonstration earlier in this tutorial. In this case, I choose “about” based on the premise that I’d be adding a lot of “about us” pages to the site, so I might as well start with that as the default setting.
8. You’re done with the template. Click the OK button to close the Editable Tag Attributes window. Save and close the template file.
Adding Template-Based Pages
As a refresher from the previous article in this series, you’ll create a few template-based pages for the site.
1. Choose File > New. The New Document window appears. In the far, left column click the “Page from Template” option. The “Site” column lists all of the sites you’ve defined within Dreamweaver — the “Dreamweaver Templates” site should be selected, and the template, “design list,” should be selected in the second column.
Click the Create button. A new template-based page appears. (Look at the yellow tab in the top-right of the document window to identify which template this page is based on.)
2. Choose File > Save and save this page as home.html.
In the files panel, double-click the file text_home.html. This contains the text for this page. Copy the text starting at the top — the “Welcome to the Design List” headline — down to the paragraph just before the “–SIDEBAR TEXT–“.
3. Click the home.html tab at the top of the document window to return to the template-based page. Click the blue “Main” tab to select everything inside that editable region. Choose Edit > Paste to insert the text.
4. Click the text_about.html tab to go back to the text file and copy the last 3 paragraphs (the ones below “–SIDEBAR TEXT–“). Return to the home.html page, click the blue “sidebar” tab and paste the text into place. Now it’s time to set the ID for this page.
5. Choose Modify > Template Properties. The Template Properties window appears (Figure 1). There’s one item listed here “page id” with a value of “about”. In the text field at the bottom of the window, change “about” to “home.” Click OK. Unlike the demo at the beginning of this tutorial, nothing changes about this page. That’s because you haven’t yet created the CSS to provide the “Home” look. You’re just getting the page ready at this point; in the next part of this tutorial you’ll add the CSS.
6. Follow steps 1 through 7 in the “Modifying the Template” section above to create two more template-based pages. Save them inside the main site folder and name them about.html and news.html. Copy the text from the files text_about.html and text_news.html and paste it into place in the template-based pages. Set the ID for the news.html to “news”. (You don’t need to set the ID for the about.html, since its default is “about”.) Save all these files, but don’t close them.
Creating the CSS
The real heart of this technique is the use of custom CSS to craft unique presentations for each of the different sections of the site. Let’s begin by adding unique background colors to each section of the site.
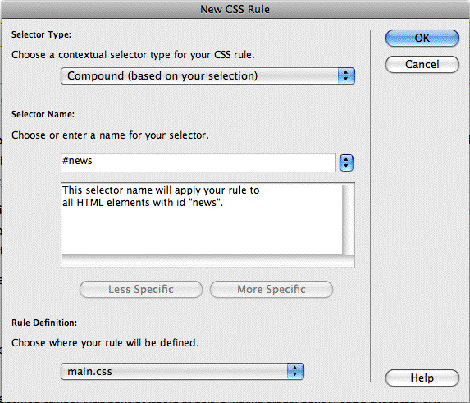
1. Make sure the CSS Styles panel is open (Window > CSS Styles). Click the “New CSS Rule” button (the + symbol in the bottom right of the panel). In the New CSS Rule window, make sure “Compound” is selected from the top menu. Type #news in the name field, and make sure main.css is selected in the bottom menu (Figure 5). Click OK.
Figure 5. To create a style in Dreamweaver, you start with the “New CSS Rule” window. Here, you need to determine what type of selector you’ll create (a class, ID, tag, or “compound” selector), name the selector and choose where to store the CSS code (in an internal or external style sheet).

2. Select the Background category in the CSS Rule Definition window. Type #80A5FB in the Background-color field, and click OK to complete the style. Click the news.html tab in the document window to bring that page into view. Notice that its background color has change to a bluish color. Click the about.html tab — its background hasn’t changed. That’s the power of descendent selectors: finely tuned styles that let you target your formatting.
3. Repeat the above two steps to create a new style — #about — with a background color of # F1CC23. Create one more style — #home — with a background color of #F56C37. Now each of the three pages has different background colors, but they’re still built from the same template. If you update the locked region of the design list.dwt file, those changes will still pass on to these three files.
4. In the CSS Styles panel click the “New CSS Rule” button. In the New CSS Rule window, make sure “Compound” is selected from the top menu. Type #home #banner in the name field, and make sure main.css is selected in the bottom menu. Click OK. The top region of the page has a <div> with an ID of banner, so this style will apply to that div but only when it’s inside another tag with the ID of home. In other words, this style will only affect the banner of the home page of this site.
5. Select the Background category in the CSS Rule Definition window. Click the Browse button, navigate to the images folder and double-click the file “home_title.png.” Click OK to complete the style. Click the home.html tab in the document window to bring that page into view. Notice that “HOME” appears in the upper right of the page.
6. Repeat the two steps above to create a new style — #news #banner — and use the image news_title.png for the background image. Create one more style — #about #banner — and use the file about_title.png. Check out the three HTML files and you’ll see that each has its own title.
Creating the “You Are Here” Link Highlights
By now you should have a good idea of how, by just creating a few styles and adding unique ID names to pages, you can create really unique presentations for the pages of your site. For the last part of this tutorial, you’ll customize the navigation bar by highlighting the link for the current section.
This little trick relies on descendent selectors, but it also relies on each of the links in that main navigation bar at the top of the page having some kind of identifier. In this case, each link has its own class name. For example, the “home” link’s HTML looks like this: <a href=”../home.html” class=”homeLink”>.
With that little bit of extra information, you can create a style to format that link, but only when it’s on the home page: a simple descendent selector will do the trick: #home .homeLink. Even though that same link (and class name) appear on every page of the site, the style #home .homeLink only applies to the link when its on a page with the ID home. Here’s how to create the styles.
1. Click the “New CSS Rule” button (the + symbol in the bottom right of the panel). In the New CSS Rule window, make sure “Compound” is selected from the top menu. Type “#about .aboutLink, #news .newsLink, #home .homeLink” in the name field. This is called a group selector. It combines multiple style names, separated by a comma. In this case, it combines three different selectors. Group selectors are useful when you want to apply the same style settings to several selectors at the same time. In this case, the “you are here” styling for links within the current section will be the same for every page.
2. Make sure main.css is selected in the bottom menu. Click OK.
3. From the Color box on the “Type” category of the CSS Rule Definition window, select a white color. Click OK to complete the style.
4. Click on the tabs for each of the three different pages and notice how the highlight link changes from page to page.
That was a bit of work, but now that you’re done with the set up, you can easily add new pages to the site: just create a new template-based page, set the ID in the “Template Properties” window, and see the page’s appearance switch to match the section of the site. If you add additional sections to the site, you only need to create new descendent selectors using whatever ID you plan on using for the <body> tag for page’s in that section of the site. For example, if you add a section to the site named “Products”, then you can create a new page from the template, assign an ID to that page’s <body> tag (products, for example), then create a new style — #products, for example, to create a new look for that page.
In the next and final installment of this series on Dreamweaver Templates, I’ll show you how to really customize your pages by using Dreamweaver’s Optional Regions feature to hide or show content on template-based pages.


This is really great. I only got tripped up once (I forgot the space between the ID and Class #about .aboutLink). I’m a Dreamweaver newb and this was great eye opener.
Am I missing something? There was neither a “home” nor a “news” file in the practice files I downloaded (from a link in Part 1) There was an “index” file that matched the description, but no template properties available to change.
There are also files to download in part 2. Look for the bold download links just before the section entitled “So How Does This Work?”
Terri Stone
Editor in Chief, CreativePro.com
Also very helpful tutorial. Thank you