
Master Templates in Dreamweaver, Part III

If you’ve read the previous articles in this series (Master Templates in Dreamweaver Part I and Master Templates in Dreamweaver Part II), you hopefully see that Dreamweaver’s Template tool streamlines production while allowing design variety from page to page in a site. In this final article in the series, I’ll show you how you can customize the look of template-based pages even further by using a powerful template feature: optional regions.
An optional region is basically a chunk of HTML that you either show or hide on a template-based page. For example, say you’re using Dreamweaver templates to build pages for an online catalog of products. Perhaps some products are on sale, so you create an “On Sale” graphic as well as a little text explaining the rules of the sale. You want to display this graphic only on the pages for sale products. You could manually add this image and text to each of those pages. But a faster way is to add an optional region to your template file that contains the image and text. Then, when adding new pages to the site, it’s a simple matter of choosing a menu option in Dreamweaver to show the graphic and text. You can even later open a specific product page, and hide the on sale graphic when that product’s no longer on sale.
Optional regions have a wide variety of uses, from showing and hiding elements from page to page of a site, to creating complex rules that govern what HTML appears in each page within a particular section of a site. In this tutorial, I’ll take you step-by-step through using this powerful feature.
Getting Set Up
The files for this tutorial are a little different than parts I and II, so make sure you download them here:
Download the files for the templates site in progress.
Download the files for the finished template site.
1. Launch Dreamweaver and choose Site > New Site. Click the Advanced tab in the Site Definition window and enter “Dreamweaver Templates III” for the site’s name. Click the folder icon to the right of the “Local Root Folder” field and select the folder you downloaded: templates_site3. Click OK to finish defining the new site.
2. In the Files panel, expand the Templates folder and double-click the file “design list.dwt”. (Or choose File > Open and open the file “design list.dwt” in the Templates folder inside the templates_site3 folder.) This is a complete template with two editable regions, and one editable tag attribute. (See the previous tutorial for the lowdown on editable tag attributes.)
Adding an Optional Region
The template file has a “Design Quote” box in the right-hand sidebar. The box holds an inspiring or interesting quote you can add to any page of the site. If you wanted this box on every page, you could leave it as is — it’s currently in an uneditable region on the page, so it will appear on every template-based page. However, this box isn’t needed on every page, so you’ll make it an optional region and show it only on the pages you want.
An optional region can also contain editable regions. For example, the box and headline “Design Quote” won’t change, but on every page that you add this box, you might want to include a different quote. In this case, the box itself can be turned into an optional region, while the quote (that’s the “Quote goes in here” paragraph on the template) can be an editable region.
1. Triple-click inside the paragraph “Quote goes in here” to select it. (Alternatively, you can click inside the paragraph, then click <p> listed in the Tag Selector in the bottom left of the document window as pictured in Figure 1.)
Figure 1. The Tag Selector in the bottom left corner of the document lets you accurately select any HTML tag on the page by simply clicking the tag’s name (<p> in this case). This invaluable tool is the best way to select a tag for applying a class style to the tag, or for wrapping the tag in a template region. Click on the image for a larger version.

2. Choose Insert > Template Objects > Editable Region. In the New Editable Region dialogue box, type quote and then click the OK button. This adds an editable region to the template. You can now add a quote to every template-based page. But to only show the quote box on select pages, you must add an optional region.
3. Click anywhere inside the purple “Design Quote” box and select Edit > Select All twice (or use the keyboard shortcut Ctrl-A/Command-A). The first “Select All” selects the contents of the box while the second selects the <div> tag (the box itself). (You could also use the tag selector method displayed in Figure 1 to select the div.)
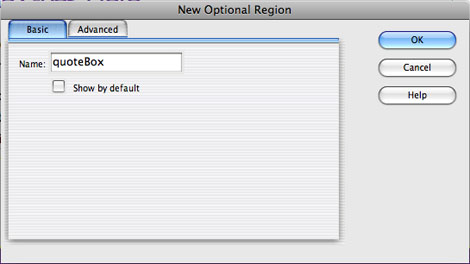
4. Choose Insert > Template Objects > Optional Region. The New Optional Region window appears (Figure 2). Type “quoteBox” in the Name field and make sure the “Show by default” box is not checked. Click the OK button to create a new optional region.
Figure 2. The Show by default option determines whether the Optional Region will be visible when you create a new template-based page. Unchecked, the optional region won’t appear until you turn it on in a template-based page. In other words, if most of your pages should show the optional region, then check this box, otherwise leave it blank.
5. Save the file, and when the Update Template Files dialog appears, click the Update button. This adds the new template code to the template-based pages of the site. Click the Close button in the Update Pages dialog after Dreamweaver finishes updating the site.
6. Close the “design list.dwt” template file. Open the “home.html” file. Did you notice that there’s no quote box on this page? That’s because you left the “show by default” box unchecked (refer back to Figure 2). The quote box won’t appear until you turn it on.
7. Open the file “news.html”. Again, there’s no quote box, but this time, you’ll make it visible.
8. Choose Modify > Template Properties. The Template Properties window opens (Figure 3). You encountered this window in the last tutorial as a way to set the value of an editable tag attribute. You also use this window to hide or show an optional region.
Figure 3. You can hide or show optional regions from the Template Properties window. The “Allow nested templates to control this” box applies only if you use Dreamweaver’s confusing and not that useful “nested template” feature.
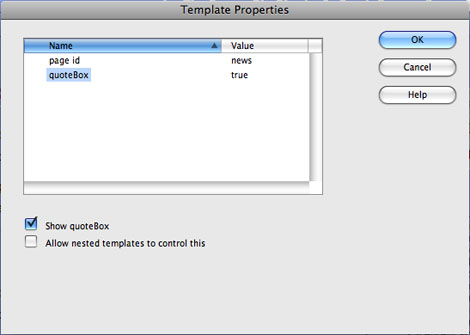
9. Click quoteBox in the first column, then check the “Show quoteBox” checkbox. Click OK and you’ll see the quote box has miraculously appeared.
10. In the middle of the quote box, you’ll see a blue tab labelled “quote.” That’s the editable region you added earlier. Click the tab and type the following:
To design is to communicate clearly by whatever means you can control or master. — Milton Glaser
11. Make sure this text is set as a paragraph by choosing Paragraph from the Property Inspector’s Format menu (or choose Format > Paragraph Format > Paragraph.)
12. Repeat steps 8 through 11 for the “about.html” file. Use the following quote:
The secret to creativity is knowing how to hide your sources — Albert Einstein
Advanced Optional Regions
The basic optional region you just created and used is a valuable tool for customizing the appearance of template-based pages. Dreamweaver also has an advanced optional region that’s basically the same as a regular optional region: a chunk of HTML you can hide or show from page to page. However, an advanced region lets you automate when the optional region is shown or hidden.
Say that each section of your site had its own set of sub-navigation links — for instance, a sidebar of links for the “About Us” section, a second set of links for the “Contact Us” section, and so on. You want to show a special message in each section of the site: boilerplate text for the “About Us” section, and a different set of text for the “Contact Us” section. In other words, HTML that you show on some pages and hide on others — a perfect opportunity for optional regions!
In other words, there are two optional regions (a set of links and some boilerplate text) for each section of the site. An advanced optional region lets you show multiple optional regions with just one selection in the Template Properties window (check it out in Figure 3 above). In fact, you can even make the display of an optional region dependent on the value of an editable tag attribute. (See part II for more about that template feature.)
Now it’s time to add two new optional regions that automatically display depending upon which section of the site you’re in. In other words, you won’t need to turn on this optional region yourself; you’ll only add a page for the proper section of the site, and the correct optional region will appear.
1. Open the “design list.dwt” file. Back to the template, where you’ll notice a list of links in the right sidebar. These actually only apply to the about page, but they appear on every page of the site at this point. You’ll turn this list of links into an optional region that only appears on pages in the “About Us” section of the site.
2. Click inside the “Our Mission” link in the right sidebar, then click in the tag selector in the bottom of the document window. This selects the bulleted list of links.
3. Choose Insert > Template Objects > Optional Region. The New Optional Region window appears. Click the Advanced tab (Figure 4). You’ll see that there are two buttons: Use Parameter and Enter Expression. The first button lets you show an optional region whenever you show another optional region. Click in the drop down menu and you’ll see the “quoteBox” optional region you added earlier listed here. If you chose this option, then the list of links would appear whenever you made the quote box visible — the links would disappear whenever the quote box wasn’t visible. That’s not what we want, so we’ll use the second option.
Figure 4. The advanced optional region tab lets you add advanced logic to a template page, which determines whether an optional region should be shown or hidden. You can learn more about Dreamweaver’s template expression language on Adobe’s Web site.
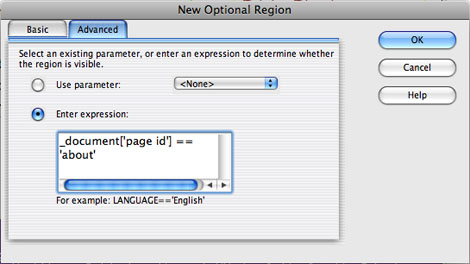
4. Click the “Enter expression” radio button to select that option. In the text field type the following:
_document['page id'] == 'about'
Basically, this equation says that whenever it’s true, the list of links will be shown and whenever it’s false, the links won’t be shown. The _document['page id'] part is related to the editable tag attribute from the last tutorial. As you’ll recall, you made the ID attribute of the <body> tag editable, so that you could apply a different ID to template-based pages. This, with a little creative CSS, made it possible to create custom looking Web pages for each section of the site, while still only using a single template. In the last tutorial, you named the editable tag attribute “page id”. In doing this, you also add what’s called a “template parameter” to the template file — to access that attribute you use the code _document['page id'] that essentially means, “Give me the current name of the ID applied to the <body> tag.” The == 'about' part finishes off the equation, which can be translated to “If the page id is equal to ‘about’ then show this optional region.” In other words, if the ID applied to the <body> tag is about, then this list of links for the “About Us” section should be displayed.
5. Click OK. Save the template file. Click the “Update” button, then click, the “Done” button after the template files after updated. (If you get an error, you probably made a typo in Step 4. Choose Edit > Undo and then repeat steps 2 through 4.)
6. Open the “home.html” file — the links are gone! Open the “news.html” file — the links are gone there, too. Now open the “about.html” file. There they are!
7. Let’s add another optional region for the newsletters page. Open the file “newsletter_links.html”. This file contains a simple, bulleted list of links. Choose Edit > Select All and Edit > Copy to copy the HTML from this page.
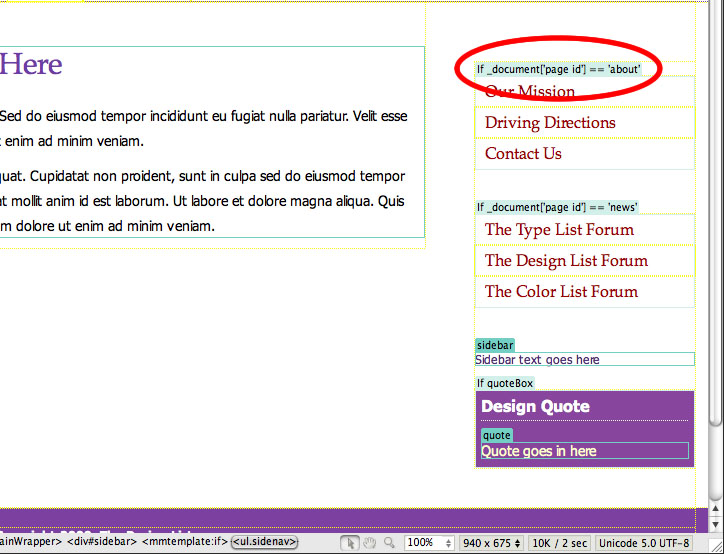
8. Open the template file “design list.dwt”. Click on the blue tab above the list of links in the right sidebar (circled in Figure 5). This selects the optional region. Hit the right arrow key. This deselects the optional region and places the cursor after it, so you can insert the new list of links. Since this is going to be another optional region, you need to make sure you don’t paste this inside the current list of links.
9. Choose Edit > Paste to paste the links on the page.
10. Click inside the “The Type List Forum” link, then click >ul.sidenav> in the tag selector to select the list of links.
11. Choose Insert > Template Objects > Optional Region. The New Optional Region window appears. Click the Advanced tab. Click the “Enter expression” radio button to select that option. In the text field type _document['page id'] == 'news'. This instruction tells Dreamweaver to display this list on any page with the ID news added to it.
12. Click OK. The sidebar should now look like Figure 5. Save the template file. Click the Update button, then after the template files are updated, click the “Done” button. If you get an error, you probably made a typo in Step 4. Choose Edit > Undo and then repeat steps 2 through 4.
Figure 5. You can add more than one optional region to a template file. In fact, you can add as many as you want. However, they’ll only show up on the pages that either you’ve turned on the optional region, or the template parameters match the settings for an advanced optional region. Click on the image for a larger version.
13. Open the “home.html” file. No links. Open the “news.html” file. There are the links!
Go to page 2 for the final steps in this process.
This article was last modified on January 8, 2023
This article was first published on August 5, 2009
Commenting is easier and faster when you're logged in!

Recommended for you

InDesign How-To: Using PageMaker Templates for a Corporate ID
Creating a corporate identity is hard work. Not only does the logo have to be me...
ICS Introduces Remote Director 3.5
Integrated Color Solutions (ICS), the industry leader in virtual proofing techno...

A Script to Find Spelled Out Numbers in InDesign
Need to check a document for improperly spelled out numbers? This script does al...