
Mastering Master Pages


Reproduced with permission of Planet Quark
It really astonishes me how many publications still hand-number pages. Of all the businesses I help upgrade to QuarkXPress 7, at least 50% of them don’t really know how to use Master Pages, and don’t know how Automatic Page Numbering works. And those who do are often tripped up by something that a simple preference change could fix. In this example I will build a Master Page spread in a facing-page layout with an Automatic Page Number on each page, and also show you how to re-apply a Master Page successfully.
The first thing to consider before you start using Master Pages for Automatic Page Numbering is how many people will be working on the documents. That is to say, is it a small publication, where John always works on pages 1-12, and Sally works on pages 13-24? Or is it a larger publication that needs to be broken up into individual pages so that every page is its own document — that way, anyone can open any page and work on it, since it is not connected to the other pages. In the first scenario, John and Sally can set up their Automatic Page Numbering in a facing-page layout. The advantage to this is that on the facing Master Pages they can place the folio (page identification information) on the left side and the right side, on the same Master Spread.
I have found that larger companies are more comfortable not working with spreads, but instead having a separate Master Page for the odd and even pages. Both approaches work, but I often find myself in an uphill battle when I try to convince the larger companies to work on Facing Page documents.
The great thing about setting up a Facing Master Page is this: Let’s say you end a layout on page 7. Then as soon as you send it to the printer for a proof, the ad rep runs in and asks you if you could squeeze in a full-page ad. As it turns out, the ad needs to go on page 7, and page 7 is now going to become page 8. You simply change the Section Start (Page> Section…) to begin numbering at page 8 and the folio automatically flips! Well… sometimes. But we will get to that soon enough.
I am going to show this on a Facing Master Page, and let you judge whether this would fit into your workflow or not. To begin, I created a text box on the Master Page to contain the folio (Figure 1).

Figure 1.
In this text box I typed the word “Page”. I want my page numbers to be on the outside of the spread, and my dates to be on the inside. Here is the big secret; Control-3 (Mac: Command-3) is the keyboard shortcut for Auto Page Number. It displays on the page as <#>. For all of you who copy and paste an Auto Page Number because you can’t remember the keyboard shortcut, you might want to get a tattoo of this shortcut — perhaps across your knuckles like the Blues Brothers. I sure wish Quark would make this useful shortcut available in one of the menus.
Next I typed in the date on the right side of the text box. But here is another great shortcut for you. Instead of setting tabs, since you only need a far-right tab, press Alt-Tab (Mac: Option-Tab) for a tab that aligns with the right edge of the text box. I then copied the text box and pasted it, moved it to the right-facing page and switched the date and page number by cutting and pasting (Figure 2). (Tip for QuarkXPress 7: after copying the text box but before pasting it, switch to the other Master Page and choose Edit> Paste In Place to paste it into exactly the same position on that page.)

Figure 2. Click on the image for a larger version.
Now you can create as many pages as you like from these Master Pages and your pages will be automatically numbered. And the great thing about doing it on a spread is that if the page number changes from an odd to an even numbered page, it will automatically reference the correct side of the Master Spread.
To Keep or to Delete — That is the Question
How many of you have seen Master Page items that look like Figure 3?

Figure 3.
You can all put your hands down now. It is time to fix this problem once and for all. Let me explain what happened, and how to fix it.
The issue arises when anyone moves any Master Page item in the slightest. That is why it is a good practice to lock items on the Master Page so they can only be edited on the Master Page. Let’s say that by accident someone clicks and moves the folio. They think it didn’t move, so they go on with their work. Later, a page needs to be added or deleted, changing the page number from odd to even.
In Figure 4, you can see that I changed the Section start from page 1 to page 2 to flip the folio.
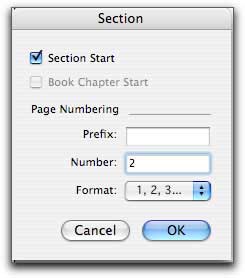
Figure 4.
But instead of having just one folio, I now have two copies of the folio — one from each side of the Master Spread. That is because once you move a Master Page item, it breaks its link to the Master. So Quark keeps the changed item, and adds the new Master Page items as well. (By the way, this also happens when you re-apply a Master page by dragging it over a page icon in the Page Layout palette.)
The simple solution is to go to QuarkXPress’s Preferences, and under Print Layout, General, in the section for Master Page items, click the radio button next to Delete Changes (Figure 5).
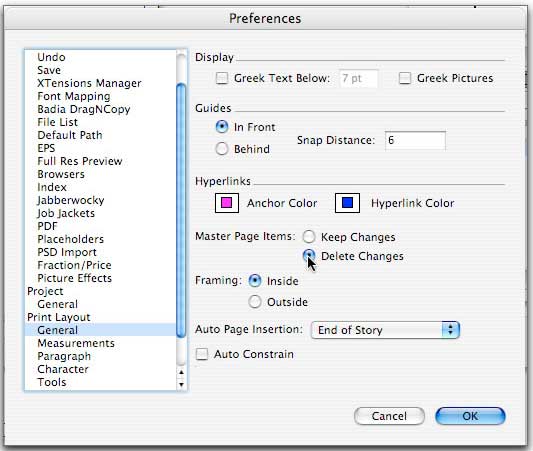
Figure 5. Click on the image for a larger version.
Now if the same mistake occurs (or if any Master Page items are changed on a regular document page), the changed item will be deleted and the Master Page item will take its place. So the million-dollar answer is… turn on “Delete Changes to Master Page Items.”
This article was last modified on January 9, 2022
This article was first published on February 4, 2008
Commenting is easier and faster when you're logged in!

Recommended for you

Massaging Text with InDesign (Getting the Text You Want from the Text You Have)
When faced with a complicated text processing task, why look any farther than In...

InDesign GREP Essentials: Wildcards
This article is part of a series of posts on using GREP in InDesign for beginner...

CreativePro Conversations: Paula Scher
David Blatner chats with Paula Scher—the incomparable designer and partner at Pe...