

For print designers, sophisticated formatting like precise margins, first-line indents, and complex borders are a given. Paragraph and character style sheets make it easy to apply and change that formatting. Web designers weren’t so fortunate until Cascading Style Sheets (CSS) not only came on the scene, but were widely supported by Web browsers and authoring tools, such as Dreamweaver. Dreamweaver 8 makes CSS a way of life. If you haven’t started living the CSS life yet, this is the introduction you’ve been waiting for.
You can create a style sheet for a single page, a set of pages, or an entire site. Dreamweaver gives you several points of entry into CSS style sheet creation, but the easiest way is to create an embedded style sheet and then transform it into an external style sheet, which you can link to any page you want. Once I walk you through that process, you’ll be comfortable with applying all kinds of custom elements and styles to your site. Note that CSS is Dreamweaver’s default mode, so any text formatting you apply automatically uses CSS tags.
CSS Gateway
The Property inspector, the palette that lets you control selected Dreamweaver page elements, is a major portal to CSS formatting. Click the Page Properties button (Figure 1) or go to Modify > Page Properties from the main menu to access the Page Properties dialog box. It includes several formatting categories you can use to customize your page design.

Figure 1. Click the Page Properties button.
Defining Styles
Once you’re in the Page Properties dialog box, the Appearance Page Properties category gives you access to basic settings such as font, type size, and text color (Figure 2). It also lets you choose a background color or navigate to an image you want to use as a background. You can specify whether a background image will cover the entire page or whether it will tile. You can also set page margins. This degree of formatting specificity is typical of CSS, and using this dialog is simple. Fill in only the styles you want to specify and leave the rest blank.
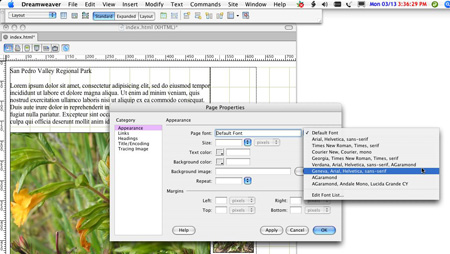
Figure 2. You can specifiy everything from font color to page margins in the Appearance category of the Page Properties dialog box.
Link Styles
Dreamweaver gives you several options to specify how to display links in your document via the Links Page Properties category (Figure 3). In addition to typographical choices and colors, you can set a rollover color to appear as the mouse hovers over the link. You can also determine how your links will show up on the page — underlined or not or underlined under specific circumstances.

Figure 3. The Links category of the Page Properties dialog box.
Heading Styles
With CSS, you have more precise and efficient typographical control over font, color, and specific size of your headlines than was possible in classic HTML (Figure 4).

Figure 4. You have much more control over CSS headings than you did over classic HTML headings, as you can see in the Headings category of the Page Properties dialog box.
Page Title and Encoding
The Title/Encoding Page Properties category gives you options for language encoding and document type (Figure 5). If you want this style sheet to be embedded on only one specific page, then go ahead and set the title now. This title will appear in the title bar of your browser window.

Figure 5. The Title/Encoding category of the Page Properties dialog box.
The Document Type Definition is an important part of every page, and it’s a good idea for all pages in your site to have the same DTD. While the best Document Type Definition for your site is beyond the scope of this piece, I recommend you choose Western ISO Latin 1 in the Encoding menu, unless you’re designing sites in a non-Roman language or for some other special purpose.
Page Design Aid
I’ve always been intrigued with the Tracing Image category, which lets you place an image underneath the document window and adjust its visibility with a slider bar (Figure 6a). Many people use this feature to reconstruct a page layout comp originally created in Photoshop. Moving the slider bar from Transparent to Opaque lets you view the image from which you can visually design your own site (Figure 6b).

Figure 6a. I’m about to place an image at 50% transparency as a guide for constructing my CSS site.

Figure 6b. I created this ghostly comp in Photoshop.
In Design View, you can easily map out where and how large the images, navigation bar, and text should be without having to design from scratch. And, of course, you can use the design you trace as the basis for creating your own template.
Modifying Styles
It’s a creative pro’s prerogative to change his or her mind, which is why there are several ways to modify styles once you create them. Click on the Property Inspector’s CSS button to launch the CSS Styles panel, or choose CSS Styles from the Window menu.
Use the CSS Styles panel to edit CSS rules in real time. Choose the tag you want to change and then use the Properties panel below to modify it in the Category, List, or Set Properties view. Live previews are a real time-saver, and once you get used to the panel, you’ll likely find yourself designing within it whenever possible. Also notice there are two modes in the CSS Styles panel — All and Current. I used the All mode for the example in Figure 7. If you have problems seeing your changes in real time, make sure that the Toggle Displaying of CSS Styles button is depressed. (This button, accessed from the Style Rendering toolbar, is hidden by default. To find it, chose View >Toolbars >Style Rendering from the main menu. Toggle on the last button in the sequence if it’s not already.)

Figure 7. Action shot of the CSS Styles panel.
Exporting your Styles
Aaaah, you’ve finally finished specifying page styles. You might be tempted to copy and paste those styles into separate files, one for every page of the site. But what if the client asks you to change the headline font style and background color for the entire site — by tomorrow? With old-style HTML, you’d be looking at a late night. Not if you use CSS properly.
The styles you just created are embedded in the page you’re working on (within the Head tag). But you can apply the same styles to other pages or throughout your site by exporting those styles as one separate style sheet document. Go to File > Export > CSS Styles and give the style sheet a name with the suffix .css.

Figure 8. It’s easy to make sweeping changes in one move when you use one separate style sheet for an entire Web site.
Removing Page Styles
Remember that the styles you just created are already embedded in the original page’s Head tag. So that the site can function consistently, unembed the page styles before linking the style sheet as an independent document. There are several ways to accomplish this. You can manually remove the code in Dreamweaver’s Code view or you can use the CSS Styles panel to remove it. Access the code for the page by choosing Code from the View menu. Or, using the CSS Styles panel, you can first choose the All tab, then click on <Style> in the panel. It will choose all the styles you added to the page (Figure 9). Then click the Trash icon at the bottom of the panel. That removes all your styles from the page.
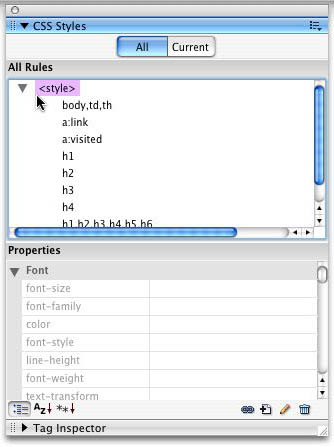
Figure 9. One way to unembed page styles is to use the CSS Styles panel.
Attach the Style Sheet
From the CSS Styles panel, click the Attach Style Sheets icon (Figure 10a). With the radio button set to Link, navigate to the style sheet you just created and click on it. Use this technique to attach a style sheet to any page on your site.

Figure 10a. To attach the separate style sheet, go to the CSS Styles panel.
Notice that after you attach the CSS file to your page (Figure 10b), the label now has the name you gave your style sheet, in this case, norcal.css. If you click the Expansion Triangle, you’ll see a list of the styles you assigned.

Figure 10b. After you successfully attach the style sheet, you’ll be able to see a list of the styles you assigned.
Let Dreamweaver Do (at Least Half) the Work
I took you through the entire process of building a CSS style sheet from scratch because it’s a skill that’s good to have. Once you’ve mastered it, you may want to create CSS styles from the Start Page dialog box. From the Create from Samples column, choose CSS Style Sheets. That opens a list of 23 pre-formatted CSS style sheets using various colors, typefaces, and styles (Figure 11). Pick the one you want, and Dreamweaver creates a style sheet you can attach to any page in your site. Open your page, alter the styles, and then save. The style sheet is updated, and every page that was linked to it updates automatically.

Figure 11. If you’re short on time, try starting from the pre-formatted CSS style sheets that come with Dreamweaver.
This article was last modified on January 8, 2023
This article was first published on July 17, 2006
Commenting is easier and faster when you're logged in!

Recommended for you
How to Improve Drop Cap Formatting and Positioning in InDesign
Learn how to improve drop cap formatting and positioning by breaking the drop ca...

Frame Tools vs. Shape Tools
Sign up for the InDesign tip of the week to get a new tip, roundups of new artic...

ImageCatalog.com is Seeking Top Quality Images from Photographers
The royalty free stock photography web site that recently launched is already pa...